| “This site contains affiliate links for which OEMDTC may be compensated” |
SERVICE BULLETIN
| Classification: | Reference: | Date: |
|---|---|---|
| BT15-020b | NTB15-073b | March 22, 2016 |
2015-2016 MURANO; AUTOMATIC BACK DOOR DOES NOT OPERATE AND RELATED DTCs
| This bulletin has been amended. Changes have been made to all sections. Please discard previous versions of this bulletin. |
| APPLIED VEHICLES: | 2015-2016 Murano (Z52) |
|---|---|
| 2016 Murano Hybrid (Z52) |
IF YOU CONFIRM
The automatic back door does not operate,
and/or
One or a combination of the following DTCs are found stored in the Automatic Back Door Control Module (ABD CU):
- B2426-29 (SPINDLE SENSOR LH)
- B2427-29 (SPINDLE SENSOR RH)
- B2416-1E (TOUCH SEN R OPEN)
- B2417-1E (TOUCH SEN L OPEN)
- B242A-13 (CLSR CONDITION)
ACTION
- For 2015 Murano Only: Refer to page 9, step 13 in the Service Procedure to confirm if ABD CU reprogramming is needed.
- Reprogram the ABD CU, if needed.
- If the ABD CU is reprogramed, also perform Automatic Back Door Manual Configuration.
- Perform Automatic Back Door Calibration (see page 22).
- Erase all DTCs.
- For 2015 Murano Only: If reprogramming was done, inform the customer of changes in automatic back door operation (see page 3, and also Owner’s Manual pages at the end of this bulletin.
IMPORTANT: The purpose of ACTION (above) is to give you a quick idea of the work you will be performing. You MUST closely follow the entire SERVICE PROCEDURE as it contains information that is essential to successfully completing this repair.
Automatic Back Door Operation Changes After Reprogramming
For 2015 Murano Only: Automatic back door operation will change if the ABD CU is reprogrammed. Refer to the table below for the explanation of these changes.
| Operating Back Door With: | Before Reprogramming | After Reprogramming |
| Instrument Panel Switch | Press once, back door opens. Press again before back door completely opens, back door reverses (closes). | Press once, back door opens. Press again, back door stops. Press again, back door reverses (closes). |
| Request Switch (1) and Liftgate (back door) Switch (2) | Press request switch, back door opens. Press back door switch with back door still opening, back door stops. Press again, back door continues to open. | Press request switch, back door opens. Press back door switch with back door still opening, back door stops. Press again, back door reverses (closes). |
| Liftgate (back door) Switch (with back door open) | Press once, back door closes. Press again before back door completely closes, back door reverses (opens) (3). | Press once, back door closes. Press again before back door completely closes, back door stops. Press again, back door reverses (opens). |
| Intelligent Key | Press button, back door opens. Press again before back door completely opens, back door reverses (closes). | Press button, back door opens. Press again, back door stops. Press again, back door reverses (closes). |
| Automatic Back Door Operation | A chime sounds three times before the back door starts to move, open or close. The hazard warning lights flash at the beginning of open or close operation. | The chime sound operation remains the same. No hazard warning light flash during operation. |
| Automatic Back Door Calibration | Hazard warning lights flash. No chime sound. Back door movement is slower than normal operating speed. | Hazard warning lights do not flash. Remainder of operation does not change. |
(1) The request switch being operated is located above the rear license plate.
(2) The back door switch is located at the bottom left of the back door.
(3) When the back door closes too much to press the back door switch again and instead the request switch is pressed, the back door stops. Press the request switch again and the back door will reverse (open).
SERVICE PROCEDURE
Battery Voltage Check
- Check the battery voltage.
- Make sure battery voltage is between 12 and 15.5 volts (engine not running).
- Charge or replace the battery as needed.
ABD CU Reprogramming (for 2015 Murano only)
NOTE:
- Refer to page 9, step 13 to confirm if ABD CU reprogramming is needed.
- If ABD CU is not needed, make sure to perform Automatic Back Door Calibration (see page 22) and erase all DTCs.
- Before starting:
- Make sure the back door is fully closed.
- ASIST on the CONSULT PC has been synchronized to the current date.
- All CONSULT related software updates (if any) have been installed.
NOTE: The CONSULT PC automatically gets all reprogramming software during ASIST synchronization.
| CAUTION:
|
- Once all ASIST and CONSULT related updates have been performed, attach the CONSULT PC to the vehicle.
- Connect the plus VI to the vehicle.
- Connect the AC adapter to the CONSULT PC.
- Turn ON the CONSULT PC, and then open CONSULT III plus (C-III plus).
NOTE: Make sure all applications other than C-III plus are closed.
- Press the ignition switch twice without depressing the brake pedal.
- The meter and gauges will illuminate.
CAUTION: Do Not start the engine, the ABD CU may be damaged.
NOTE: Make sure ALL accessories are turned OFF.
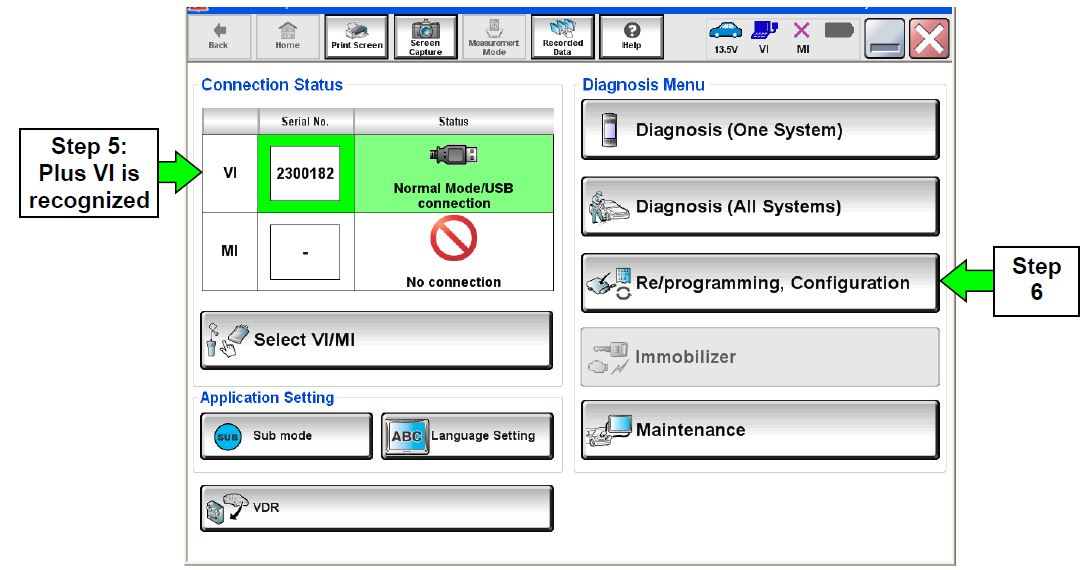
- Wait for the plus VI to be recognized.
- The serial number will display when the plus VI is recognized.
- Go to Re/programming, Configuration.
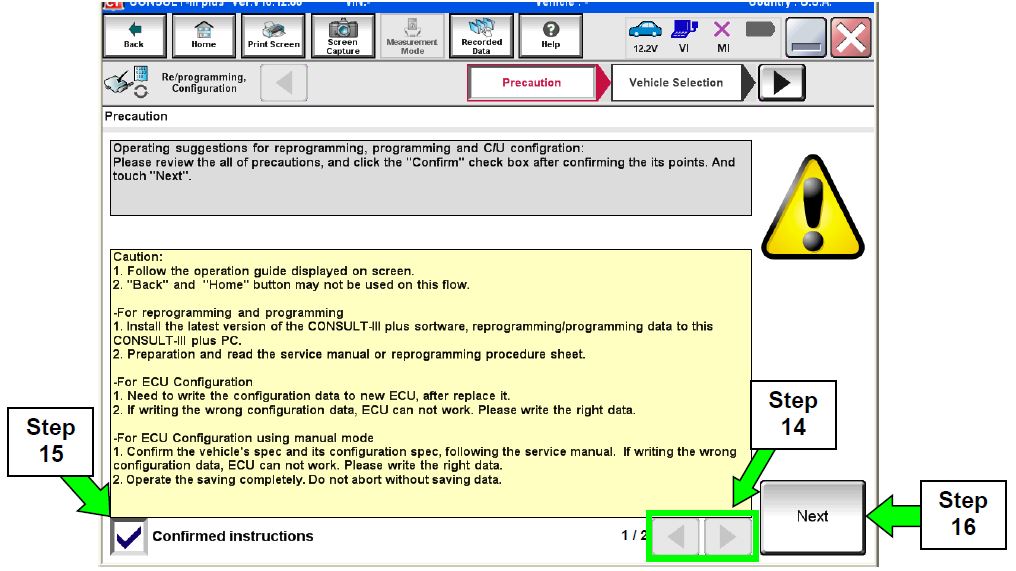
Figure 1
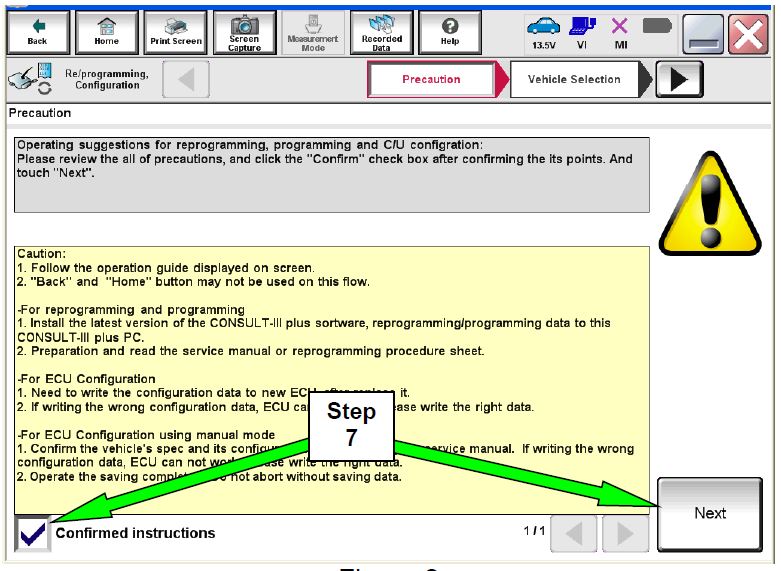
- Check the box for Confirmed Instructions after viewing and reading all precautions, and then select Next.
Figure 2
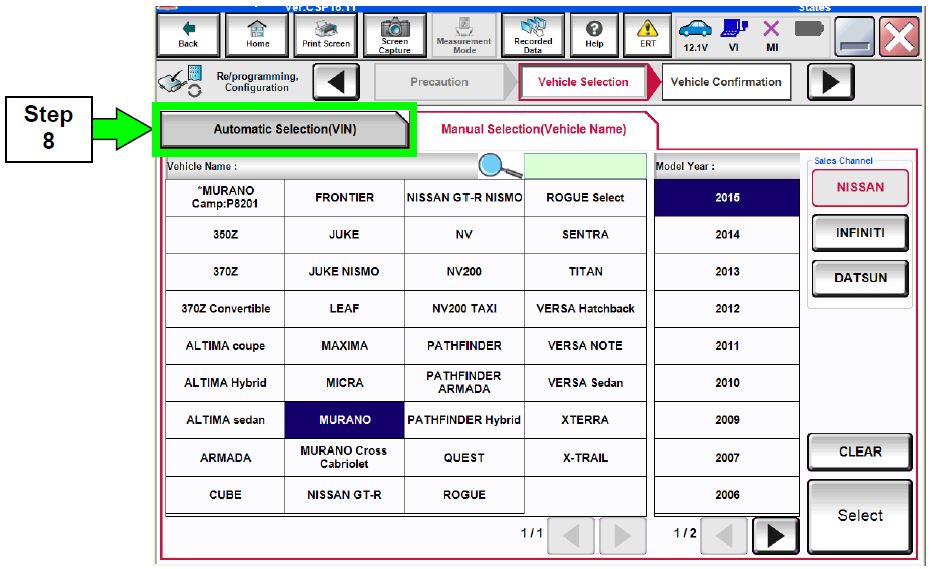
- If the screen in Figure 3 appears, select Automatic Selection (VIN).
Figure 3
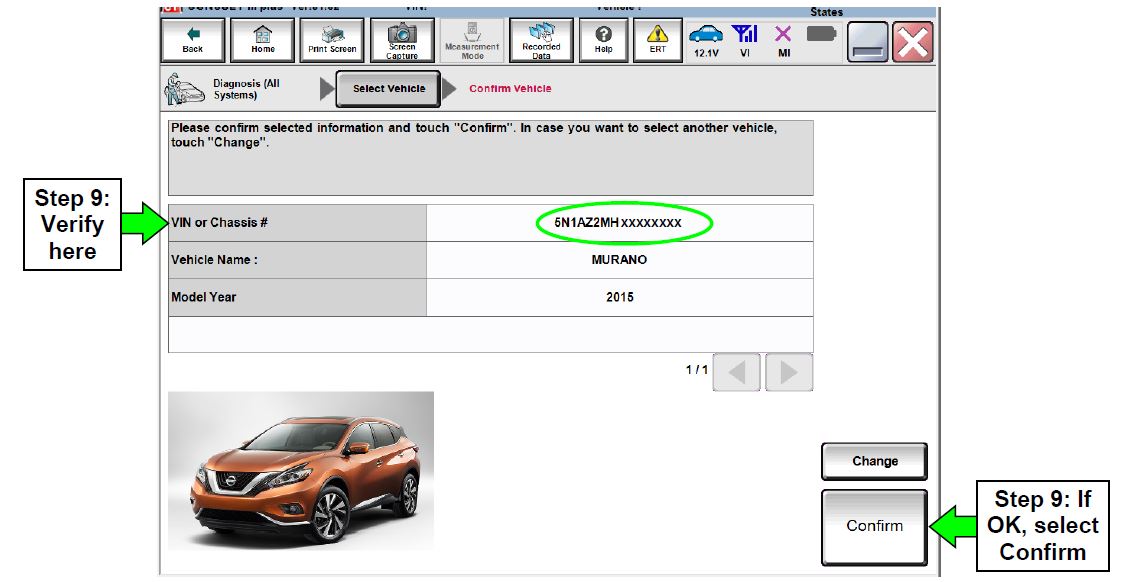
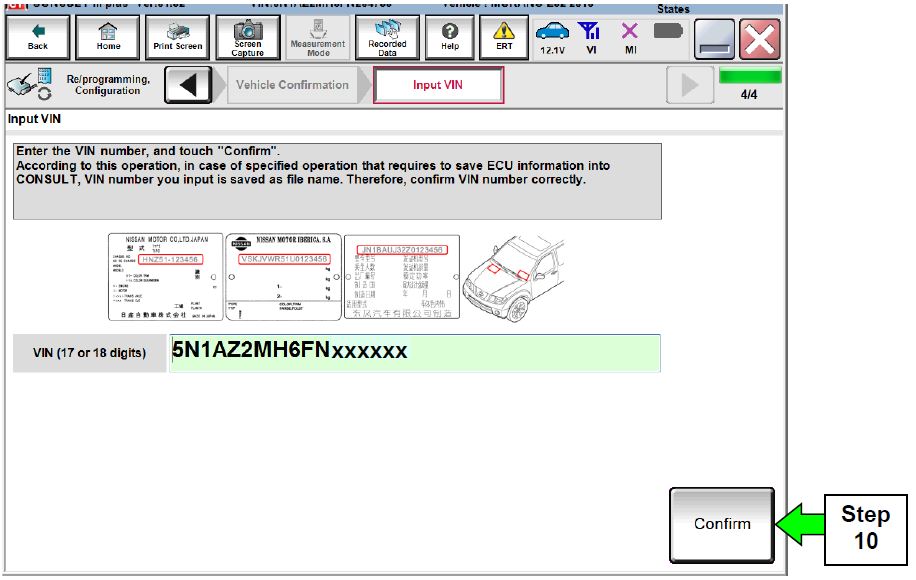
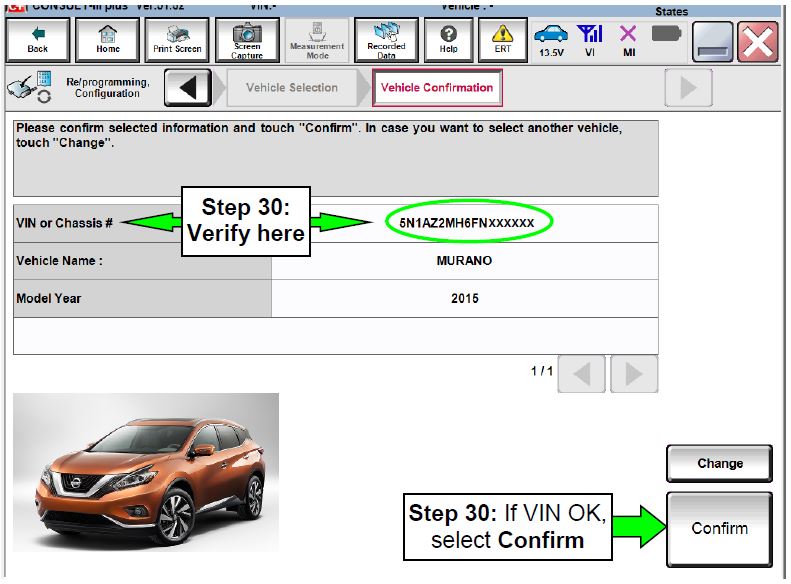
- Verify the VIN or Chassis # matches that of the vehicle.
- If the correct VIN is displayed, select Confirm.
Figure 4
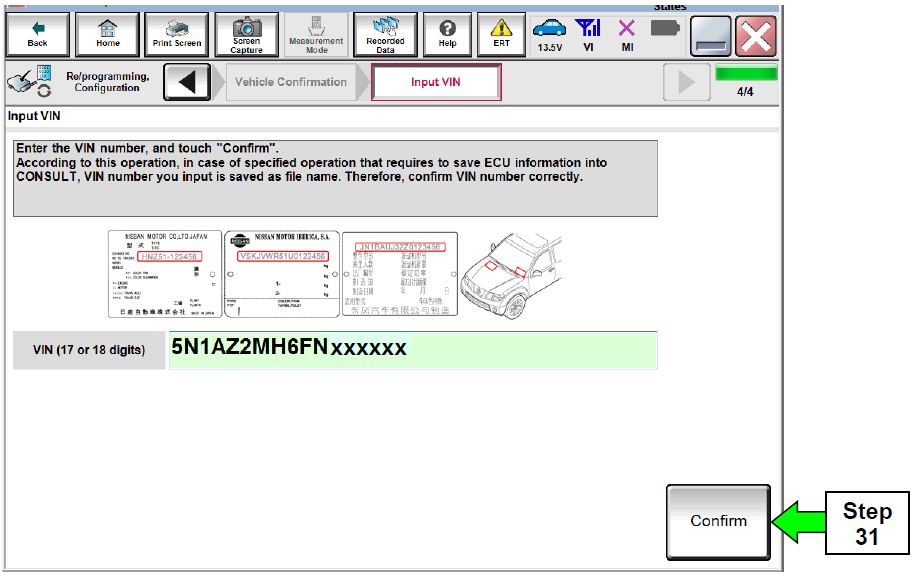
- Select Confirm
Figure 5
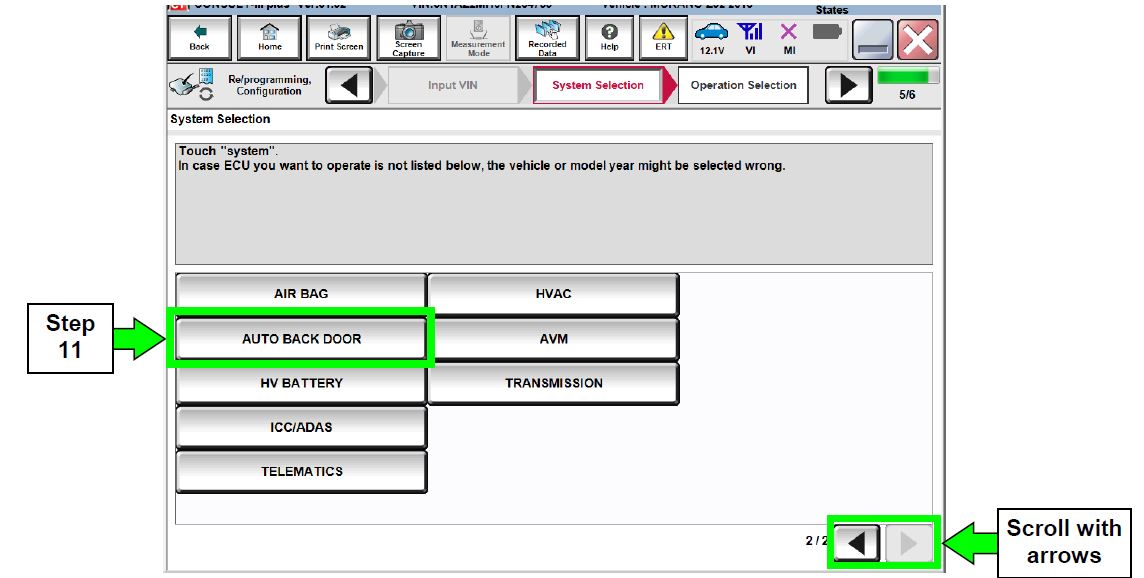
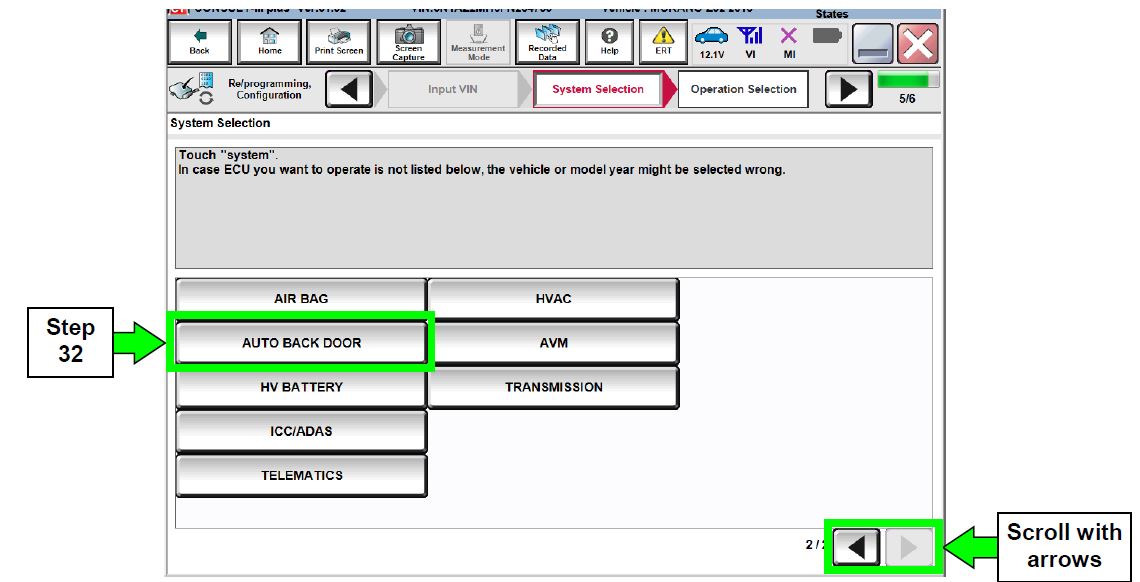
- Select AUTO BACK DOOR.
- Use the arrows if needed to scroll and access AUTO BACK DOOR.
Figure 6
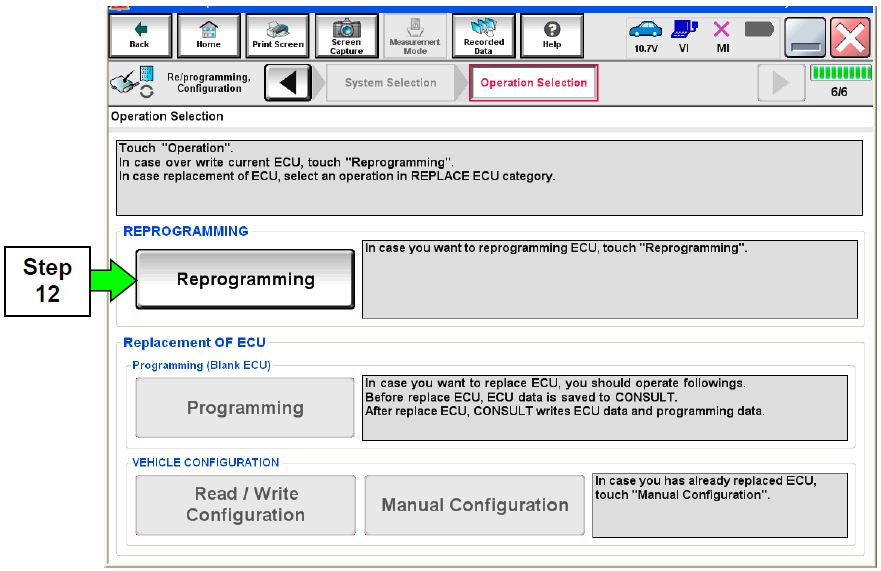
- Wait for System Call to complete, and then select Reprogramming.
Figure 7
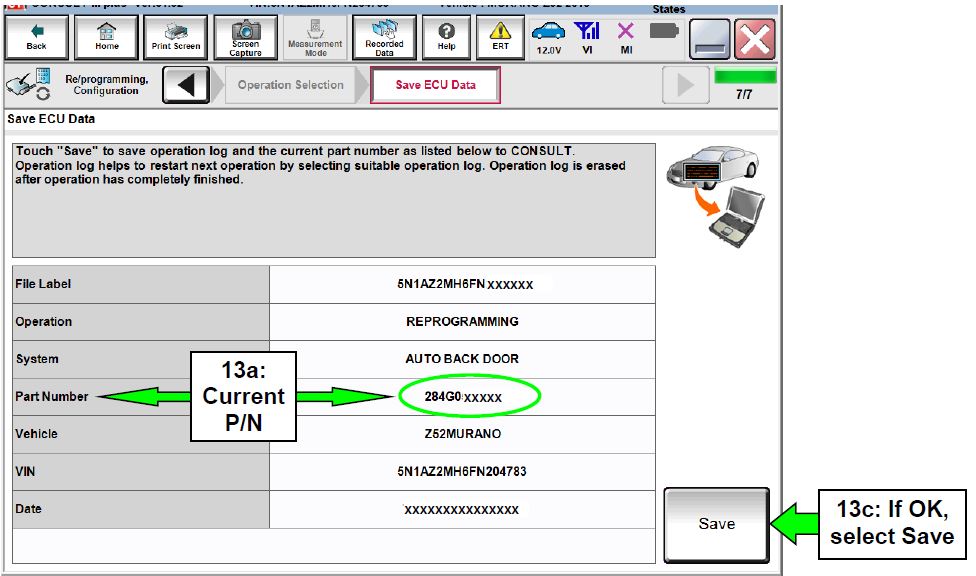
- When you get to the screen shown in Figure 8, confirm reprogramming applies as follows:
a. Find the ABD CU P/N and write it on the repair order.
NOTE: This is the current ABD CU P/N.
Figure 8
b. Compare the P/N you wrote down to the number in Table A
- If there is a match, the reprogramming applies. Go to step 13c.
- If there is not a match, this reprogramming is not needed. Go to Automatic Back Door Calibration on page 22.
Table A
| CURRENT P/N: 284G0- |
| 5AA0A |
c. If there is a P/N match as specified above, select Save, and then continue with the reprogramming procedure on the next page.
- Use arrows (if needed) to view and read all precautions.
- Check the box confirming the precautions have been read.
- Select Next.
Figure 9
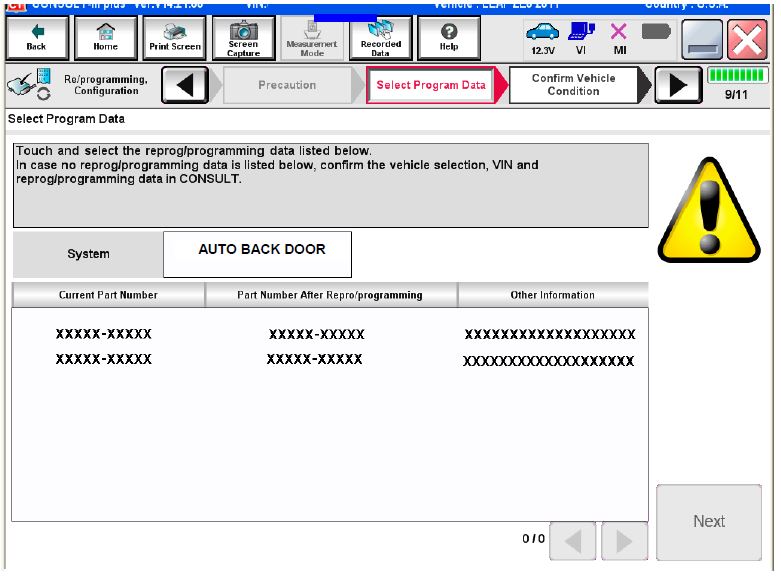
NOTE: In some cases, more than one new P/N for reprogramming is available.
- In this case, the screen in Figure 10 will display.
- Select and use the reprogramming option that does not have the message “Caution! Use ONLY with NTBXX-XXX”.
- If you get this screen and it is blank (no reprogramming listed), it means that there is no reprogramming available for this vehicle. This bulletin does not apply or it has already been done.
Figure 10
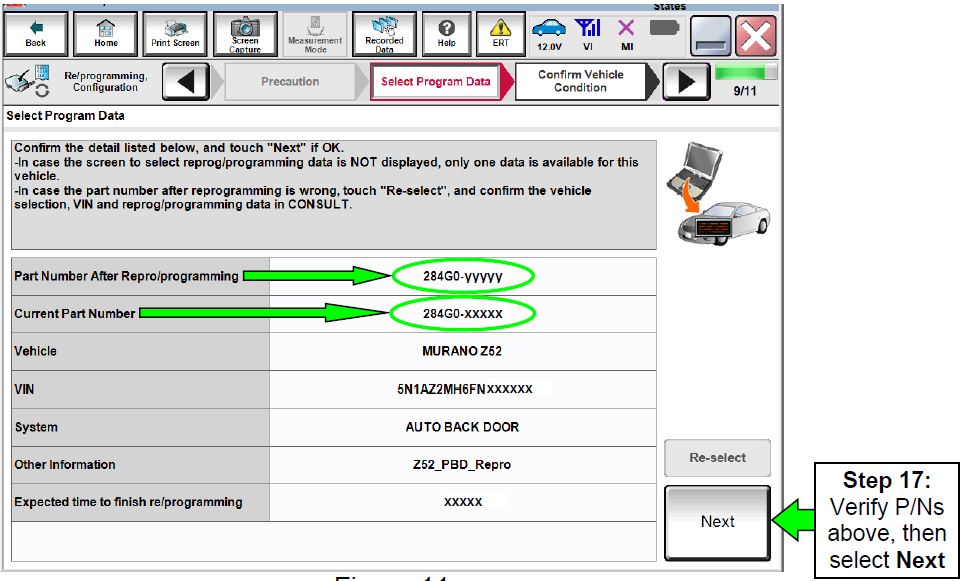
- Verify the Current Part Number matches the P/N written down in step 13 and the Part Number After Repro/programming is different, then select Next.
Figure 11
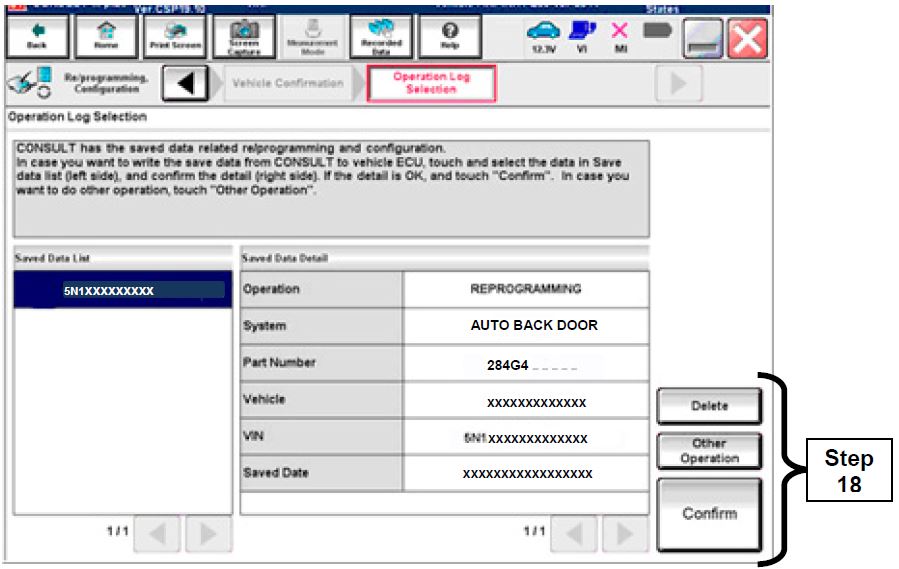
- If the screen in Figure 12 appears, first select Delete, then Confirm, and then Other Operation.
- This will erase the Saved Data List and restart the reprogram from page 8, step 12. You must go back to step 12.
- If no Saved Data List is stored, Figure 13 on the next page will be displayed. Proceed to step 19.
Figure 12
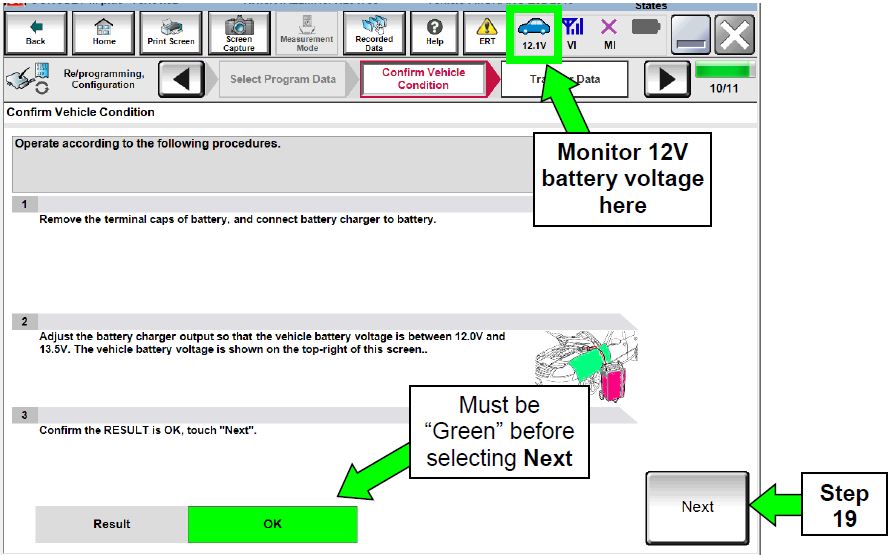
- Confirm battery voltage is correct, and then select Next.
NOTE: Battery voltage must stay within the specified range to make the indicator turn green.
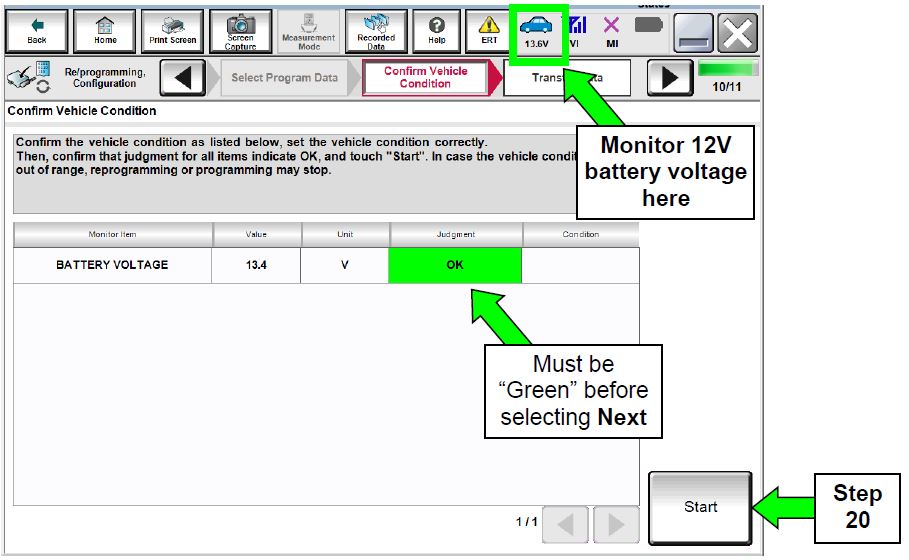
Figure 13
- With battery voltage OK (green), select Start.
- The reprogramming process begins when Start is selected.
NOTE: For reprogramming to continue, vehicle 12V battery voltage must stay within 12 volts and 15.5 volts.
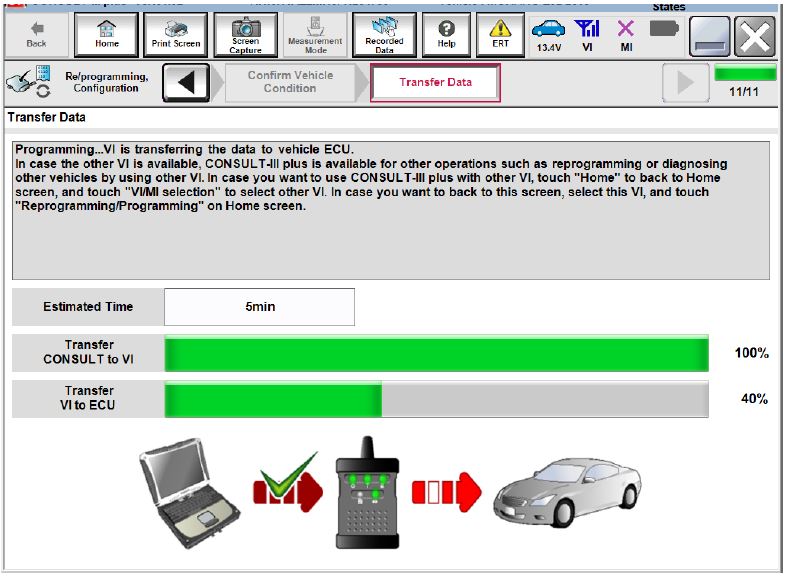
Figure 14
- Wait for both bar graphs to complete.
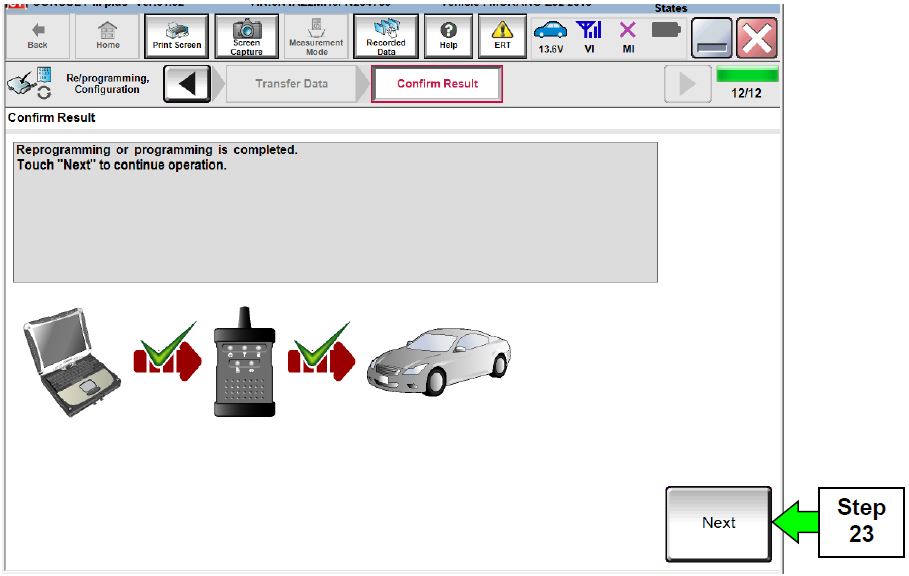
Figure 15
- When the screen in Figure 16 displays, reprogramming is complete.
NOTE: If the screen in Figure 16 is not displayed (which indicates reprogramming did not complete), refer to the information on the next page.
- Select Next, and then wait for System Call to complete.
Figure 16
Control Unit Recovery:
Do not disconnect plus VI or shut down C-III plus if reprogramming does not complete.
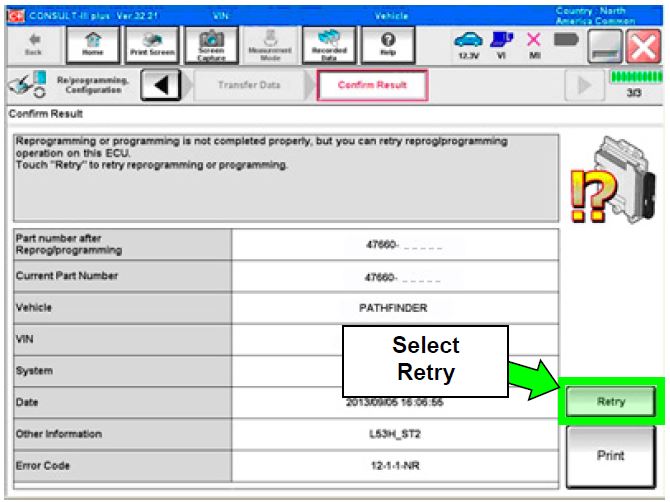
If reprogramming does not complete and the “!?” icon displays as shown in Figure 17:
- Check battery voltage (12.0–15.5 V).
- Ignition is ON, engine OFF. Ready Mode is OFF.
- External Bluetooth® devices are OFF.
- All electrical loads are OFF.
- Select retry and follow the on screen instructions.
- “Retry” may not go through on the first attempt and can be selected more than once.
Figure 17
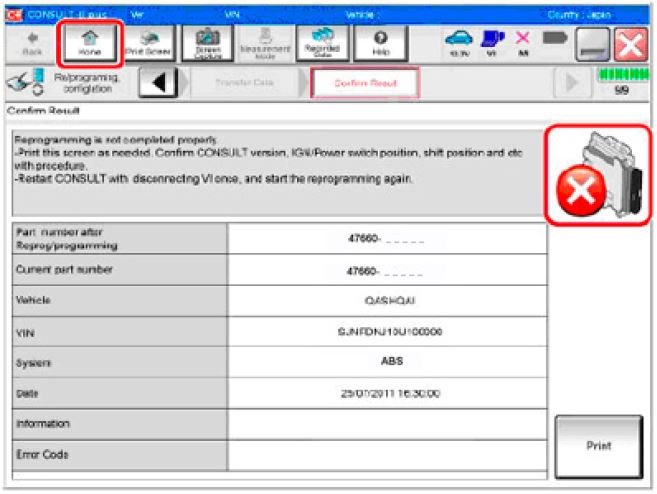
If reprogramming does not complete and the “X” icon displays as shown in Figure 18:
- Check battery voltage (12.0 – 15.5 V).
- CONSULT A/C adapter is plugged in.
- Ignition is ON, engine OFF. Ready Mode is OFF.
- Transmission is in Park.
- All C-III plus / VI cables are securely connected.
- All C-III plus updates are installed.
- Select Home, and restart the reprogram procedure from the beginning.
Figure 18
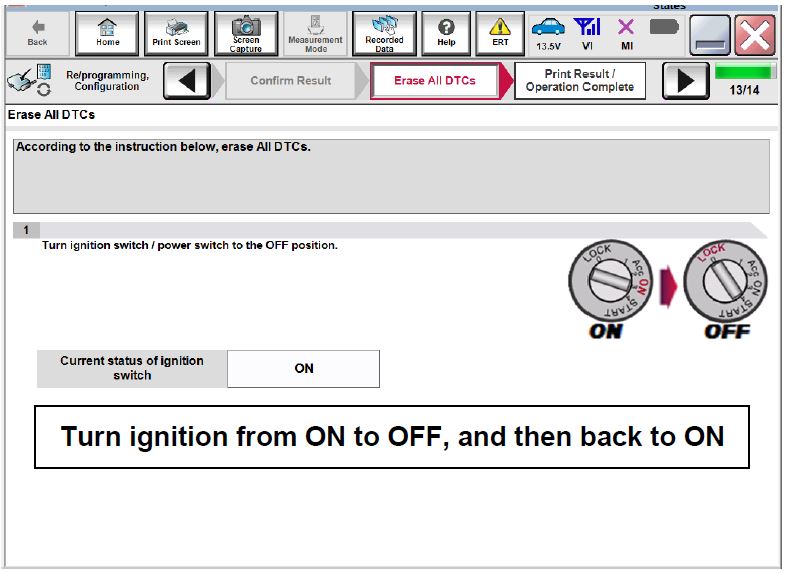
- Erase all DTCs as follows:
a. Turn the ignition OFF
b. Turn the ignition ON.
c. Wait for DTC erase to complete.
Figure 19
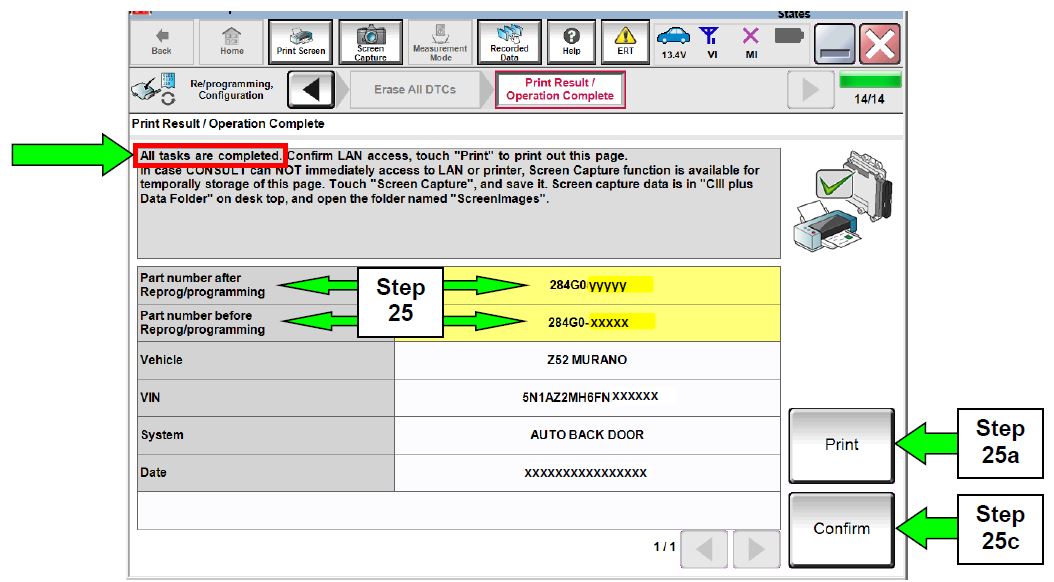
- Verify the part number has changed (before and after reprogramming part numbers should be different).
a. Print a copy of the screen in Figure 20 by selecting Print.
b. Attach the copy to the repair order.
c. Once a copy has been printed, select Confirm.
Figure 20
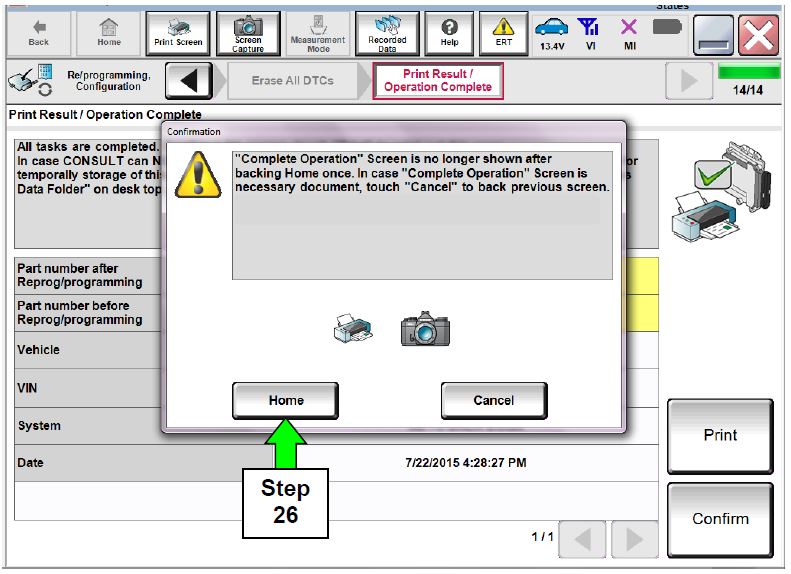
- After Confirmation has completed, select Home.
Figure 21
Go to Automatic Back Door Manual Configuration on the next page.
Automatic Back Door Manual Configuration
(Perform ONLY if reprogramming was done)
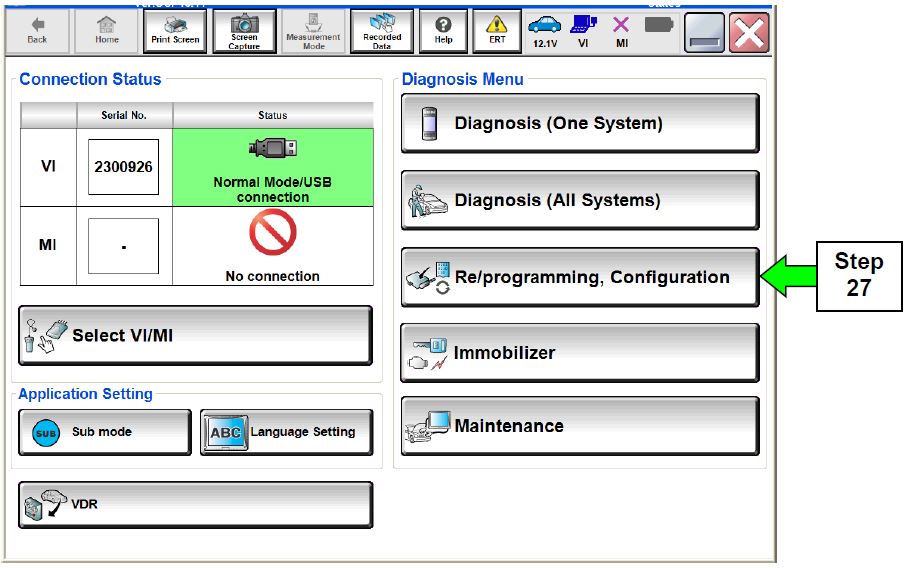
- Select Re/programming, Configuration.
Figure 22
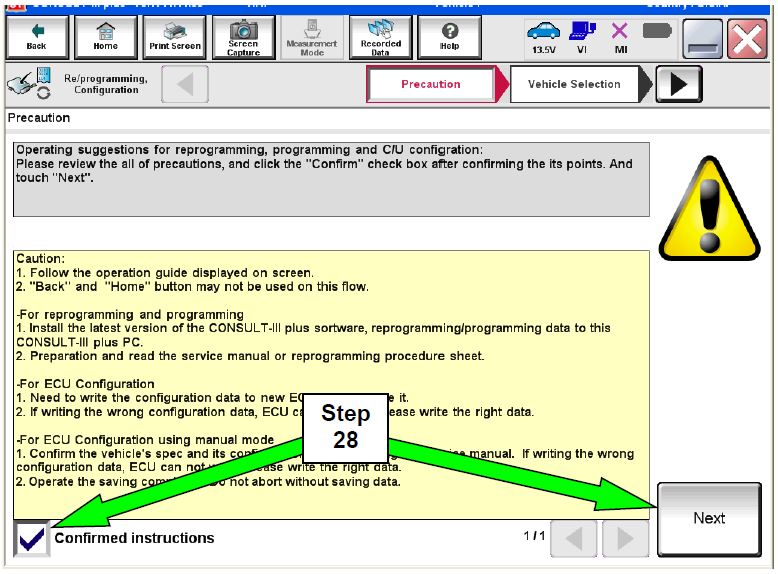
- Check the box for Confirmed Instructions, and then select Next.
Figure 23
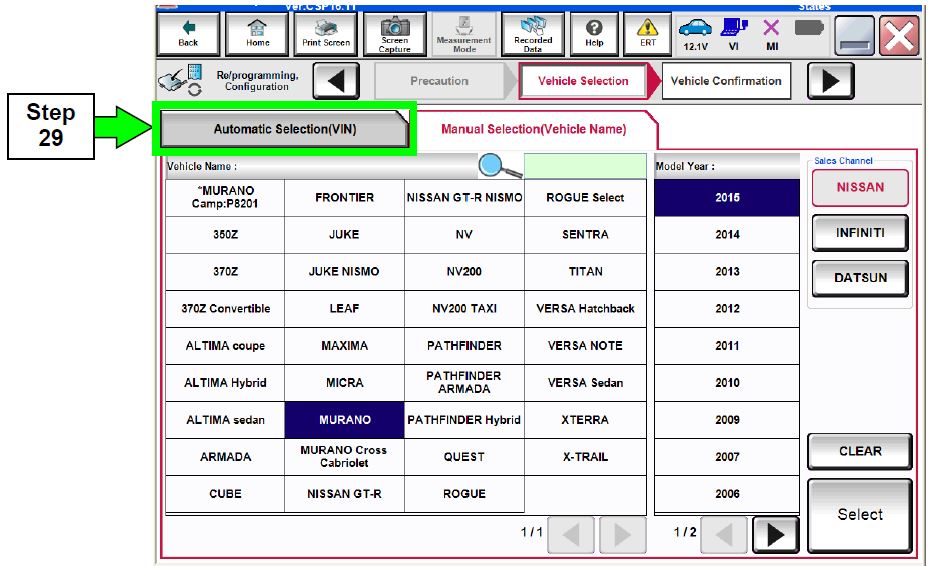
- If the screen in Figure 24 appears, select Automatic Selection (VIN).
Figure 24
- Verify the VIN or Chassis # matches that of the vehicle.
- If the correct VIN is displayed, select Confirm.
Figure 25
- Select Confirm again.
Figure 26
- Select AUTO BACK DOOR.
- Use the arrows if needed to scroll and access AUTO BACK DOOR.
Figure 27
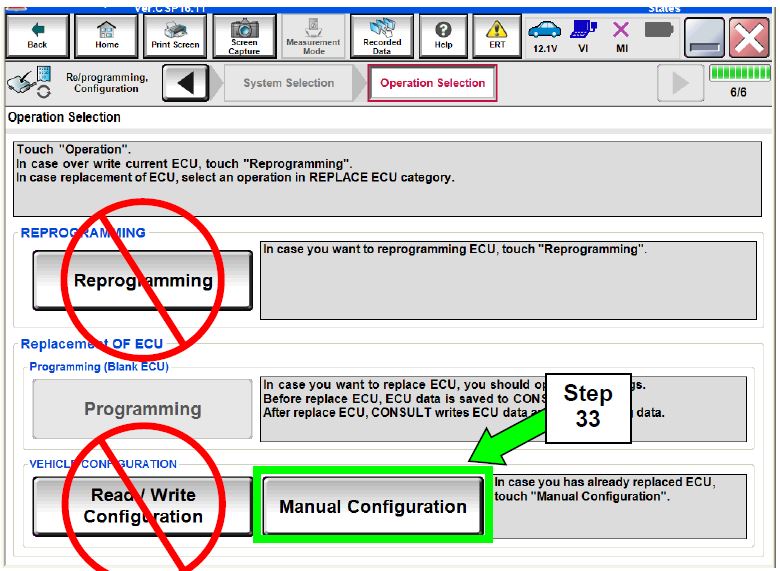
- Select Manual Configuration.
Figure 28
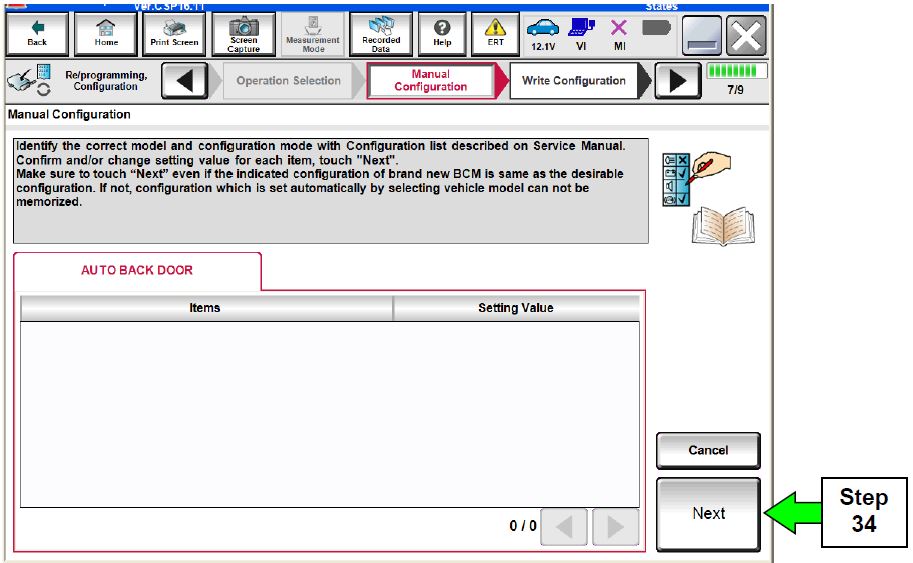
- Select Next.
Figure 29
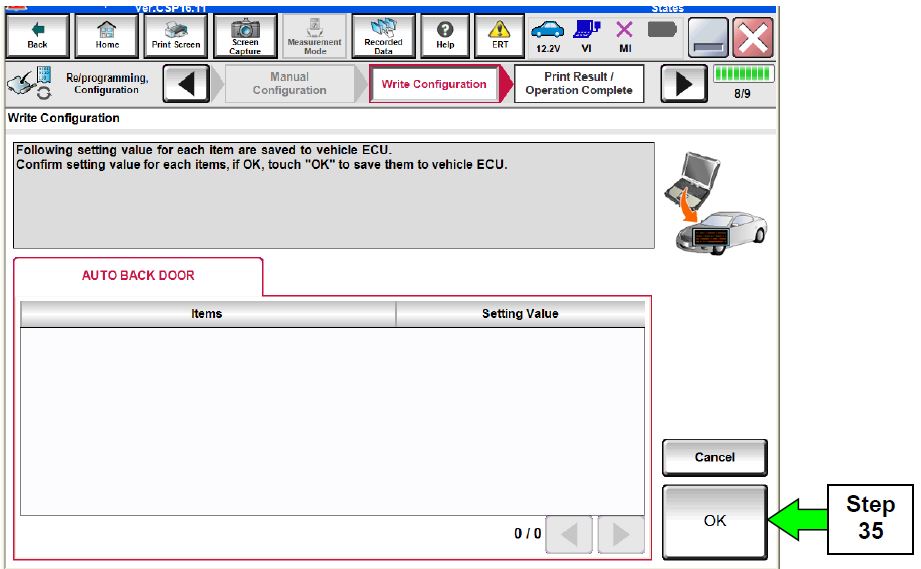
- Select OK.
Figure 30
- Select End.
Figure 31
Go to Automatic Back Door Calibration on the next page.
Automatic Back Door Calibration
NOTE: The operating characteristics of automatic back door calibration changes after reprogramming. See page 3 for details.
- Calibrate the automatic back door.
a. Open the automatic back door by pressing the request switch (above rear license plate).
NOTE: Once the automatic back door is fully open, two long confirmation beeps will sound.
b. Close the automatic back door by pressing the back door switch (located at bottom left of back door).
NOTE: The automatic back door can be closed manually instead of using the request switch.
Back Door Open Position Setting Function
- Adjust the back door to fully open by performing Back Door Open Position Setting Function.
- Refer to the ESM, section DLK-Door & Lock, for Back Door Position Setting Function.
- Inform the customer that the back door has been set to the full open position. If they desire a different position, it will have to be reset.
Verify the automatic back door works properly.
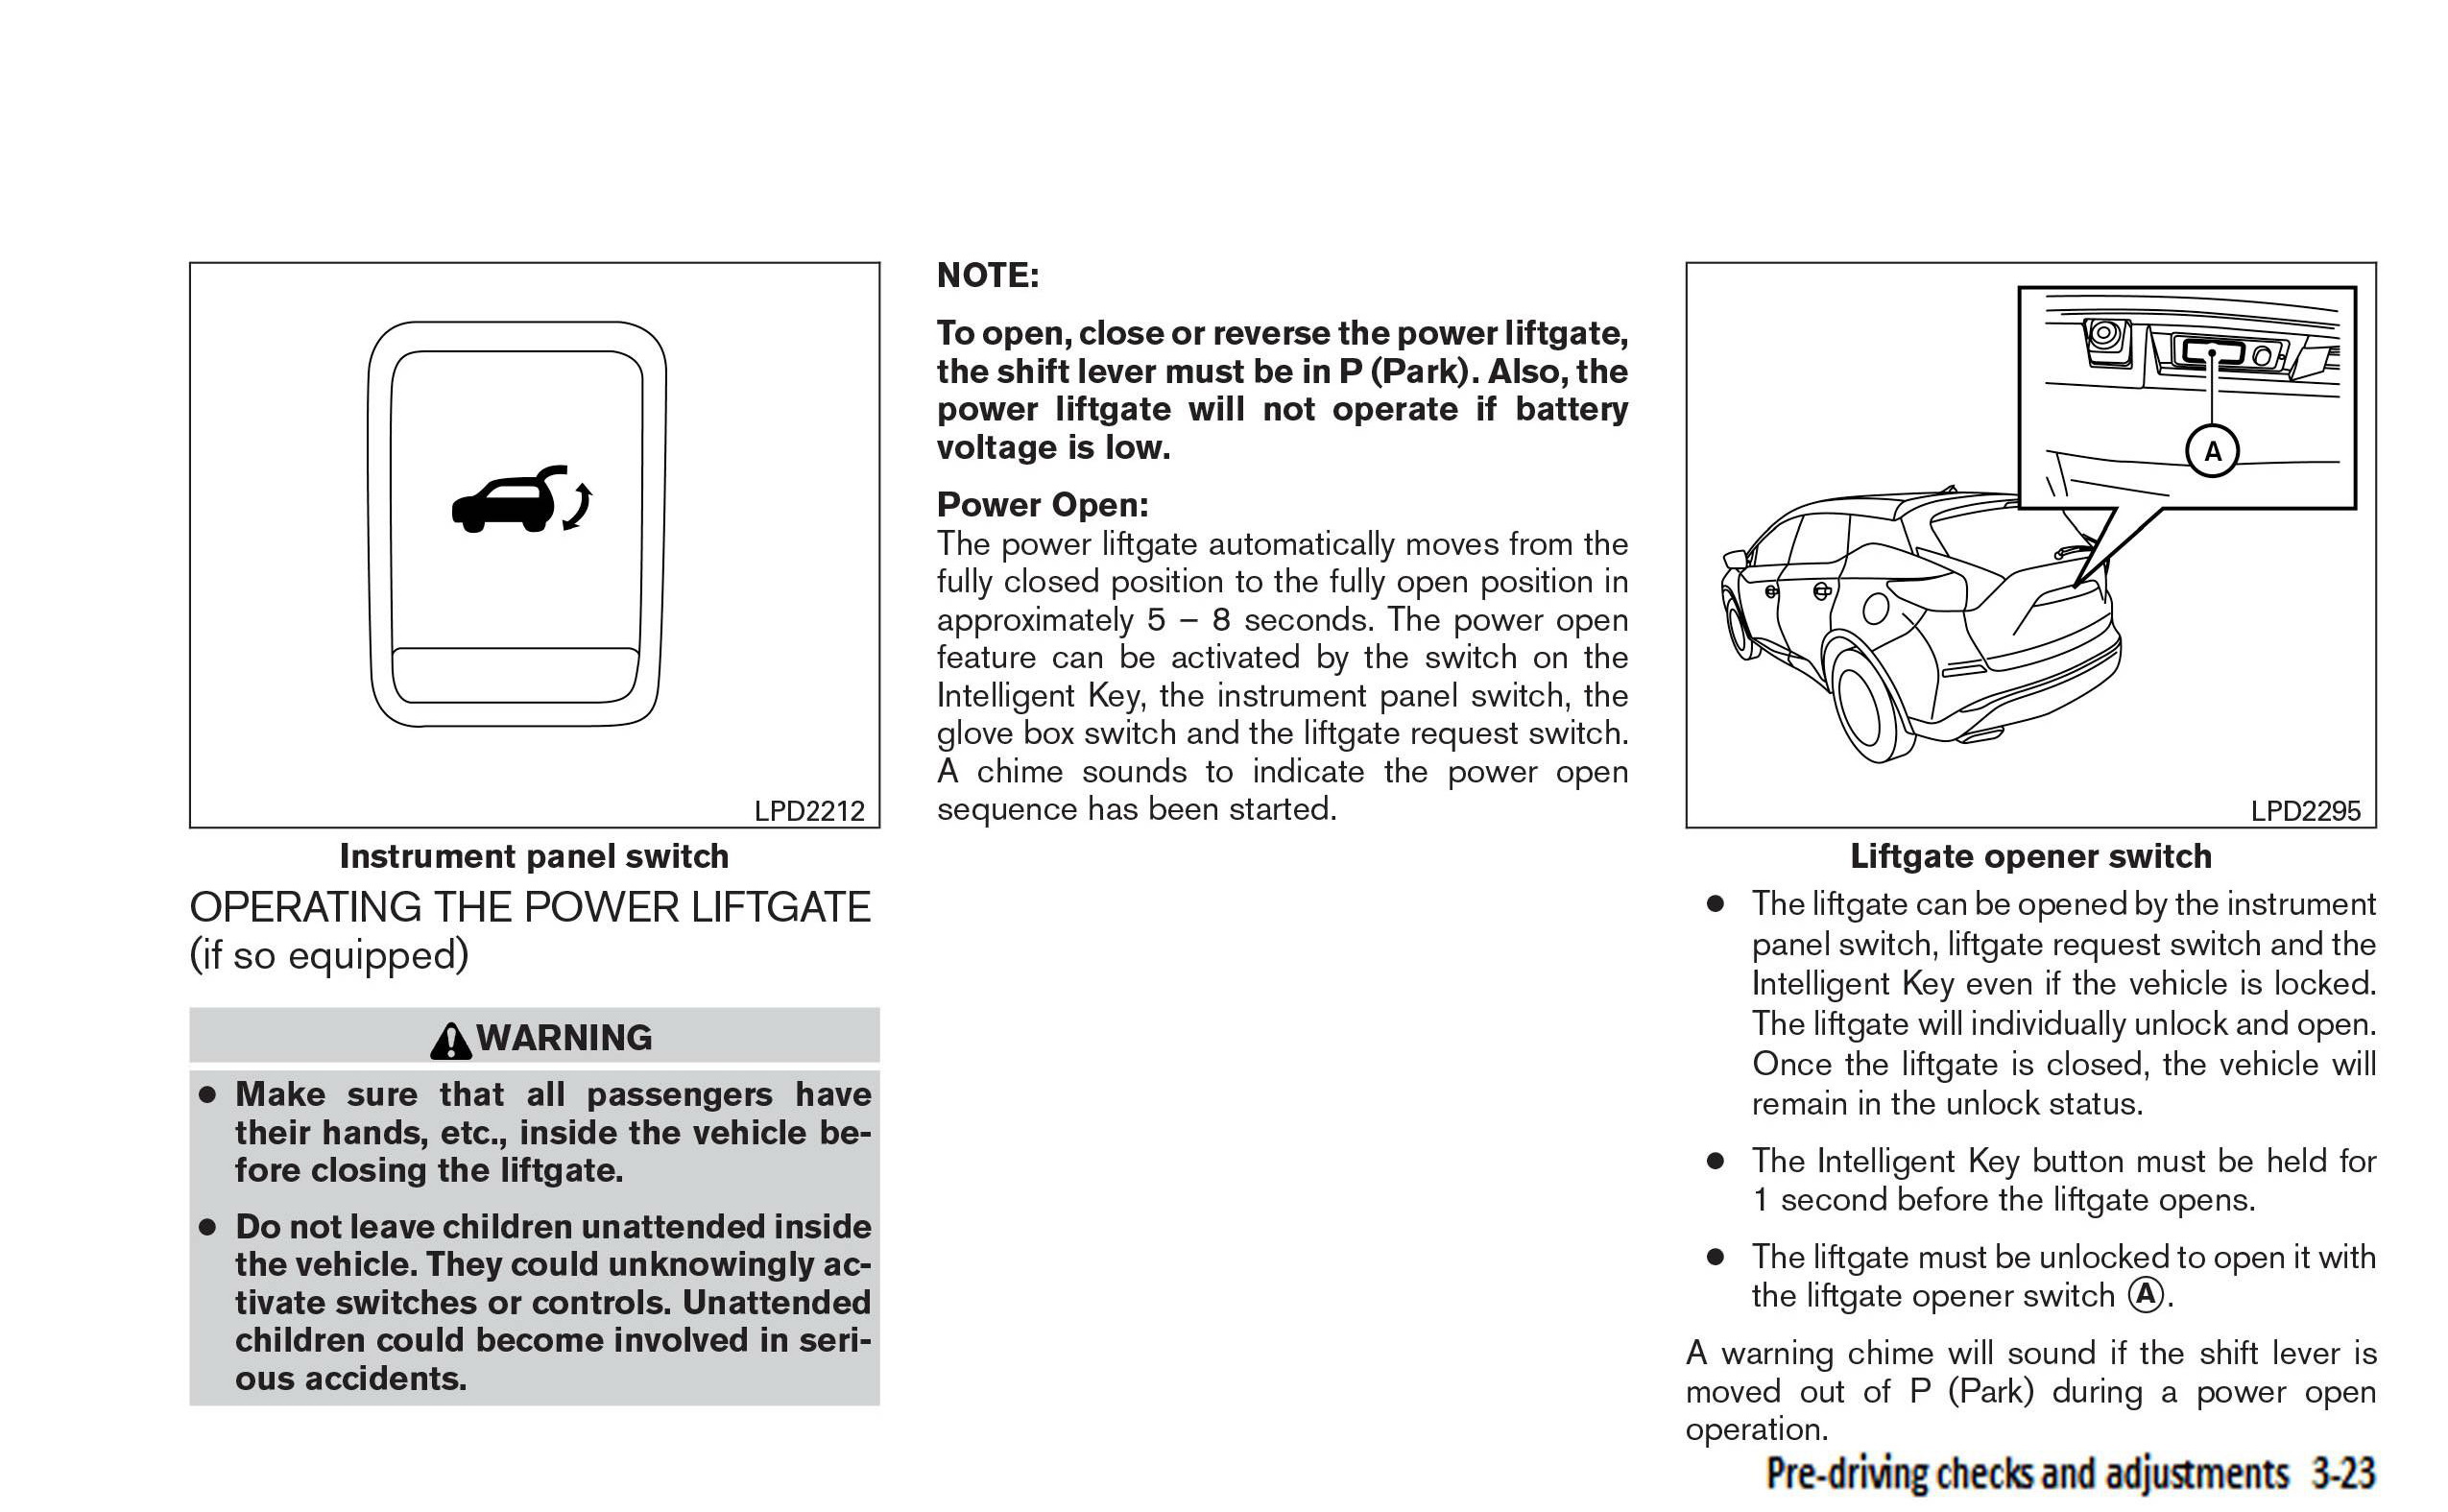
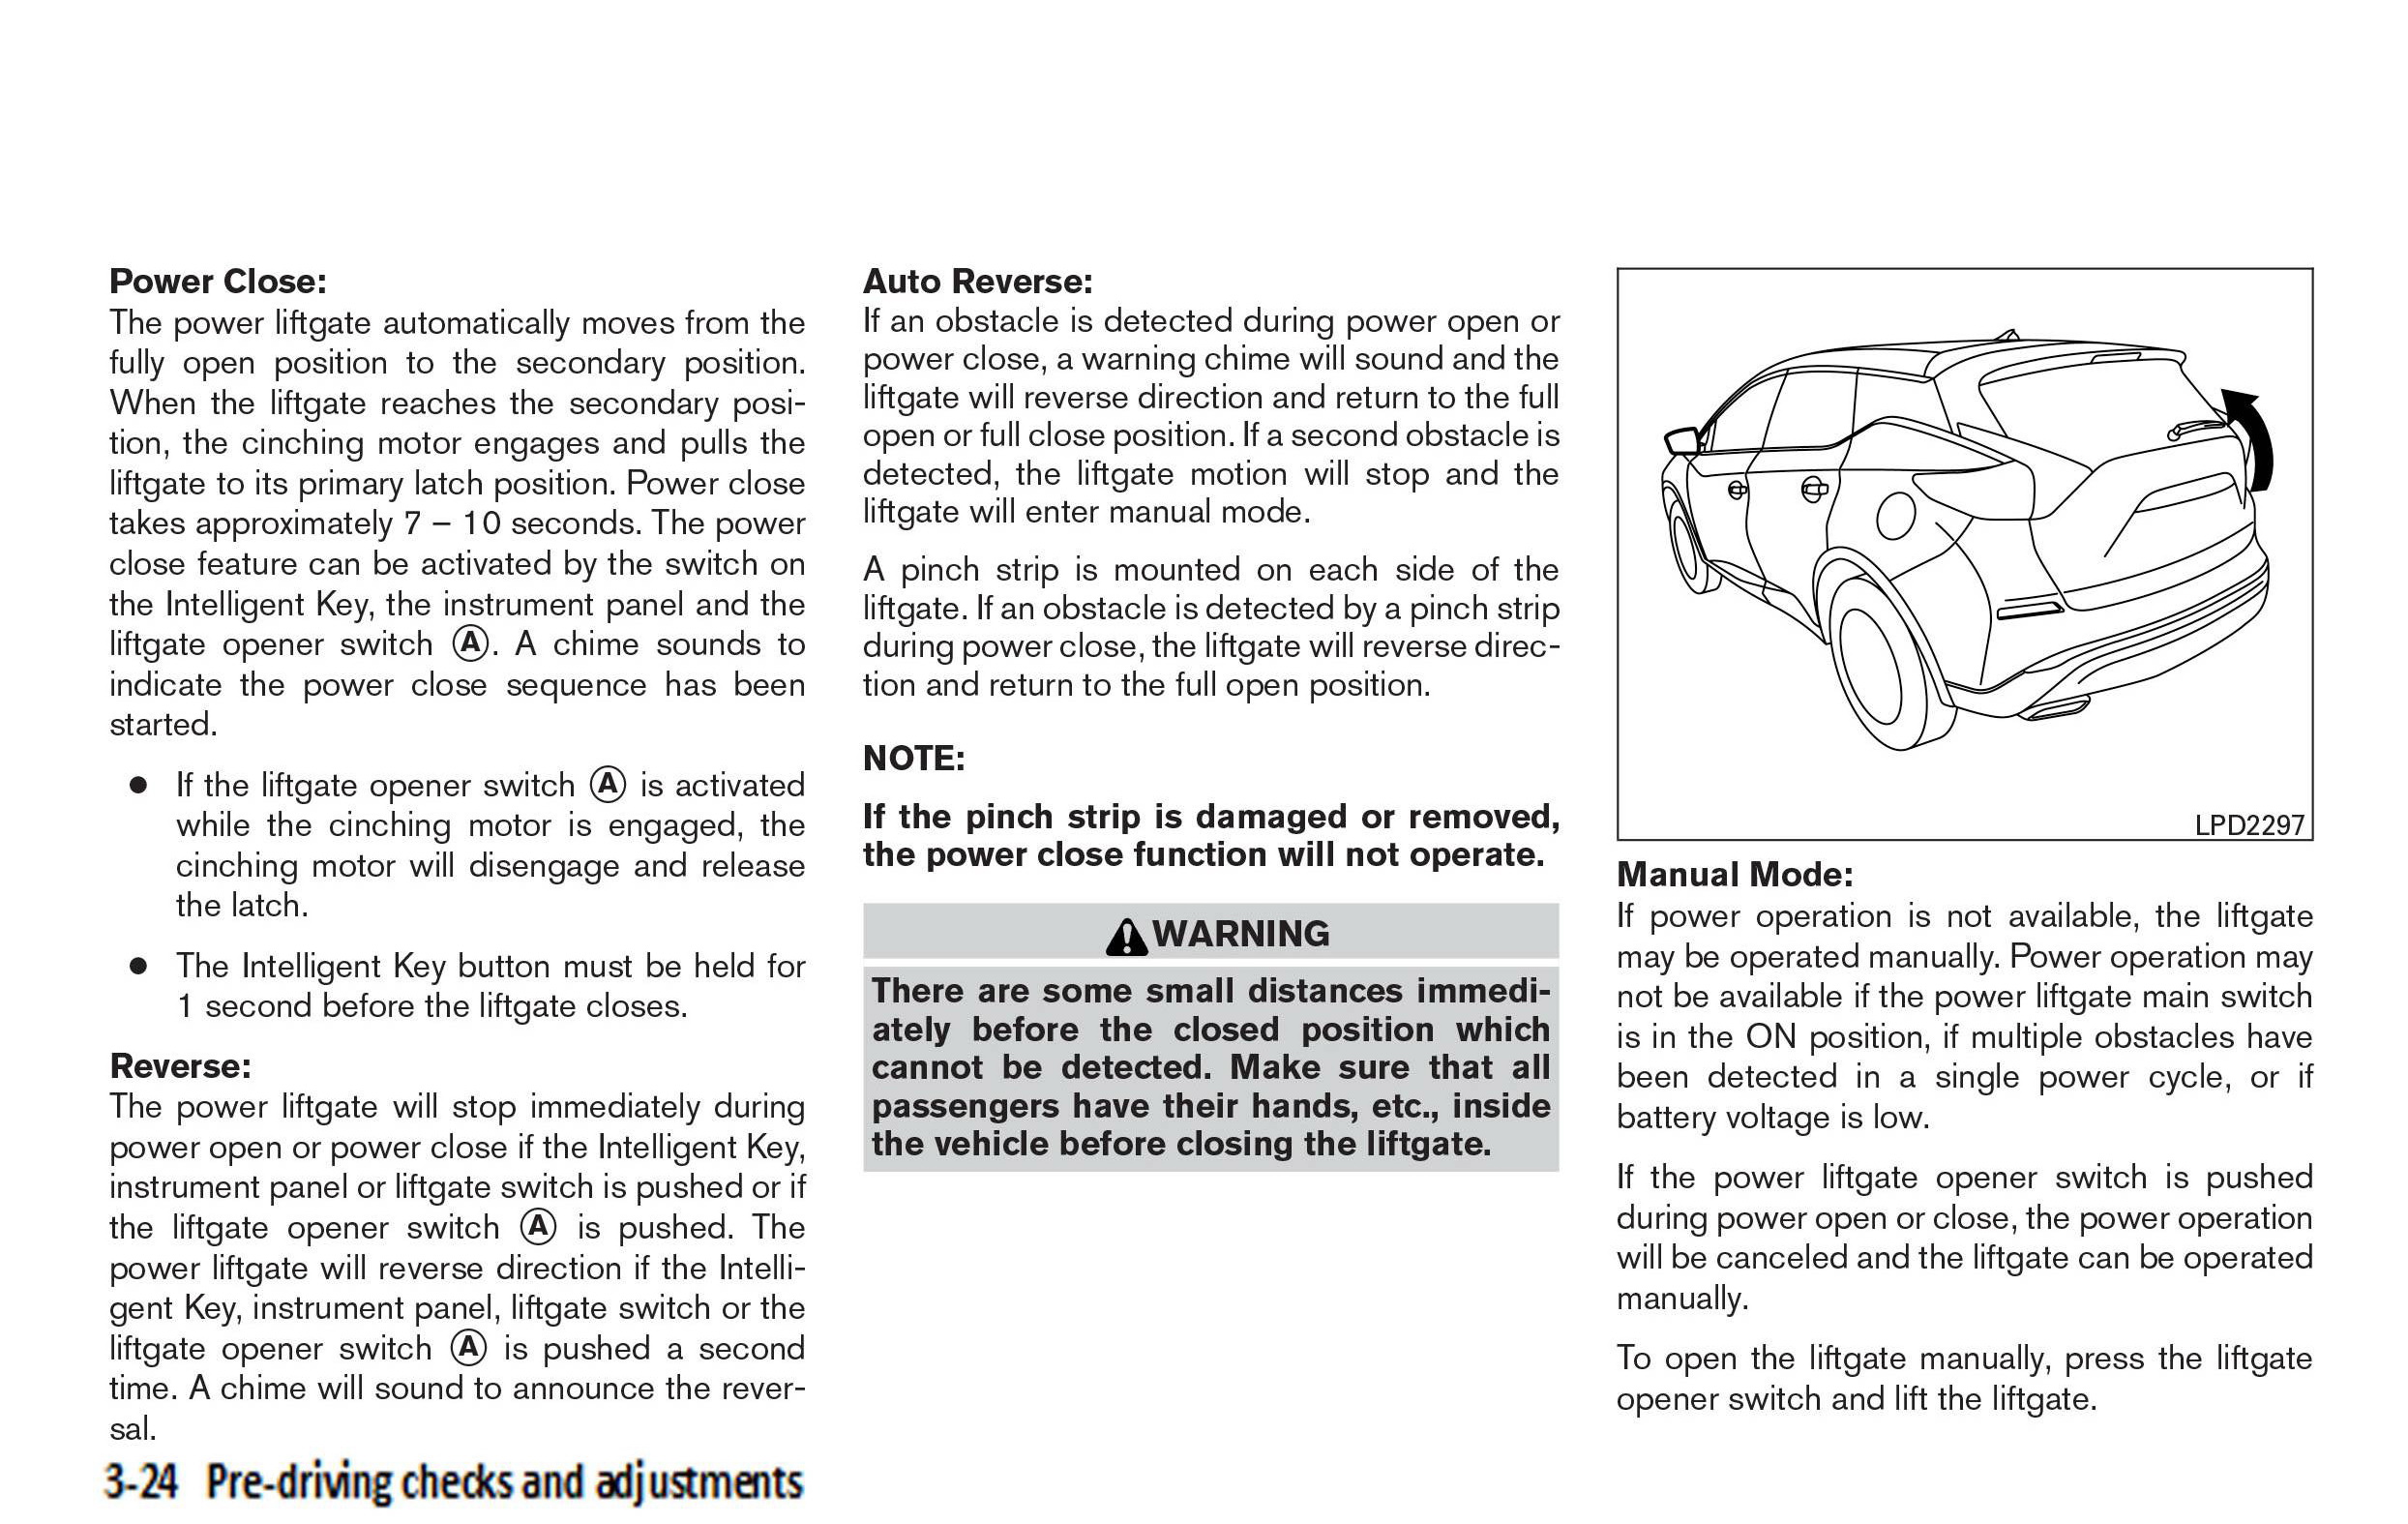
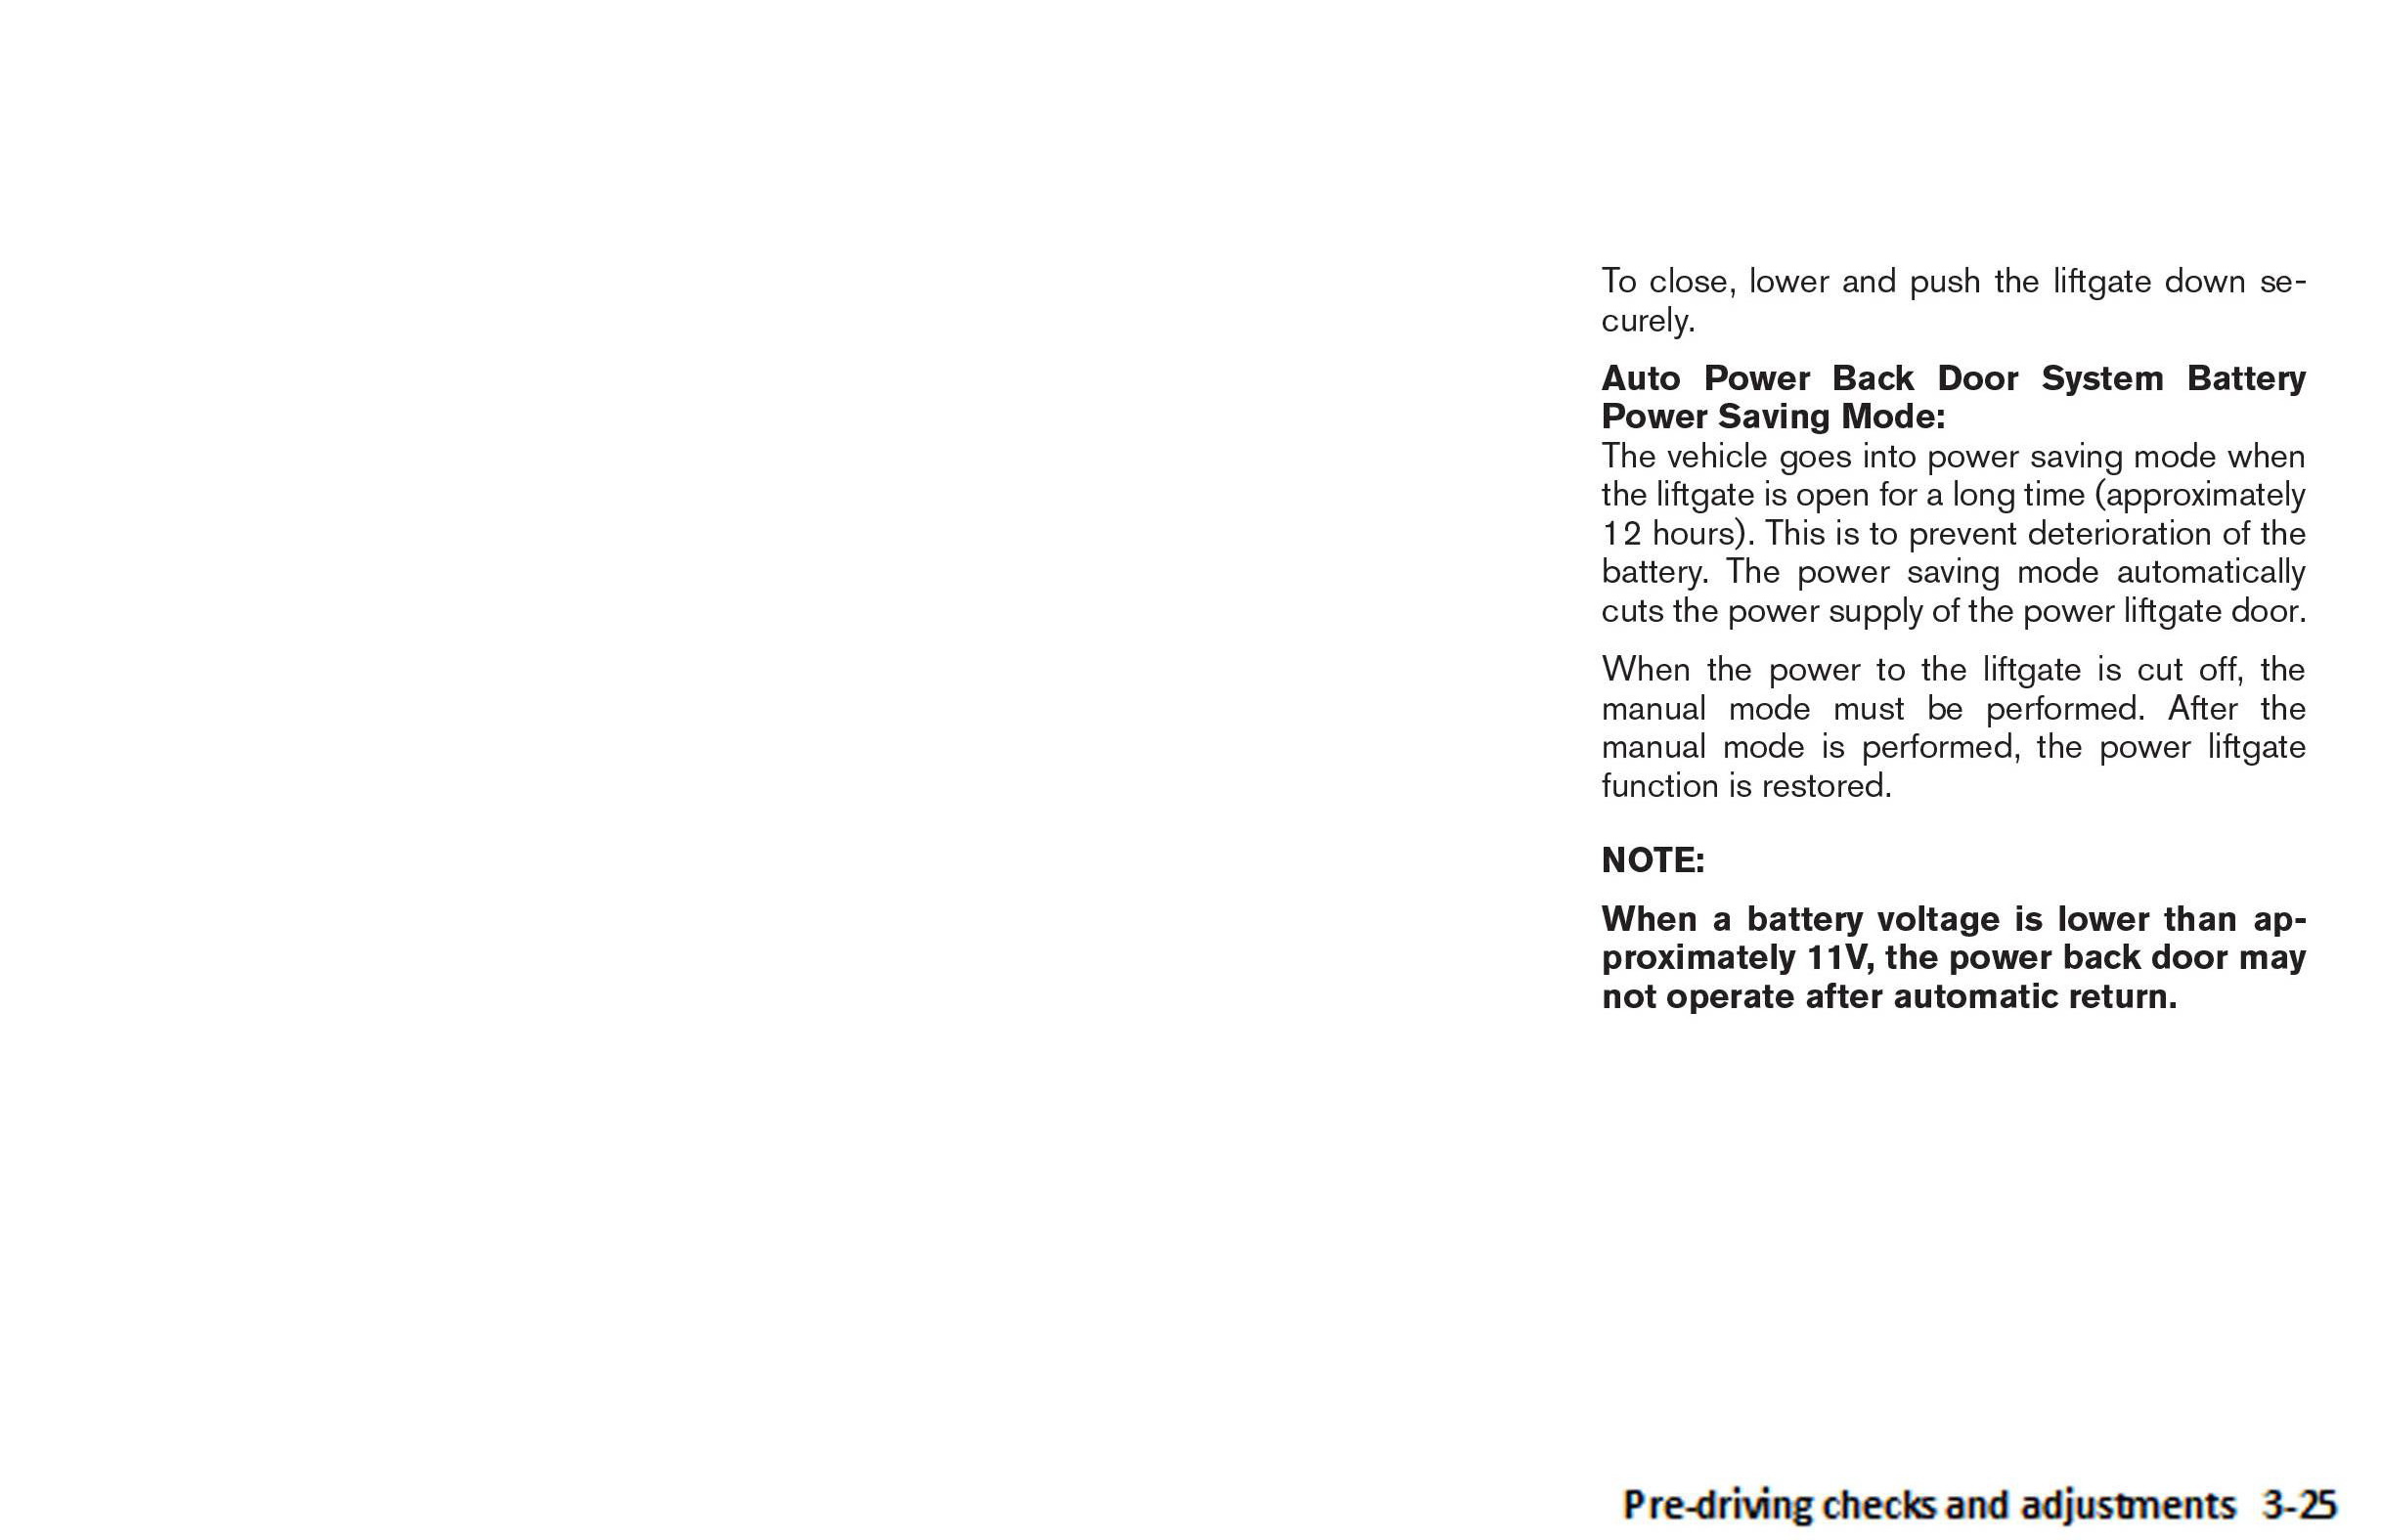
For 2015 Murano Only: Owner’s Manual Corrected Pages
Go to pages 24-26 in this bulletin, print them, and then:
- Put them into the customer’s Owner’s Manual, or
- Give them to the customer and ask the customer to put them into their Owner’s Manual.
- These pages go in the 2015 MURANO OWNER’S MANUAL, section 3-Predriving checks and adjustments. They replace pages 3-23, 3-24, and 3-25.
CLAIMS INFORMATION
Submit a Primary Part (PP) type line claim using the following claims coding:
| DESCRIPTION | PFP | OP CODE | SYM | DIA | FRT |
|---|---|---|---|---|---|
| Check/Clear DTCs and perform Back Door Calibration | 284G0-5AA1A | BX5RAA | ZE | 32 | 0.2* |
*FRT allows adequate time to access DTC codes and reprogram. No other diagnostic procedures subsequently required. Do NOT claim any Diagnostic Op Codes with this claim.
On the Same repair line
If needed:
| DESCRIPTION | OP CODE | FRT |
|---|---|---|
| Test and Charge Battery | GB18AA | (1) |
(1) Reference the current Nissan Warranty Flat Rate Manual and use the indicated flat rate time.
If needed:
(1) Reference the current Nissan Warranty Flat Rate Manual and use the indicated flat rate time.
If needed (for 2015 Murano Only):
| DESCRIPTION | PFP | OP CODE | SYM | DIA | FRT |
|---|---|---|---|---|---|
| Auto Back Door Programming | 284G0-5AA1A | BX5AAA | ZE | 32 | 0.4* |
* FRT allows adequate time to access DTC codes and reprogram. No other diagnostic procedures subsequently required. Do NOT claim any Diagnostic Op Codes with this claim.
NTB15-073b
 Loading...
Reprogramming
J2534-1 Re/Programming
Tutorial for Purchasing NERS Software
Software updated April 26, 2019 to version # 04.03.00. It is recommended the latest version of NERS be installed before connecting to a vehicle.
This NERS software supports reprogrammable Engine and Transmission control units from 1999 to 2019 model year vehicles, and 2005 MY and later VIN writing into ECUs, when using a Nissan validated pass-through device. Click the Reprogramming Tab for additional information on reprogramming. This software only provides ECU reprogramming, blank programming and VIN writing capability. It does not provide diagnostic or key programming capability. For Engine and Transmission control unit reprogramming and VIN writing capability on 2020 MY & newer, please use CONSULT-III plus or CONSULT-III plus R2R software.
Vehicle reprogramming requires the use of the following:
- Nissan
 validated J2534-1 device
 - Nissan
 ECU Reprogramming Software (NERS)
 - Personal computer running Windows XP (SP2 or later) or Windows 7 or 10 64Bit
- Applicable reprogram file
Nissan tested and validated the below listed devices. Nissan
 does not recommend the use of any other J2534-1 device not listed here.
| Manufacturer | Models |
| Actia | PassThru +XS |
| Autel | MaxiFlash Elite (with firmware v3.01) |
| Bosch | Mastertech VCI (SFP v5.11.9) |
| Dearborn Group | VSI-2534 |
| Drew Technologies/OPUS IVS | CarDAQ Plus, CarDAQ M, Mongoose ISO/CAN |
| Hella Gutmann Solutions | Mega Macs 42 SE (DT VCI), Mega Macs 66 (DT66) |
| Texa | TEXA Navigator TXTs Series |
Click the below link to purchase NERS diagnostic software.
Download Purchased ECU Data File(s)
Once you have purchased ECU data file(s) and your order is completed, your ECU files can be downloaded. Please verify that you are logged in to your account before proceeding.
Purchase of ECU data enables file download access for a period of 24 hours, after which time the file will no longer appear in your list of purchased data files. Be sure to download all data files immediately following your purchase.
When you purchase a J-2534 reprogramming file, you will get a zip file containing a data file (.dat, .pdx, .xcal, .7z), a .csv or .xml file and a Reprog_readme.pdf. Please review the readme file for information on where to place the files in your PC.
Please Note that J2534-1 supports reprogramming on 1999 MY and later vehicles.
How to find the proper J-2534 Reprogramming ECU file:
In order for you to locate the proper ECU file, you will need to look up the applicable Technical Services Bulletin(TSB) for your vehicle. Instructions in the TSB will pinpoint and advise you of the ECU part # to enter below.
Download Purchased ECU Data File(s)
Once you have purchased ECU data file(s) and your order is completed, your ECU files can be downloaded. Please verify that you are logged in to your account before proceeding.
Purchase of ECU data enables file download access for a period of 24 hours, after which time the file will not longer appear in your list of purchased data files. Be sure to download all data files immediately following your purchase.
Special Note: Nissan and Infiniti
 vehicle uses a high level of security when Re/programming or Configuration is performed to the vehicle ECUs. With the release of NERS software version 04.00.01 or greater, technicians will be required to login with their Nissan
 or Infiniti
 Techinfo website user ID and password to perform Re/programming and Configuration in NERS.
Login Instruction Guide
September 2013, Nissan and Infiniti
 began the phase in of “Blank” Service Parts ECUs and TCMs. Depending upon the model and model year, replacement modules come WITHOUT software. When a replacement module is installed in an applicable vehicle for any reason, it will need to be programmed.
When you purchase a J-2534 Blank programming file, you will get a zip file containing a data file (.dat, .pdx, .xcal, .7z), a .csv or .xml file and a Reprog_readme.pdf. Please review the readme file for information on where to place the files in your PC.
How to find the proper J-2534 Blank Programming ECU file:
- Obtain the blank ECU part number when you purchase the replacement ECU. Nissan
 ’s and Infiniti
 ’s parts catalog provides both the blank ECU part number and the ROM-DATA ID part number (after programming part number) to be used. Enter this blank ECU part number in the field below.
or
- Using C-III plus software, retrieve the blank ECU part number from the new ECU. Enter this blank ECU part number in the field below.
Please note: Take care after making your selection that the listed vehicle information matches the vehicle you are programming.
- Special Note: NERS Version 03.08 or higher supports Blank RWD, 5 speed TCM programming.
Download Purchased ECU Data File(s)
Once you have purchased ECU data file(s) and your order is completed, your ECU files can be downloaded. Please verify that you are logged in to your account before proceeding.
Purchase of ECU data enables file download access for a period of 24 hours, after which time the file will not longer appear in your list of purchased data files. Be sure to download all data files immediately following your purchase.
Special Note: Nissan and Infiniti
 vehicle uses a high level of security when Re/programming or Configuration is performed to the vehicle ECUs. With the release of NERS software version 04.00.01 or greater, technicians will be required to login with their Nissan
 or Infiniti
 Techinfo website user ID and password to perform Re/programming and Configuration in NERS.
Login Instruction Guide
- J2534 Pass-Thru Programmer: TOPDON RLink J2534 is an advanced diagnostic and reprogramming tool that support all J2534 protocols, as well as D-PDU, CAN-FD and DoIP, ensuring compatibility with a wide range of modern vehicles. It offers extensive versatility with support for over 17 major automotive brands, including Chrysler, Ford, GM, Nissan
 , Toyota, Honda, Subaru, Land Rover/Jaguar, Volvo, Wuling, Volkswagen, Mercedes-Benz, and BMW, and so on, enjoy dealership-level functions at your fingertips
 - All-in-One OEM Diagnostics: This J2534 ECU programming tool elevates your automotive repair capabilities to new heights by delivering complete OEM diagnosis. Boasting comprehensive full-system diagnostics, intuitive repair guides, advanced ECU programming and coding, common reset services, a vast library of repair information and more, this all-in-one solution empowers technicians to effortlessly tackle complex vehicle issues with ease
- Proven Performance You Can Trust: Backed by over 10000 real vehicle tests and benefit from a wealth of practical experience, this OEM reprogramming tool guarantees stable and exceptional performance. Supported by TOPDON's dedicated technical experts with in-depth knowledge of both auto repair and J2534 Pass-Thru programming, the RLink J2534 provides prompt and professional assistance, ensuring a smooth setup and reliable compatibility
- Integrated Excellence, Always Up-to-Date: Featuring the exclusive RLink Platform to provide a streamlined experience with one-click driver installation and management, ensuring flawless integration with your OE software, maintaining the original performance quality. The built-in operation guide makes mastering OE software quick and easy, so you can get started right away. Plus, with lifetime free updates, your diagnostics will stay current with the latest drivers and innovations
- Efficiency Meets Versatility: Engineered to support three CAN channels simultaneously - CAN FD and CAN-CC included, giving you the edge in fast troubleshooting. To perfectly synchronized with the OE software, please diagnose with active subscriptions and make sure your computer system is running a compatible 64-bit Windows version (7, 8, 10 or later) to fully leverage the power of RLink J2534. *We don't provide extra OE software
 Scan Tool with J2534,HD Trucks Scan, Topology Map, 60+Service,Online Coding Full Function Scanner, CANFD/DoIP/D-PDU/CAN 2.0, FCA, 2 Yrs Update" title="2015-2016 NISSAN MURANO; AUTOMATIC BACK DOOR DOES NOT OPERATE AND RELATED DTCs 46">
- 【J2534 PROTOCOL WITH SMARTLINKC】 LAUNCH X431 PRO3S+ ELITE scan tool with newly upgraded smartlinkC V2.0. The SmartLinkC is a communication interface supporting J2534 specifications. Of course, it also can be used as a J2534 PassThru device, working together with the PC installed with the OEM diagnostic software to perform the J2534 protocol.J2534 protocol is the only solution for problems ranging from driveability and loss of power to poor fuel economy.
- 【INTELLIGENT TOPOLOGY MAP TO FASTER FULL SYSTEMS DIAGNOSIS】 X431 PRO3S+ELITE bidirectional scan tool with new-added intuitive topology mapping. Harnesses intuitive topology mapping for comprehensive visualization of the vehicle all system. It shows all available control units in different colors, the numbers of system, the scanned system, and the scan results, bringing maximum convenience & superfast speed for you to do swift diagnosis & high-level repairs.
- 【TOP HARDWARE CONFIGURATION, UPGRADED OF LAUNCH X431 PRO3S+】 LAUNCH X431 PRO3S+ELITE diagnostic scanner possess with Android 10.0 OS; CPU 4-Core Processor, 2.0 GHz. Greatly increased the speed of running multiple task. 2.4GHz/5GHz; 6300mAh/7.6V stronger battery capacity; 10.1 Inch Touchscreen with 8MP camera; AUTO VIN; 4GB+64GB storage memory; 20X faster transmission rate, save more vehicle documents and customer data; Supports 25+ Software Languages, such as EN, DE, FR, SP nd JP and so on.
- 【3000+ ACTIVE TEST/BI-DIRECTIONAL CONTROL LAUNCH SCANNER】 LAUNCH X431 PRO3S+ELITE HD automotive scanner is a cost-effective bidirectional scanner that deserves owned by every repairing DIYers and mechanics. You can easily send command signal at fingertips from the scanner to various module actuators to test component integrity and functionality in minutes or even seconds to tell if replacement or repair is needed.
- 【COMPLETE 60+ HOT RESETS, CALIBRATION, INITIALIZATION, RELEARN】 LAUNCH X431 PRO3S+ELITE SmartLinkC escaner automotriz professional enjoys 60+ special service, such as Oil Reset, ABS brake bleed, EPB, SAS, BMS, Suspension, Injector reset, Power Balance, Turbo Calibration, VGT, Transmission Adaption, Throttle Adaptation, matching and etc. rigorous on-site testing has been performed to ensure 100% availability.
- ALL OF THE J2534 PROTOCOLS - This single unit has all of the protocols you need for your OEM J2534 reprogramming and diagnostics including the latest in DoIP and CanFD
- J2534 TECHNICAL SUPPORT - FREE for the life of the tool. Staffed by technicians who understand vehicle repair and J2534 Pass‑thru
- TOOLBOX WITH OEM APPLICATION DESCRIPTIONS - educational video tutorials and real-time news – Giving you the confidence and up-to-date knowledge to get the job done
- J2534 v05.00 API - The newest version of J2534 to give you the latest in pass-thru technology
- FUTURE PROOF WITH 4 CAN CHANNELS - Going beyond the 3 required by select Chrysler/FCA models, CarDAQ-Plus 3 also provides a 4th to meet the needs of future OEM applications
- CUSTOM-DESIGNED FOR USE WITH FORSCAN: Works with all FORScan compatible vehicles and is recommended by the FORScan Team
- DEALERSHIP-LEVEL DIAGNOSTICS: OBDLink EX supports all Ford protocols, modules, and advanced features of FORScan
- ELECTRONIC SWITCH allows FORScan to access all CAN buses simultaneously and enables advanced functions not possible with “toggle switch” adapters
- MAXIMUM THROUGHPUT -- up to 20 times faster than “toggle switch” adapters
- ROCK-SOLID CONNECTION avoids data corruption and dropped packets
- 🌐【Works with Autel Elite II Elite MS908 MS908S Pro II MS908CV II MK908P MK908 Pro II】Autel J2534 work with these tools to program ECUs on specific BM.W/ BE.NZ for specific functions. ★★NOTE: J2534 CANNOT directly work with these single devices. After you received the J2534, you HAVE TO send us both the S/N(12 digits) of your scanner MS908S(etc.) and J2534. So, technically, Autel engineers can help you bind J2534 with your devices. If need any supports, contact us via: 🚘auteldirect @ outlook. com🚘.
- 🌐【SAE J2534-1 & J2534-2 Standards】Autel MaxiFlash Elite J2534 is a fully compliant SAE J2534-1 & SAE J2534-2 (March 2006) device, which performs standard PassThru J2534 functionality: Compatible with for Toyota Techstream, Volvo VIDA, Honda HDS, Jaguar-Land Rover IDS and BM.W 3G for OEM diagnostics. Autel MaxiFlash J2534 is also specially designed to provide users with P-C communication and ECU reprogramming capabilities on any modern vehicle diagnostic bus, reliability and flexibility.
- 🌐【High-speed Transmission Speed】Autel MaxiFlash Elite Reprogramming Device J2534 supports simultaneous communication definition in J2534-1, running 3 protocols at the same time, which greatly improves reprogramming and diagnostic speed. Embedded with the ARM9 Dual-core processor (clocked up to 500MHz), which further boosts the communicating speed to save more times and win more business.
- 🌐【Multiple Devices Connected with P-C】Autel MaxiFlash Elite J2534 also supports multiple device connections to the P-C, which can operate diagnostic and reprogramming functions on more than one vehicle at the same time. Autel MaxiFlash Elite J2534 built-in wireless and data storage, which can update via Internet. It also ensures quickly reprogramming even the newest controllers.
- 🌐【Extensive Compatibility】Autel MaxiFlash J2534 is compatible with Toyota Techstream, Volvo VIDA, Honda HDS, Jaguar-Land Rover IDS and BM.W 3G for OEM diagnostics. To check compatibility, please contact 🚘auteldirect @ outlook . com🚘 directly for satisfaction-guaranteed support!
- [J2534 COMPLIANT] - The Mastertech II is a J2534-1 and J2534-2 compliant VCI for OEM reprogramming and diagnostic applications
- [FULLY VALIDATED BY TOP 6 OEMS] - Mastertech II has been fully validated to operate with the top 6 OEM reprogramming applications: GM, Ford, FCA, Nissan/Infinity, Honda/Acura, and Toyota/Lexus
- [PRE-CONFIGURED] - The pre-configured wireless and wired connections make it quick and easy to connect to a vehicle from your PC (requires PC compliant with OE specifications and software)
- [RIGHT TO REPAIR] - Supports 'Right to Repair' (R2R) initiatives
- [COMPREHENSIVE KIT] - Kit includes: VCI, WiFi adapters (wireless PC to VCI), J1962 Cable (connect to vehicle), USB cable (connect to PC for firmware updates and setup), and Quick Start Guide
Last update on 2025-05-08 / Affiliate links / Images from Amazon Product Advertising API
This product presentation was made with AAWP plugin.
