| “This site contains affiliate links for which OEMDTC may be compensated” |
| Classification: | Reference: | Date: |
| BR02-003 | NTB02-080 | July 24, 2002 |
2001-02 FRONTIER/XTERRA ABS WARNING LIGHT DIMLY LIT
| APPLIED VEHICLES: | 2001-02 Frontier (D22) – KA24DE engine, 2WD ONLY 2001-02 Xterra (WD22) – KA24DE engine, 2WD ONLY |
| APPLIED DATES: | Frontier: Vehicles built before 1N6MD27Y42C369200 Xterra: Vehicles built before 5N1MD28Y22C578500 |
| APPLIED VIN: | Frontier & Xterra: Vehicles built before May 1, 2002 |
SERVICE INFORMATION
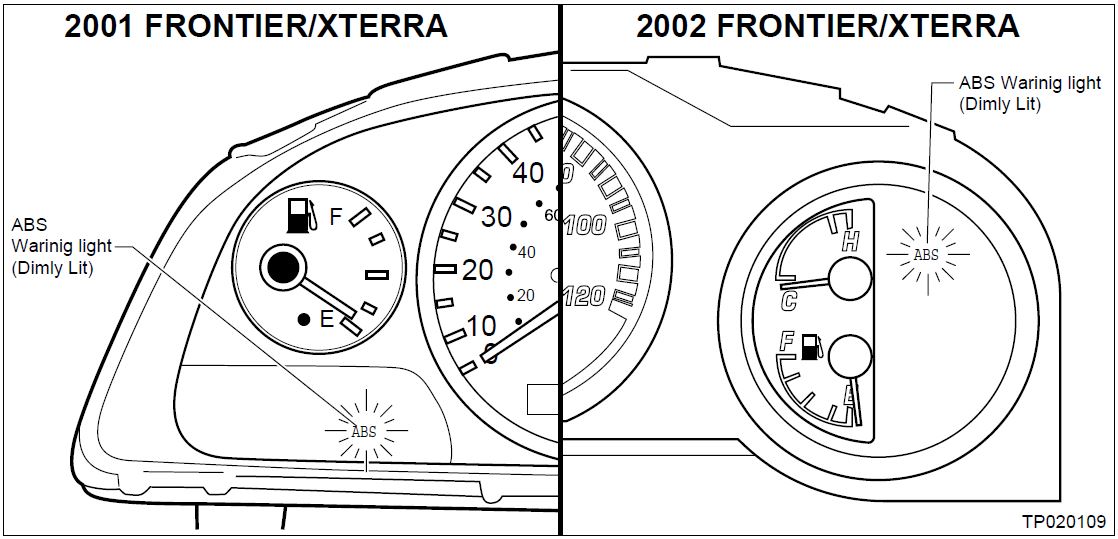
If an applied vehicle has an Anti-Lock Brake System (ABS) warning light (see Figure 1) that is dimly lit when:
Perform the Service Procedure on page 2.
Figure 1
NOTE: The vehicle may have to be in a shaded area to see the dimly lit ABS warning light.
SERVICE PROCEDURE
NOTE: Use suitable covers to protect carpet, upholstery, etc. during the following procedure.
- Perform the Self Diagnosis procedure in the BR section of the applicable Service Manual to check for stored ABS-related DTC(s).
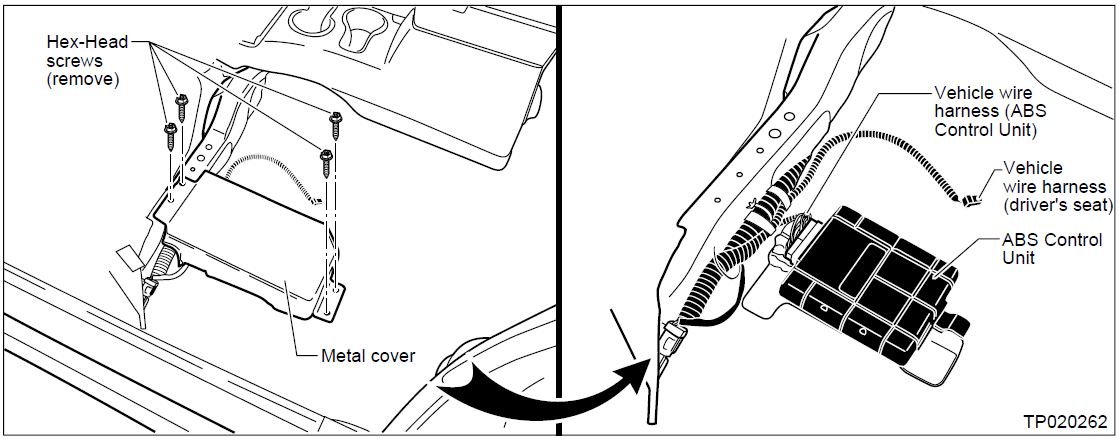
- Locate the ABS control unit under the drivers seat, as follows:
- Remove the four bolts that secure the driver’s seat to the vehicle floor.
- Carefully lift up the front of the seat and disconnect the vehicle wire harness from the bottom seat cushion connector.
- Carefully remove the seat from the vehicle and place it in a clean, safe location.
- Remove four screws and remove the metal cover (covering the ABS control unit).See Figure 1a below.
Figure 1a Figure 1b
- Replace the ABS control unit, with the one listed in the Parts Information section, as follows:
- Record all radio station pre-sets.
- Turn the ignition switch to the OFF
- Disconnect the negative cable from the battery.
- Disconnect the vehicle wire harness from the ABS Control Unit (See Figure 1b).
- Remove the old ABS control unit.
- Install the new ABS control unit. Make sure the vehicle wire harness connector is fully seated and snapped in place on the control unit connector.
- Re-install the metal cover, making sure it does not press against (pinch) the vehicle wire harnesses.
- Re-install the driver’s seat, making sure:
- The vehicle wire harness is re-connected to the bottom seat cushion connector • The four seat mounting bolts are tightened to 43-55 N-m (4.4-5.6 Kg-m, 32-41 ft-lbs).
- Re-connect the negative cable to the battery. Tighten the cable clamp nut to 35 in-lbs.
- Re-program all radio station pre-sets and re-set the clock (if applicable).
- Make sure the ABS warning light illuminates with the ignition key in the “ON” position (engine OFF). Then, test drive the vehicle to make sure the ABS warning light stays “OFF”.
PARTS INFORMATION
| DESCRIPTION | PART NUMBER | QUANTITY |
|---|---|---|
| Module Assembly, Antiskid | 47850-8Z400 | 1 |
CLAIMS INFORMATION
Submit a Primary Failed Part (PP) line claim using the following claims coding:
| DESCRIPTION | PFP | OP CODE | SYM | DIA | FRT |
|---|---|---|---|---|---|
| RPL ABS Module Assy | 47850-8Z400 | PN26AA | ZE | 32 | (1) |
- Reference the current Nissan
 Flat Rate Manual and use the indicated FRT.
 Loading...
Price Disclaimer


