
SERVICE BULLETIN
| Classification: | Reference: | Date: |
|---|---|---|
| EL15-006g | NTB15-049g | March 21, 2016 |
TELEMATICS SERVICE INFORMATION
| This bulletin has been amended. The service information and procedures have been revised. Please discard previous versions of this bulletin. |
| APPLIED VEHICLES: | 2016 Altima (L33) – SL Edition with Technology Package |
|---|---|
| 2016 Maxima (A36) – Platinum Edition | |
| 2016 Rogue (T32) – SL Edition | |
| 2016 Sentra (B17) – SR and SL Edition with Technology Package | |
| 2016 Titan XD (A61) – SL and Platinum Edition, Pro-4X with Convenience Package |
SERVICE INFORMATION
The Applied Vehicles are equipped with a wireless communication device called a Telematics Communication Unit (TCU). With an active NissanConnectSM Services subscription, the TCU communicates with the NissanConnectSM Services Data Center to provide various security and convenience services.
This bulletin contains important service procedures that must be performed properly in order to set-up and maintain the telematics system for the Applied Vehicles.
Service procedures in this bulletin:
- Turning ON the TCU During PDI (Pre-Delivery Inspection) – Page 2
- When a TCU Needs To Be Replaced – Page 8
NOTE: If the “Turning ON the TCU During PDI” procedure is not followed correctly, the vehicle cannot the be used in Dealer Demo mode or enrolled in NissanConnectSM Services. Should this occur, the “Turning ON the TCU During PDI” process will need to be performed again.
Turning ON the TCU During PDI
For TCU replacement instructions, refer to page 8.
NOTE: In most instances, the TCU is OFF when delivered to the dealership and will need to be turned ON during PDI.
- With the ignition ON, check whether or not the green LED on the SOS button is illuminated (see Figure 1a).
NOTE: It may be difficult to tell if the green LED is illuminated if the vehicle is outside in bright sunlight.
- If the green LED is illuminated, the process to turn ON the TCU is complete and no further action is needed.
- If the green LED is not illuminated, proceed to step 2.
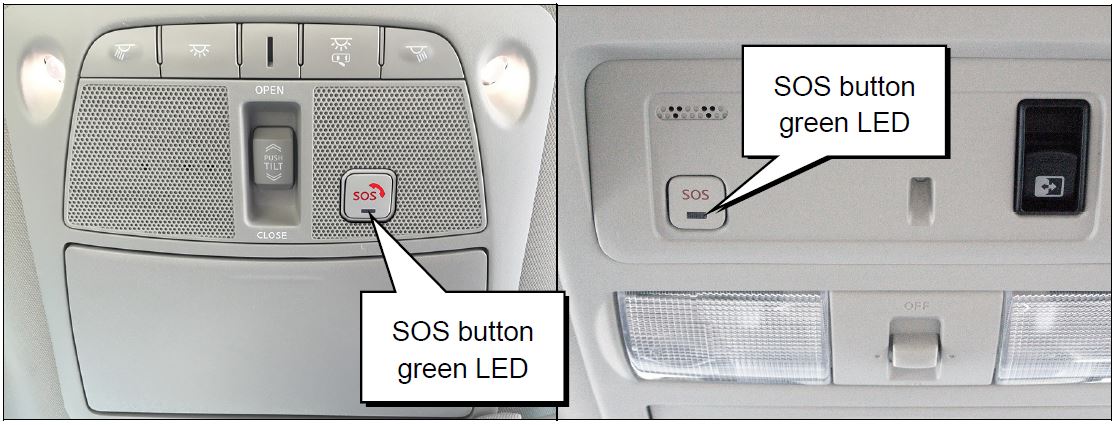
Figure 1a
- Place the vehicle in non-shipping mode (extended storage switch pushed IN).
a. Open the driver’s door and leave it open.
b. With the battery connected and ignition OFF, remove the fuse panel located to the left of the steering wheel.
c. Push the white extended storage switch IN.
d. Turn the ignition ON.
e. Turn the ignition OFF.
f. Wait at least 2 seconds, and then turn the ignition ON.
g. Make sure the extended storage warning message is not displayed in the combination meter/display.
- Connect the C-III plus VI to the vehicle.
- Set the parking brake and confirm the ignition is ON.
- Launch C-III plus on the CONSULT PC.
- Select Diagnosis (One System).
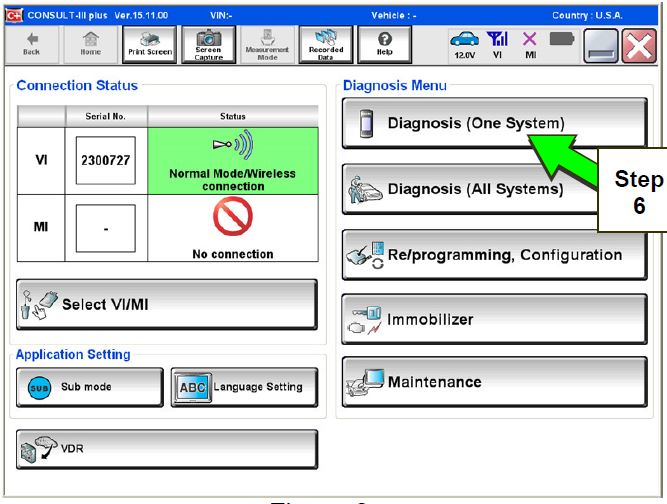
Figure 2a
- Select Telematics on page 2 of the all systems list.
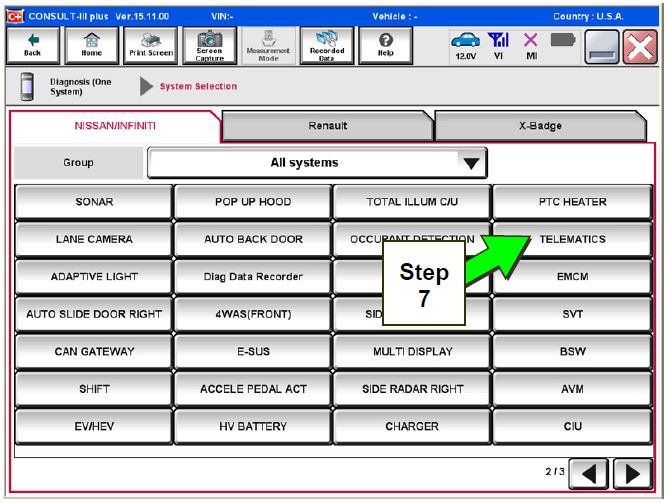
Figure 3a
- Select Work Support.
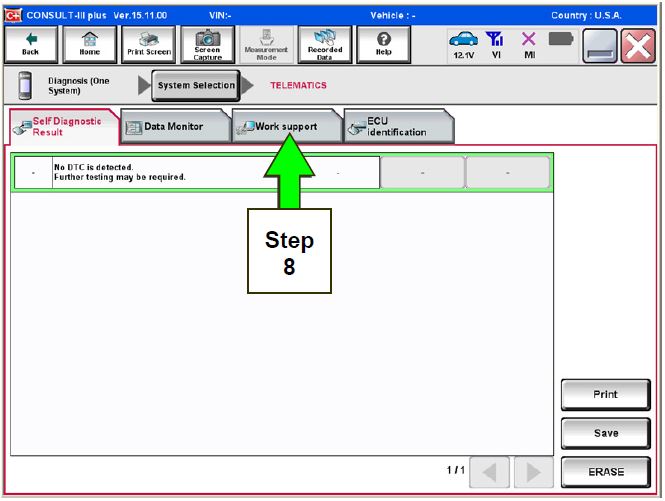
Figure 4a
- Select TCU ACTIVATE SETTING.
- Select Start.
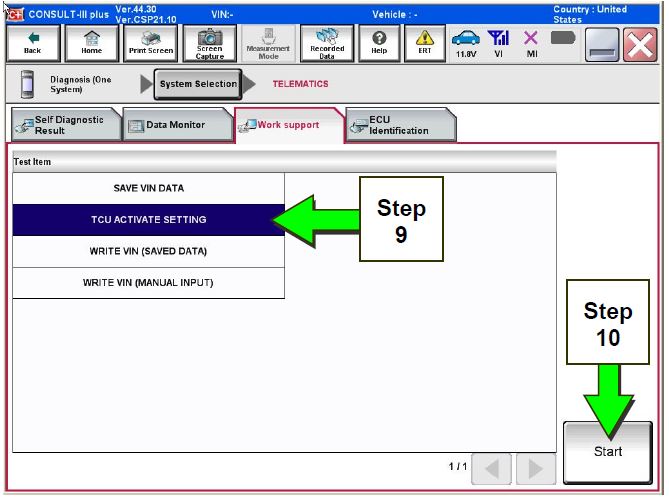
Figure 5a
- Select Start.
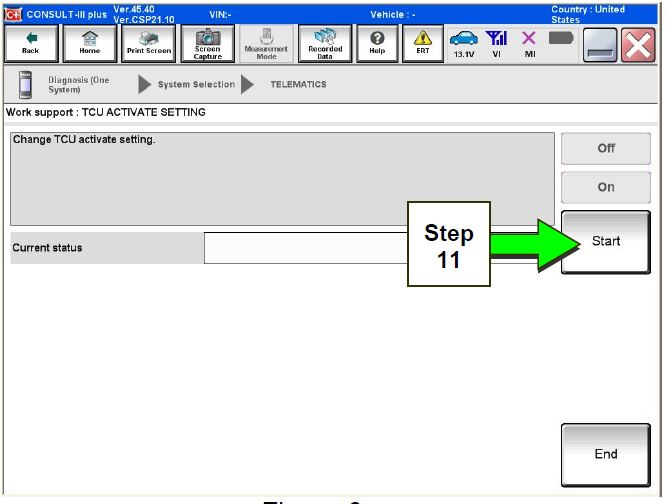
Figure 6a
- Select ON to turn ON the TCU.
- Select END.
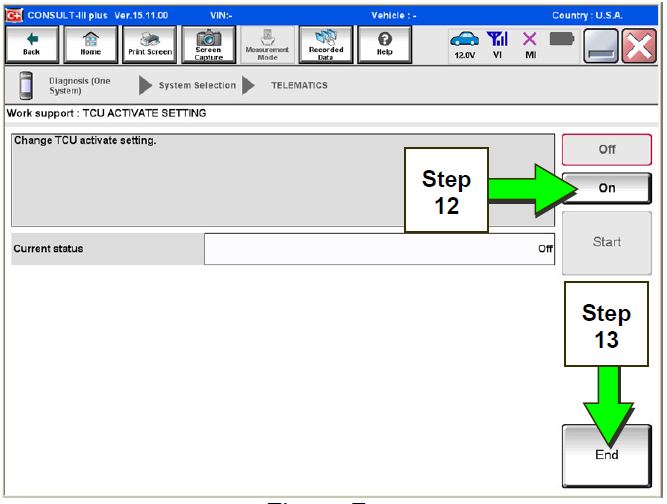
Figure 7a
- Select Start.
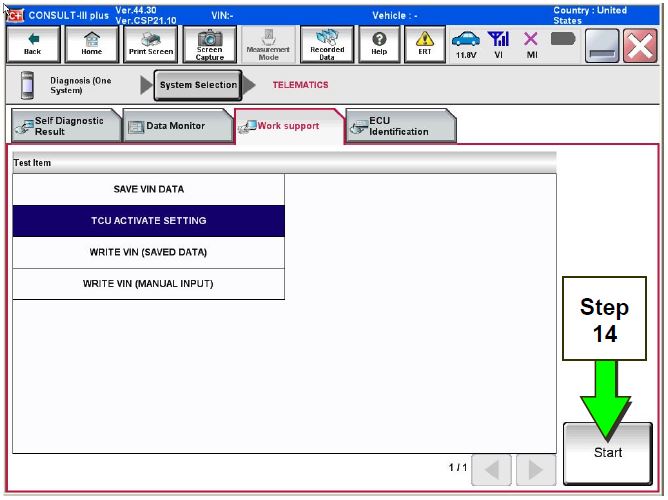
Figure 8a
- Confirm “On” is displayed in the Current status field.
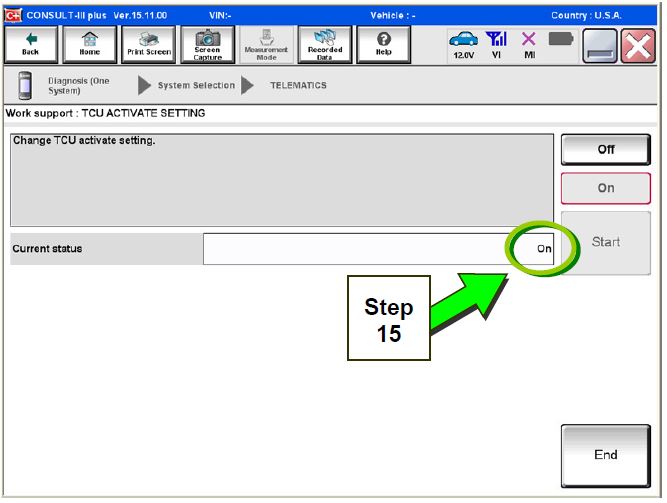
Figure 9a
- Check for TCU cellular reception.
NOTE: It may take up to 3 minutes for the vehicle icon to turn white after the ignition is turned ON.
Check TCU cellular reception – Maxima:

If vehicle icon is white, vehicle has cellular reception.

If vehicle icon is gray and has a red slash through it, move the vehicle to a different location with good reception.
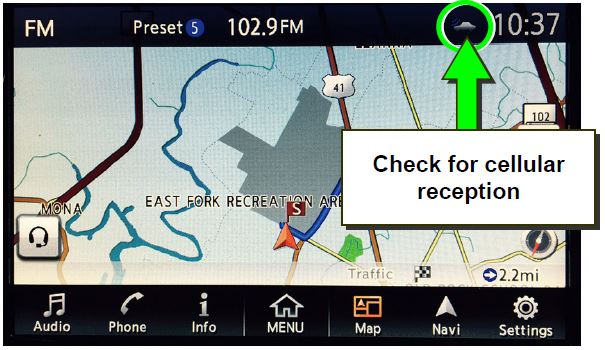
Figure 10a
Check TCU cellular reception – Altima, Rogue, Sentra, and Titan:

If vehicle icon does not have a white slash through it, vehicle has cellular reception.

If vehicle icon does have a white slash through it, move the vehicle to a different location with good reception.
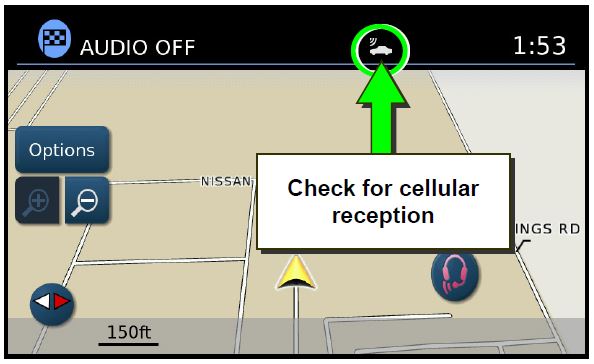
Figure 11a
- Press the Voice Menu button (headset icon) on the Map Screen to initiate a call.
- If the voice menu is heard, proceed to step 18.
- If the voice menu is not heard, call SXM support at 1-844-631-2928.
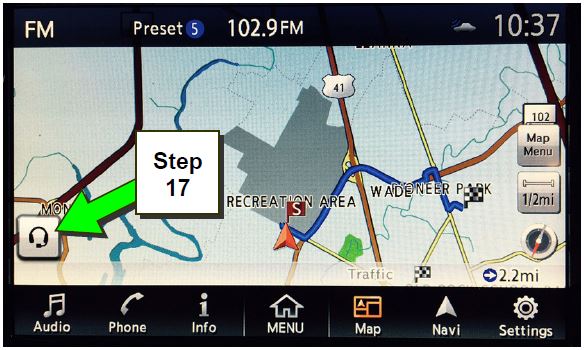
Figure 12a
- End the call by pressing Stop.
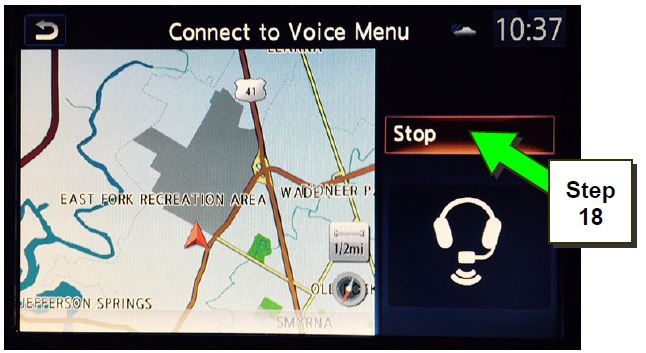
Figure 13a
- Turn the ignition OFF.
- Pull OUT the extended storage switch to return the vehicle to shipping mode.
NOTE:
- Before delivery, make sure the vehicle is in non-shipping mode (extended storage switch pushed IN). The customer will not be able to enroll in NissanConnectSM Services if the vehicle is in shipping mode.
- If the “Turning ON the TCU During PDI” procedure is not followed correctly, the vehicle cannot the be used in Dealer Demo mode or enrolled in NissanConnectSM Should this occur, the “Turning ON the TCU During PDI” process will need to be performed again.
When a TCU Needs To Be Replaced
NOTE:
- For Altima, Maxima, and Titan vehicles ONLY: You MUST have ALL customer keys before beginning this procedure.
- Each TCU is registered to a specific Vehicle Identification Number (VIN). TCUs cannot be “swapped” between vehicles. Once a TCU is registered to a vehicle, the TCU cannot be used in another vehicle.
- The VIN MUST be written to the replacement TCU after installation.
- The replacement TCU must come from Nissan North America parts supply.
- Connect the C-III plus VI to the vehicle.
- Set the parking brake.
- Turn the ignition ON.
- Launch C-III plus on the CONSULT PC.
- Select Diagnosis (One System).
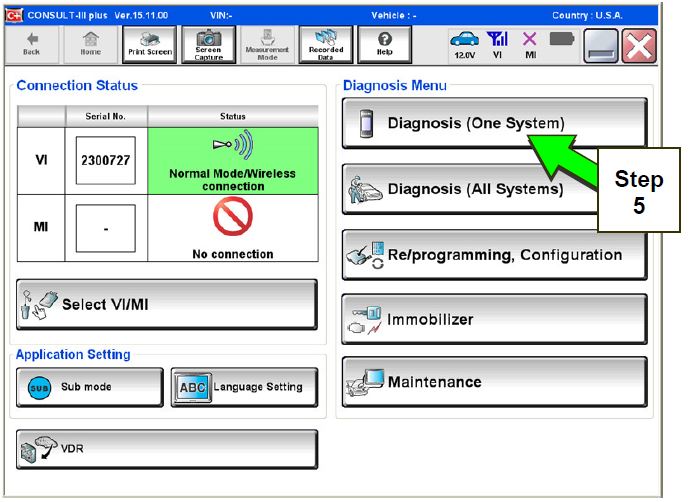
Figure 1b
- Select Telematics on page 2 of the all systems list.
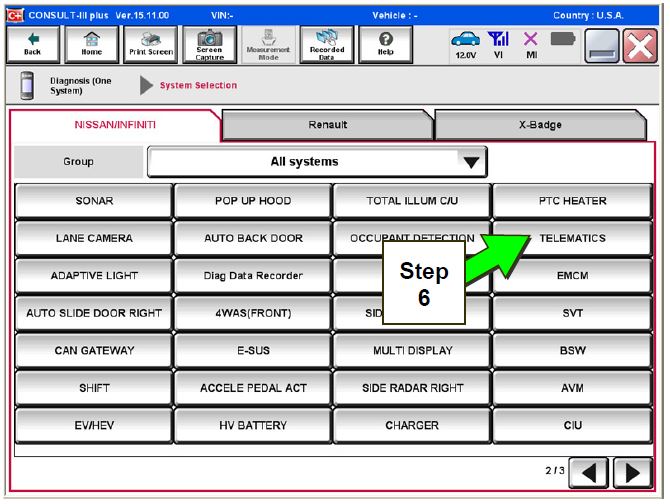
Figure 2b
- Select Work Support.
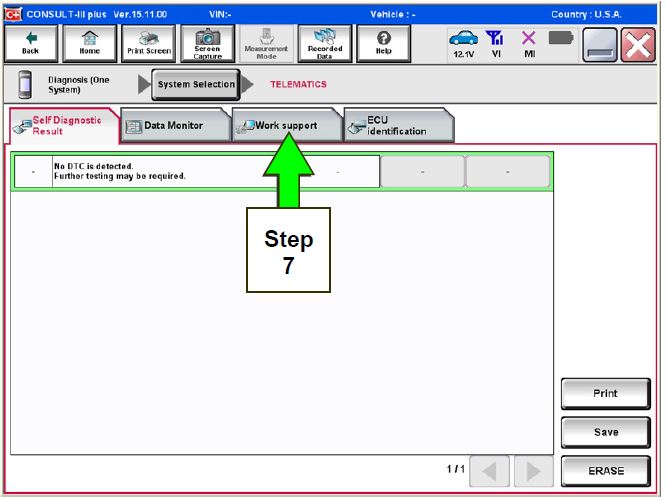
Figure 3b
- Select TCU ACTIVATE SETTING.
- Select Start.
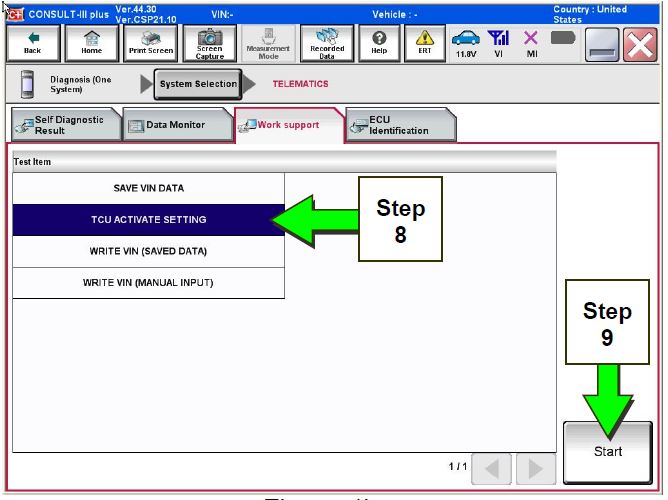
Figure 4b
- Select Start.
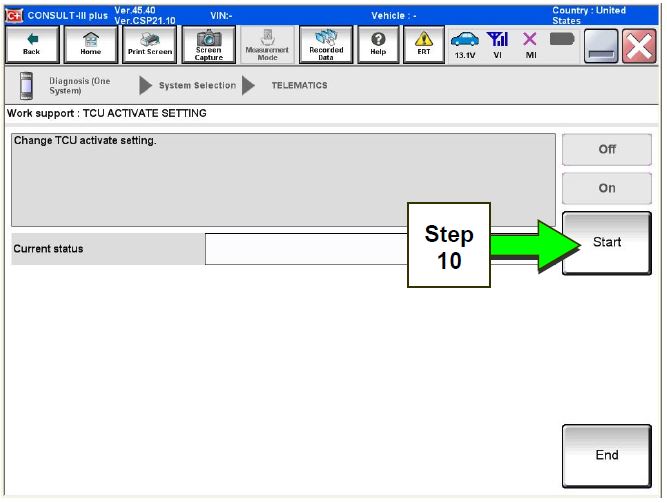
Figure 5b
- Select Off to turn OFF the TCU.
- Select END.
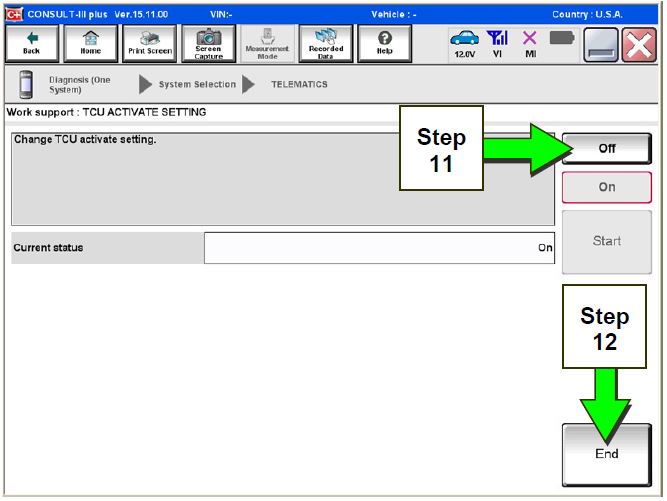
Figure 6b
- Select SAVE VIN DATA.
- Select Start.
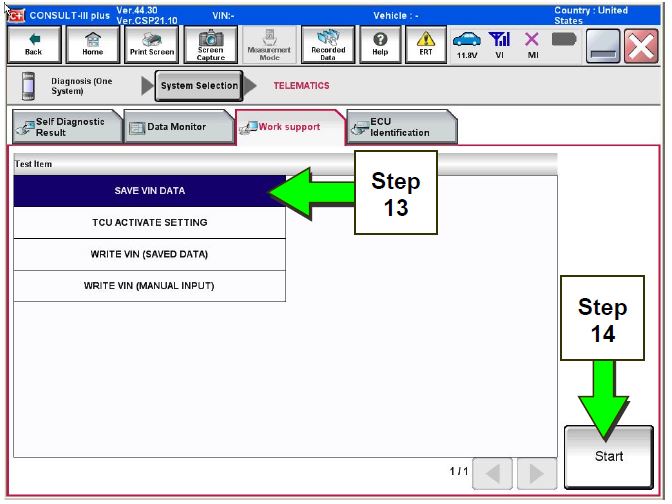
Figure 7b
- Select Start.
NOTE: If the VIN data cannot be saved, you will have to manually enter the VIN later in this procedure.
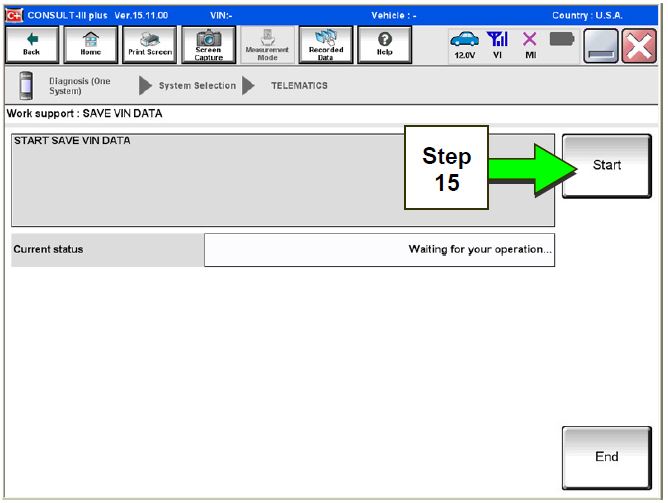
Figure 8b
- Select End.
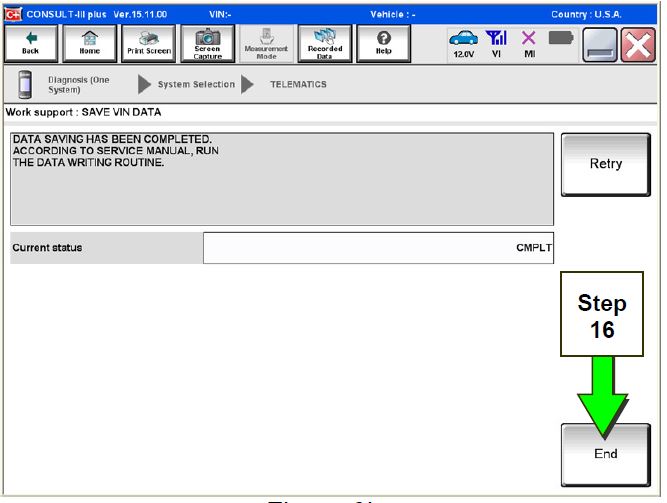
Figure 9b
- Remove the TCU from the vehicle.
- Refer to the Electronic Service Manual (ESM), section AV–Audio, Visual & Navigation System, for removal information.
Step 18 must be performed AFTER the original TCU is removed from the vehicle and BEFORE the replacement TCU is installed.
- Write down the following information:
a) VIN
b) International Mobile Equipment Identity Number (IMEI) of the original TCU. This number is located on the TCU.
c) IMEI Number of the replacement TCU. This number is located on the TCU.
d) Serial Number of the replacement TCU. This number is located on the TCU.
LABEL ON TCU
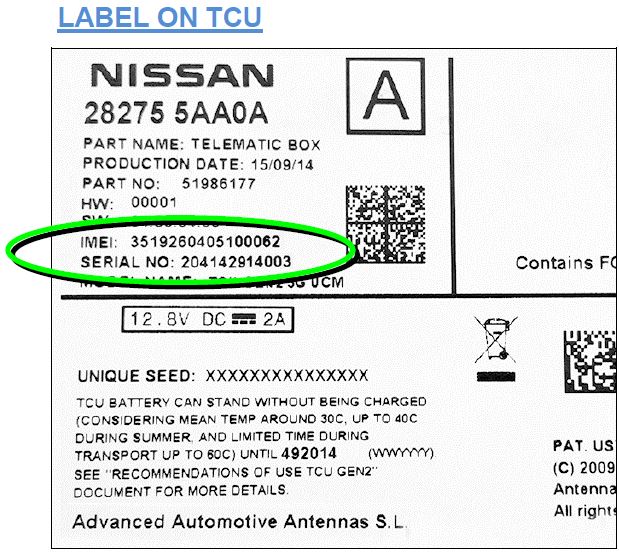
Figure 10b
- Install the replacement TCU into the vehicle.
- Refer to the ESM, section AV–Audio, Visual & Navigation System, for installation information.
- Perform steps 1-7, beginning on page 8, to access Work Support.
- Select WRITE VIN (SAVED DATA).
NOTE: If VIN DATA could not be saved in step 15, proceed to Manually Enter VIN Data (if needed) on page 19.
- Select Start.
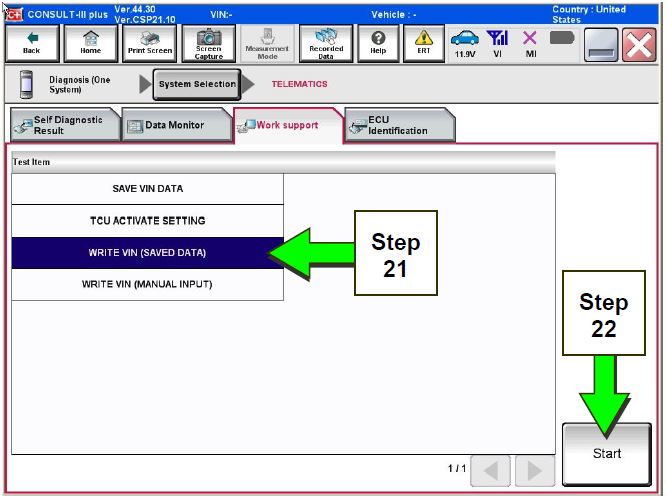
Figure 11b
- Select Start.
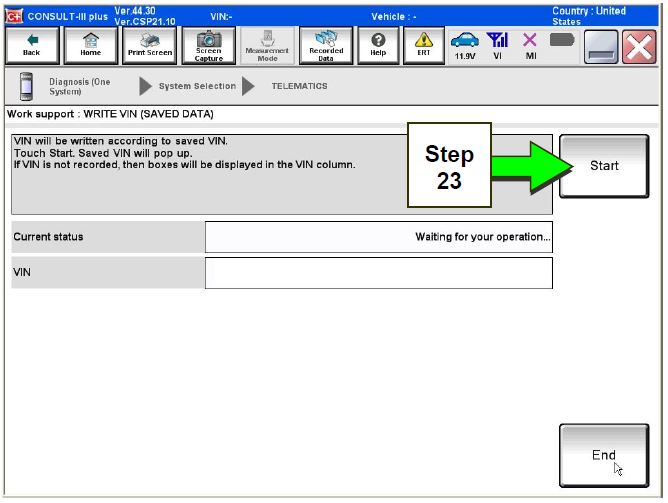
Figure 12b
- Select End.
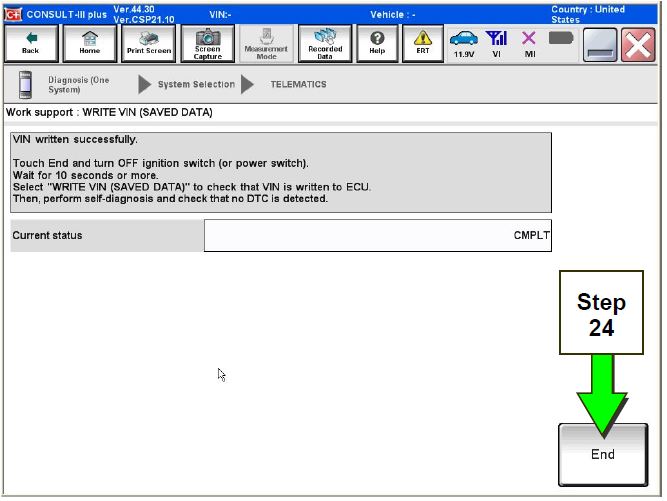
Figure 13b
- For Altima, Maxima, and Titan vehicles ONLY: Perform Intelligent Key registration for all customer keys.
NOTE: The Remote Engine Start and Stolen Vehicle Locator features (if so equipped) of NissanConnectSM Services will not function if Intelligent Key registration is not completed.
Step 26 must be performed AFTER all customer Intelligent Keys have been registered (step 25, Altima, Maxima, and Titan vehicles ONLY).
- Call SiriusXM at 1-844-631-2928. (Hours of operation are listed below.)
During this call:
- You will be asked for your name, dealership name, and all of the information collected in step 18.
- The Call Center agent will de-register the original TCU and register the replacement TCU.
- Wait for the SiriusXM Call Center agent to call back, confirming TCU registration.
- This step may take 1-2 hours.
- TCU registration does not enroll the customer in NissanConnectSM Services.
NOTE: The TCU will not be able to communicate with the NissanConnectSM Services Data Center if step 26 and 27, above, are not completed.
SiriusXM Call Center – Hours of Operation (Eastern Time Zone)
Monday thru Friday: 8 A.M. – 11 P.M.
Saturday: 8 A.M. – 8 P.M.
Holidays: 8 A.M. – 8 P.M.
Step 28 must be performed AFTER the SiriusXM Call Center agent has called back, confirming TCU registration (see step 27, on the previous page).
- Turn ON the TCU.
a. Connect the C-III plus VI to the vehicle.
b. Set the parking brake and confirm the ignition is ON.
c. Launch C-III plus on the CONSULT PC.
d. Select Diagnosis (One System).
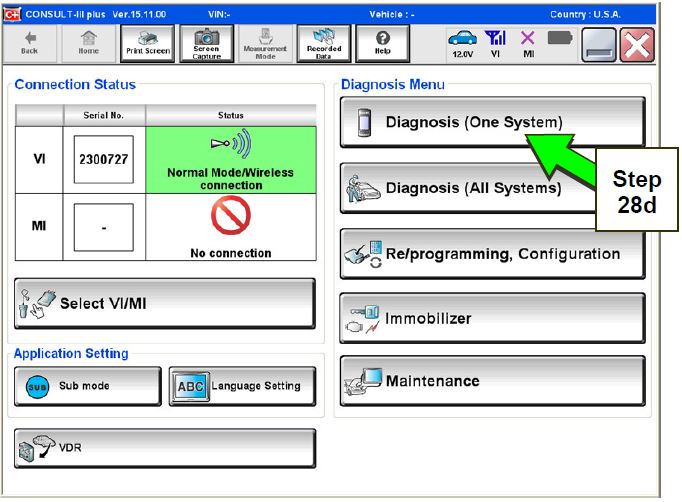
Figure 14b
e. Select Telematics on page 2 of the all systems list.
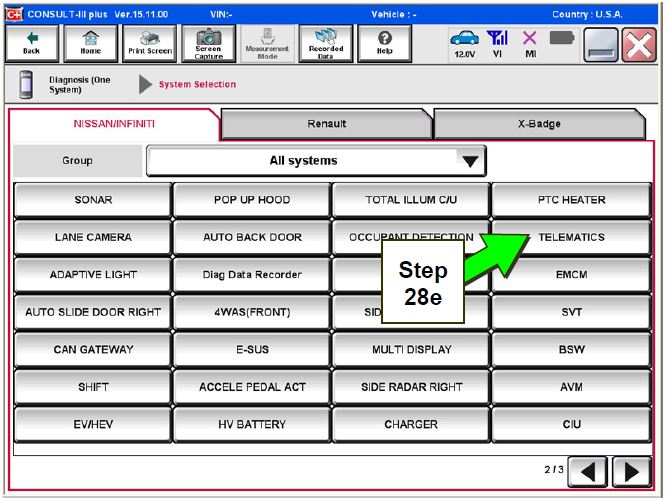
Figure 15b
f. Select Work Support.
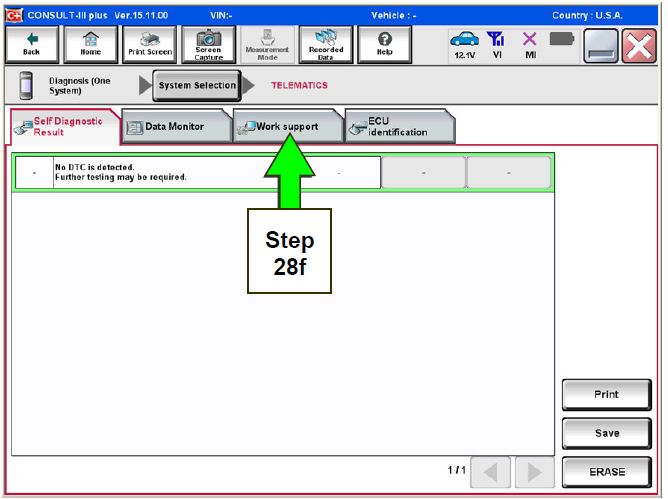
Figure 16b
g. Select TCU ACTIVATE SETTING.
h. Select Start.
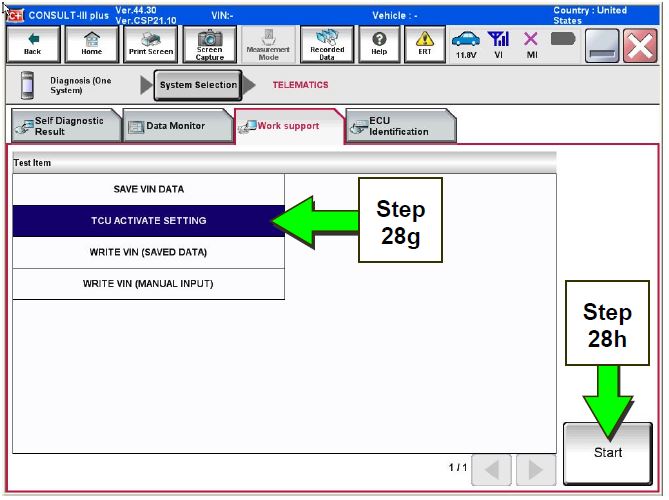
Figure 17b
i. Select Start.
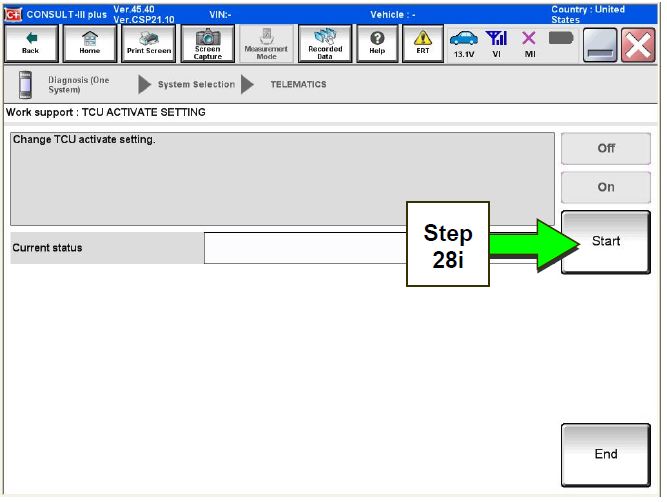
Figure 18b
j. Select ON to turn ON the TCU.
k. Select END.
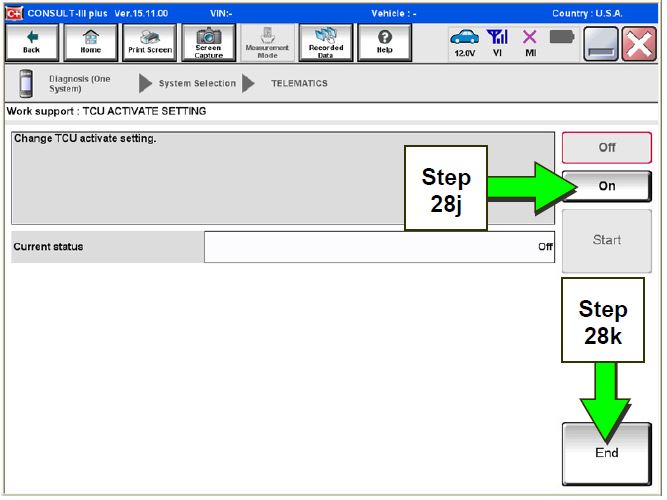
Figure 19b
l. Select Start.
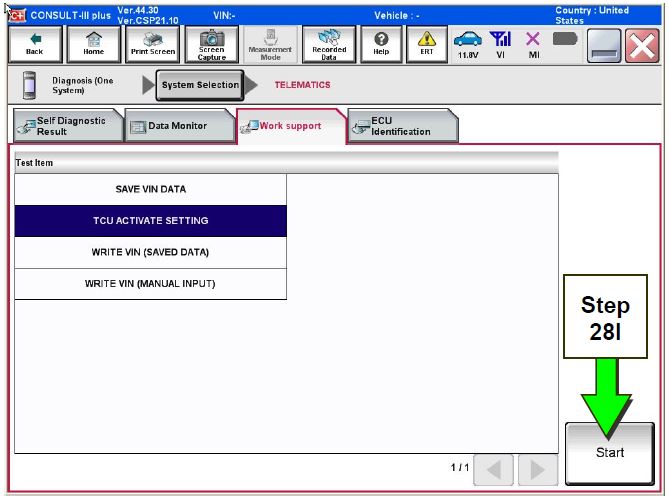
Figure 20b
m. Confirm “On” is displayed in the Current status
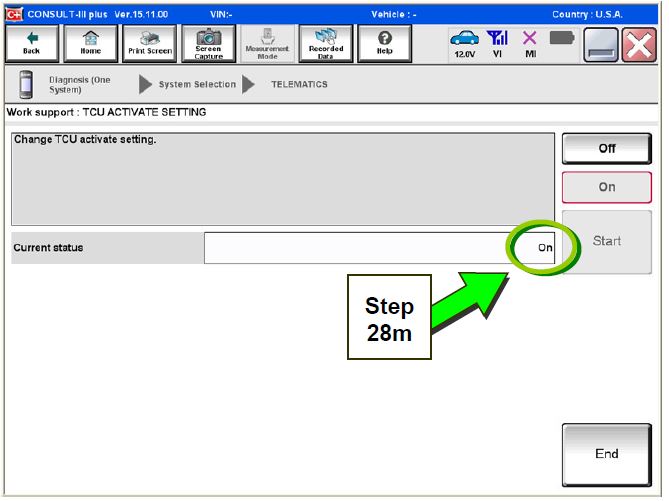
Figure 21b
- Check for TCU cellular reception.
NOTE: It may take up to 3 minutes for the vehicle icon to turn white after the ignition is turned ON.
Check TCU cellular reception – Maxima:
If vehicle icon is white, vehicle has cellular reception.
If vehicle icon is gray and has a red slash through it, move the vehicle to a different location with good reception.
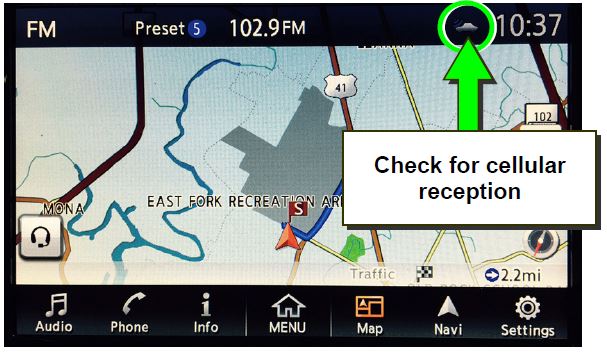
Figure 22b
Check TCU cellular reception – Altima, Rogue, Sentra, and Titan:
If vehicle icon does not have a white slash through it, vehicle has cellular reception.
If vehicle icon does have a white slash through it, move the vehicle to a different location with good reception.
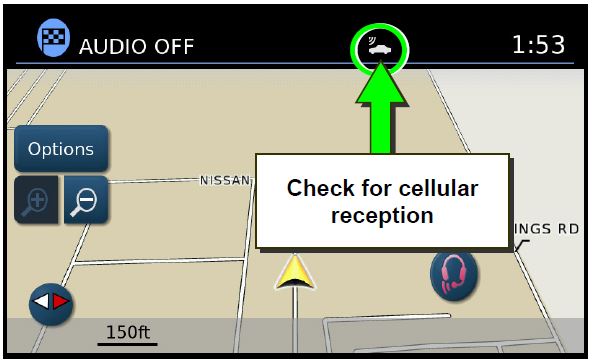
Figure 23b
- Press the Voice Menu button (headset icon) on the Map Screen to initiate a call.
- If the voice menu is heard, proceed to step 31.
- If the voice menu is not heard, call SiriusXM support at 1-844-631-2928.
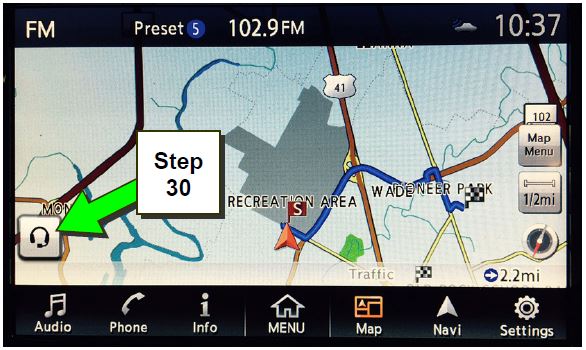
Figure 24b
- End the call by pressing Stop.
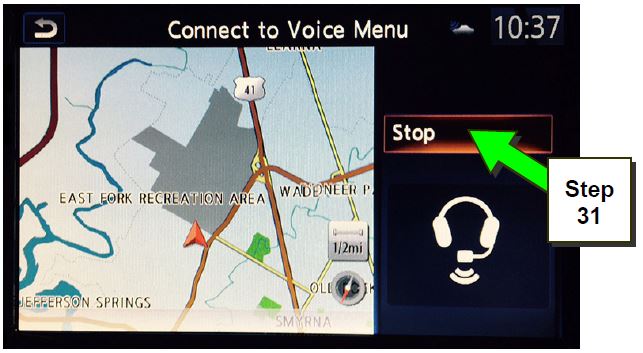
Figure 25b
- Turn the ignition OFF.
Manually Enter VIN Data
(If step 15 on page 10 was unsuccessful)
- Select WRITE VIN (MANUAL INPUT).
- Select Start.
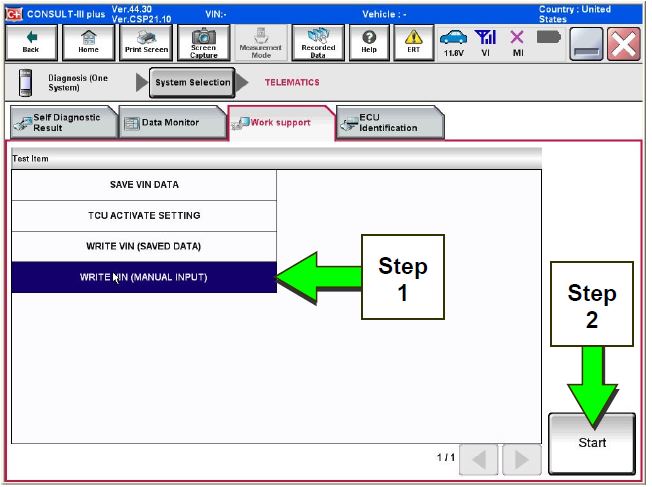
Figure 1c
- Enter the VIN.
a) Touch the VIN (1ST TIME) input field and type in the VIN.
b) Touch the VIN (2ND TIME) input field and type in the VIN again.
c) Select Start.
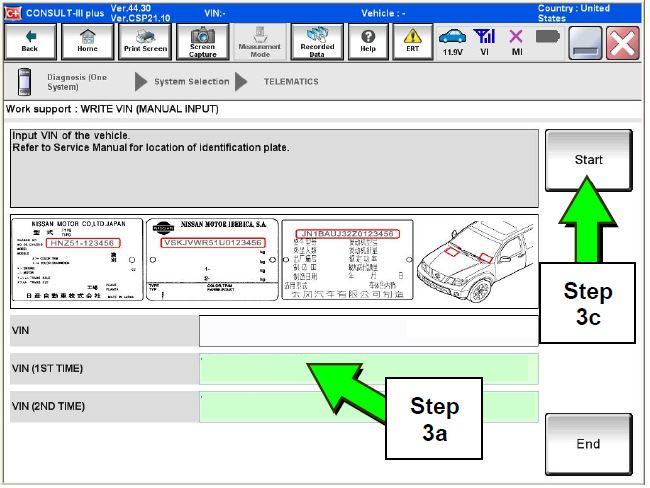
Figure 2c
- Select End.
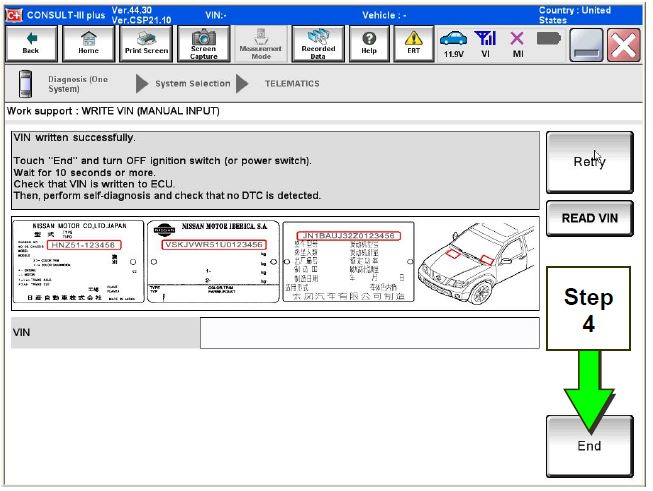
Figure 3c
- Perform steps 25-29, beginning on page 13.
NTB15-049g

- J2534 Pass-Thru Programmer: TOPDON RLink J2534 is an advanced diagnostic and reprogramming tool that support all J2534 protocols, as well as D-PDU, CAN-FD and DoIP, ensuring compatibility with a wide range of modern vehicles. It offers extensive versatility with support for over 18 major automotive brands, including Chrysler, Ford, GM, Nissan, Toyota, Honda, Subaru, Land Rover/Jaguar, Volvo, Wuling, Volkswagen/Audi, Mercedes-Benz, and BMW. NOTE: Not compatible with Ford IDS diagnostic software
- All-in-One OEM Diagnostics: This J2534 ECU programming tool elevates your automotive repair capabilities to new heights by delivering complete OEM diagnosis. Boasting comprehensive full-system diagnostics, intuitive repair guides, advanced ECU programming and coding, common reset services, a vast library of repair information and more, this all-in-one solution empowers technicians to effortlessly tackle complex vehicle issues with ease. *Not compatible with 24V vehicles
- Proven Performance You Can Trust: Backed by over 10000 real vehicle tests and benefit from a wealth of practical experience, this OEM reprogramming tool guarantees stable and exceptional performance. Supported by TOPDON's dedicated technical experts with in-depth knowledge of both auto repair and J2534 Pass-Thru programming, the RLink J2534 provides prompt and professional assistance, ensuring a smooth setup and reliable compatibility
- Integrated Excellence, Always Up-to-Date: Featuring the exclusive RLink Platform to provide a streamlined experience with one-click driver installation and management, ensuring flawless integration with your OE software, maintaining the original performance quality. The built-in operation guide makes mastering OE software quick and easy, so you can get started right away. Plus, with lifetime free updates, your diagnostics will stay current with the latest drivers and innovations
- Efficiency Meets Versatility: Engineered to support three CAN channels simultaneously - CAN FD and CAN-CC included, giving you the edge in fast troubleshooting. To perfectly synchronized with the OE software, please diagnose with active subscriptions and make sure your computer system is running a compatible 64-bit Windows version (7, 8, 10 or later) to fully leverage the power of RLink J2534. *We don't provide extra OE software
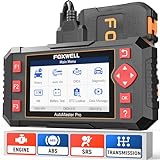
- [Easy to Use—Work Out of the Box] + [FOXWELL 2026 New Version] FOXWELL NT604 Elite scan tool is the 2026 new version from FOXWELL, designed for car owners who want to figure out the cause of issues before fixing car problems by scanning common systems like ABS, SRS, engine, and transmission. The NT604 Elite obd2 scanner diagnostic tool comes with the latest software—no need to waste time downloading software first. Plug the scanner into the OBDII port with OBDII cable to start the diagnosis.
- [Affordable] + [Reliable Car Health Monitor] Will you be confused what happens when the warning light of ABS/SRS/transmission/check engine flashes? Instead of taking your cars to dealership, this FOXWELL scanner will help you do a thorough scanning and detection for your cars and pinpoint the root cause. Note:The device is a diagnostic tool, not a repair tool. To turn off a warning light, you must first physically repair the issue causing it. Only then can the scanner be used to clear the corresponding fault code.
- [5 in 1 Car Diagnostic Scanner] Compared with obd scanners (50-100), NT604 Elite code scanner not only includes their OBDII diagnosis but also serves as ABS/SRS scanner, transmission and check engine code reader. When it’s an odb2 scanner, you can use it to check if your car is ready for annual test through I/M readiness menu. In addition, live data stream, built-in DTC library, data play back and print, all these features are a big plus for it. Note: doesn't support maintenance functions like reset or relearn. For the SRS system, NT604 Elite can read and clear common fault codes not caused by a crash, but crash/collision data cannot be cleared.
- [Fantastic AUTOVIN] + [No extra software fee] Through the AUTOVIN menu, this NT604 Elite car scanner allows you to get your V-IN and vehicle info rapidly, no need to take time to find your V-IN and input one by one. What's more, the NT604 Elite ABS SRS scanner supports 60+ car brands from worldwide (America/Asia/Europe). You don’t need to pay extra software fee. AUTOVIN may not work on some older vehicles or certain vehicle brands. If AUTOVIN fails, please input the vin code manually or go to the Diagnostic Menu to select your vehicle model.
- [Solid protective case KO plastic carrying bag] + [Lifetime update] Almost all same price-level car scanner diagnostic tool only offers plastic bag to hold the scanner.However, NT604 Elite automotive scanner is equipped with solid protective case, preventing your obd2 scanner from damage. Then you don’t need to pay extra money to buy a solid toolbox.

- CEL Doctor: The ANCEL AD310 is one of the best-selling OBD II scanners on the market and is recommended by Scotty Kilmer, a YouTuber and auto mechanic. It can easily determine the cause of the check engine light coming on. After repairing the vehicle's problems, it can quickly read and clear diagnostic trouble codes of emission system, read live data & hard memory data, view freeze frame, I/M monitor readiness and collect vehicle information
- Sturdy and Compact: Equipped with a 2.5 foot cable made of very thick, flexible insulation. It is important to have a sturdy scanner as it can easily fall to the ground when working in a car. The AD310 OBD2 scanner is a well-constructed mechanic tool with a sleek design. It weighs 12 ounces and measures 8.9 x 6.9 x 1.4 inches. Thanks to its compact design and light weight, transporting the device is not a problem. The buttons are clearly labelled and the screen is large and displays results clearly
- Accurate Fast and Easy to Use: The AD310 scanner can help you or your mechanic understand if your car is in good condition, provides exceptionally accurate and fast results, reads and clears engine trouble emission codes in seconds after you fixed the problem. This device will let you know immediately and fix the problem right away without any car knowledge. No need for batteries or a charger, get power directly from the OBDII Data Link Connector in your vehicle
- OBDII Protocols and Car Compatibility: Many cheap scan tools do not really support all OBD2 protocols. AD310 scanner as it can support all OBDII protocols such as KWP2000, J1850 VPW, ISO9141, J1850 PWM and CAN. This device also has extensive vehicle compatibility with 1996 US-based, 2000 EU-based and Asian cars, light trucks, SUVs, as well as newer OBD2 and CAN vehicles both domestic and foreign. Pls confirm with our customer service whether it is compatible with your vehicle before purchasing
- Home Necessity and Worthy to Own: This is an excellent code reader to travel or home with as it weighs less and it is compact in design. You can easily slide it in your backpack as you head to the garage, or put it on the dashboard, this will be a great fit for you. The AD310 is not only portable, but also accurate and fast in performance. Moreover, it covers various car brands and is suitable for people who just need a code reader to check their car

- 2026 Advanced ECU Coding Scan Tool: Maximize the capabilities of your vehicles with the ArtiDiag Pro. This scan tool, seamlessly compatible with renowned models such as VW, A-U-D-I, SKODA, SEAT, BENZ, and more, empowers you to uncover hidden features, deactivate annoying functions, and code retrofitted components for peak performance. Ensure a backup before coding and steer clear of problems on low battery levels.
- Efficient Diagnostics with Bidirectional Control: Say goodbye to uncertainty, streamline diagnostics, and reclaim valuable time with ArtiDiag Pro scan tool. This bidirectional scan tool exceeds expectations, enabling targeted tests on individual actuators to swiftly identify and resolve issues. Covering lights, door locks, fuel and coolant systems, windows, wipers, EVAP, and more in vehicle components.
- 35+ Services Resolve 90% of Repair Challenges: Unleash maximum productivity with the ArtiDiag Pro, a scan tool that tackles 90% of maintenance issues through its 35 special functions. Effortlessly clear oil maintenance indicators with oil reset. Engage the EPB Reset for brake system management and establish precise alignment with the Steering Angle Reset to define the straight-line reference position for your vehicle.
- FCA Autoauth : This diagnostic tool supports Autoauth for FCA SGW/Renault, Chrysler, Jeep, Dodge, Fiat etc. 2017 and later. NOTE: Due to Product Upgrade, there is no Chrysler 12+8 adapter, the BMW-20 Adapter in the package any more. We are sincerely sorry for the inconvenience. NOTE: Please confirm compatibility before purchase.(Topdon Website>Support>Vehicle Coverage)
- Professional Customer Support: At TOPDON, your satisfaction is our unwavering commitment. Experience hassle-free support and a lifetime of expert assistance. Should you encounter any challenges, reach out to us at 833-629-4832. For returns, please damage the packaging to prevent Amazon from reselling it. Please be advised that after two years, a subscription fee of 249 Bucks will apply.
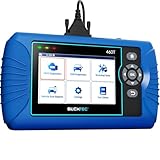
- [All System Diagnostics, Professional-Level Scanner] - BLCKTEC 460T is the ultimate OBD2 diagnostic tool for home mechanics and professionals. It supports all 10 OBD2 modes, reads and clears Engine/Transmission/ABS/SRS codes, performs All-System Diagnostics, offers workshop reset tools, and provides real-time live data. It helps you pinpoint issues, assess your car's condition, and prepare for SMOG checks with ease. NOTE: Function availability depends on your vehicle. Before you buy, be sure to use the Compatibility Checker on BLCKTEC website or contact our customer support to verify that the features you need are supported for your vehicle’s specific year, make, and model.
- [12+ Most Popular Reset Functions] - BLCKTEC 460T OBD2 scanner offers 12+ dealer-level service functions, including Oil Maintenance Reset, ABS Bleeding, EPB Reset, SAS(Steering Angle Sensor) Recalibration, DPF(Diesel Particulate Filter) Reset, Throttle Body Relearn, Battery Reset/Initialization, TPMS Relearn, Transmission Reset, Fluid Change Reset, Maintenance Reset and more, enabling you to perform workshop services like a pro. NOTE: Function availability depends on your vehicle. Be sure to use the Compatibility Checker on BLCKTEC website to verify that the features you need are supported for your vehicle.
- [Real-Time OBD2 and OEM Live Data, Freeze Frame Data] - BLCKTEC 460T helps diagnose vehicle issues when warning lights like Check Engine Light or ABS/SRS Light appear. It offers detailed DTC info, ECU Freeze Frame Data, and real-time OBD2 and advanced OEM live data, including Engine, Transmission, ABS, SRS, and more, making it easy to diagnose and resolve vehicle problems. You can view, graph, record, replay, and overlay up to four live data streams in a single graph for better analysis.
- [AutoVIN, AutoReLink, AutoScan, 3X Faster] - Equipped with AutoVIN technology, 460T automatically retrieves the VIN to save you time. Its AutoScan and AutoReLink features scan all of the vehicle's ECUs and detect any fault codes immediately after you plug the scanner into the vehicle's OBD2 port - no button presses required. Additionally, it regathers DTC and I/M readiness information every 30 seconds, simplifying monitor tests. 460T's advanced technology makes it 3X faster than other products.
- [Get RepairSolutions2, the #1 Auto Repair App for Free] - When paired with RepairSolutions2(RS2) App, 460T becomes even more powerful. RS2's Verified Fix Database built by master technicians, provides the parts needed for the repair. Additionally, RS2 gives you access to OEM warranty info, maintenance schedules, TSB, and dealership recall info, making car care easier than ever. RS2 is free with no subscription fees and it stores your car scan reports in the cloud, allowing you to access, share, or print them anytime and anywhere.
This product presentation was made with AAWP plugin.