| “This site contains affiliate links for which OEMDTC may be compensated” |
NISSAN
BULLETIN
ECM Reprogram Dealer Service Action
Reference: PC479
Date: August 16, 2016
Attention: Dealer Principal, Sales, Service & Parts Managers
| Affected Models/Years: | Affected Population: | Dealer Inventory: | SERVICE COMM Activation date: |
|---|---|---|---|
| MY16 Frontier (D40) | NA | 103 | August 16, 2016 |
*****Dealer Announcement*****
Nissan is conducting a dealer inventory service action to update Electronic Control Module (ECM) software on 103 specific 2016 Frontier vehicles identified in Service Comm. The incorrect ECM ROM (Read Only Memory) data was installed on the affected vehicles.
These vehicles are either currently in dealer inventory or assigned and in transit to the dealer.
Vehicles are not subject to stop sale. Nissan requests dealers to complete this software update prior to sale to ensure customer satisfaction.
*****What Dealers Should Do*****
PLEASE FOLLOW THE ATTACHED REPAIR INSTRUCTIONS:
- Verify if vehicles currently in new dealer inventory are affected by this service action using Service Comm D.PC479.
- New vehicles in dealer inventory can be also be identified using DCS (Sales-> Vehicle Inventory, and filter by Open Campaign). Please continue to check newly arriving inventory for campaign applicability. § Refer to NPSB 15-460 for additional information
- Use the attached procedure to install the updated software.
- The service department should submit the applicable warranty claim for the action performed so it can be closed on Service Comm and release the vehicle.
***** Dealer Responsibility *****
It is the dealer’s responsibility to check Service Comm using the appropriate campaign I.D for the inspection status on each affected vehicle currently in new vehicle inventory. Nissan requests dealers to perform this repair on new vehicles in inventory prior to being retailed to ensure customer satisfaction.
NISSAN NORTH AMERICA, INC.
Aftersales DIVISION
PC479
Frontier (D40) ECM OBD Software Update
ECM Reprogramming Procedure
- Vehicles Conditioning for ECM Reprogramming
- Engine coolant temperature: 70 – 100°C (158 – 212°F)
- Battery voltage: More than 12.9V (At idle)
- Transmission: Warmed up
NOTE:
- After reprogramming is complete, you will be required to perform Throttle Valve Closed Position, Idle Air Volume Learn (IAVL), Accelerator Closed Position, and DTC erase.
- The above conditions are required for the IAVL to complete.
- Connect the plus Vehicle Interface (plus VI) to the vehicle.
- Make sure to use the correct VI for C-III plus (plus VI).
CAUTION: Make sure the plus VI is securly connected. If the plus VI connection is loose during reprogramming, the process will be interrupted and the ECM may be damaged.
- Connect the AC Adapter to the CONSULT PC.
CAUTION: Be sure to connect the AC Adapter. If the CONSULT PC battery voltage drops during reprogramming, the process will be interrupted and the ECM may be damaged.
- Connect a battery charger to the vehicle battery:
For Conventional Vehicles
- Set the battery charger at a low charge rate.
NOTE: The GR-8 (Battery and Electrical Diagnostic Station) set to “Power Supply” mode is recommended.
CAUTION: Be sure the battery charger is connected securely to the battery. Make sure the battery voltage stays between 12.0V and 15.5V during reprogramming. If the battery voltage goes out of this range during reprogramming, the ECM may be damaged.
- Turn off all external Bluetooth® devices (e.g., cell phones, printers, etc.) within range of the CONSULT PC and the VI.
CAUTION: Make sure to turn off all external Bluetooth® devices. If Bluetooth® signal waves are within range of the CONSULT PC and the VI during reprogramming, reprogramming may be interrupted, and the ECM may be damaged.
- Turn the ignition ON with the engine OFF or “not ready”.
- The engine must not start or run during the reprogramming procedure.
- Turn OFF all vehicle electrical loads such as exterior lights, interior lights, HVAC, blower, rear defogger, audio, NAVI, seat heater, steering wheel heater, etc.
IMPORTANT: Make sure to turn OFF all vehicle electrical loads. Make sure the battery voltage stays between 12.0V and 15.5V during reprogramming. If the battery voltage goes out of this range during reprogramming, the ECM may be damaged.
- Turn ON the CONSULT PC.
- Select CONSULT-III plus (open C-III plus).
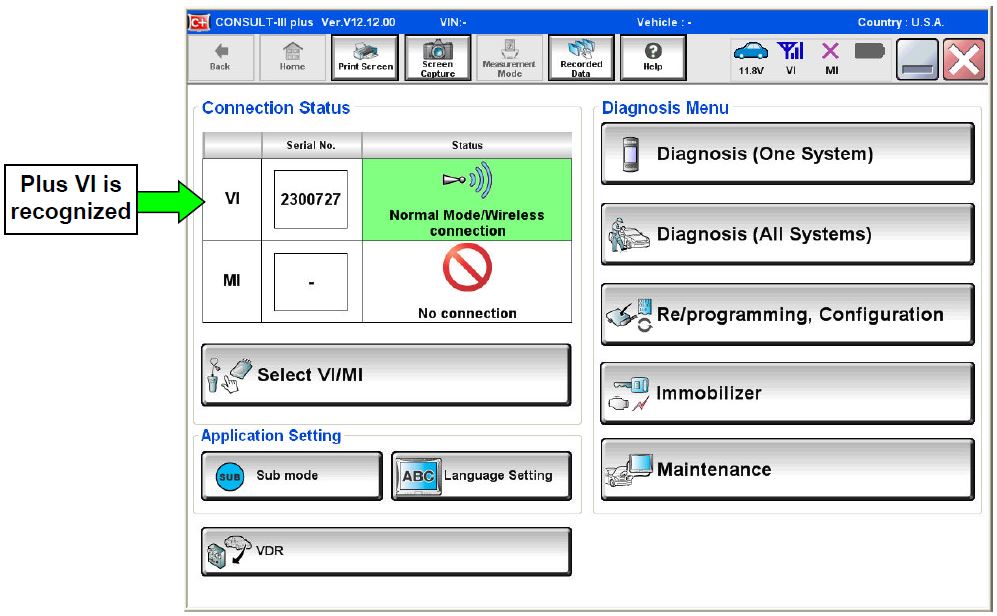
- Wait for the plus VI to be recognized / connected.
- Serial number will display when the plus VI is recognized / connected.
Figure 1
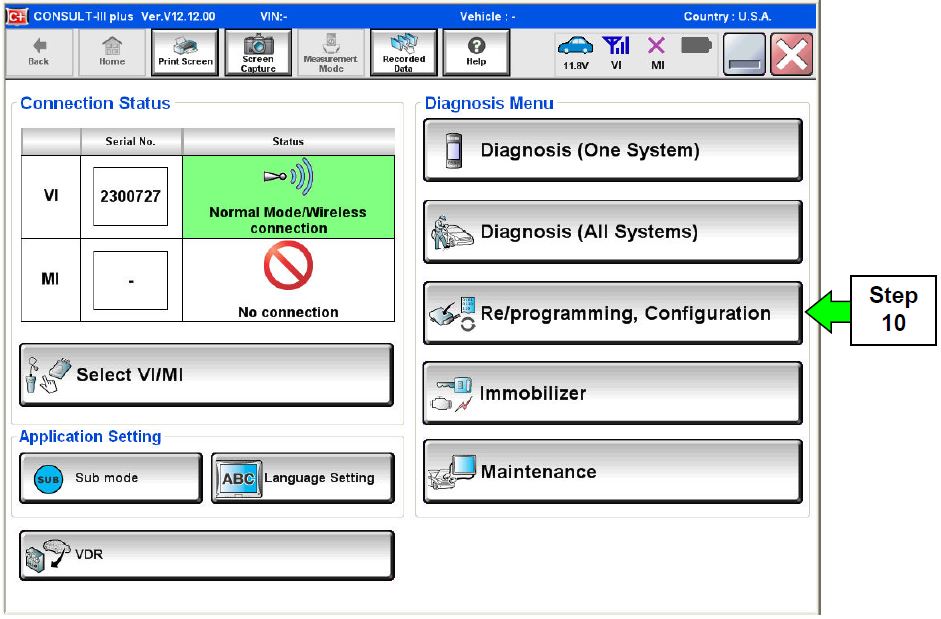
- Select Re/programming, Configuration.
Figure 2
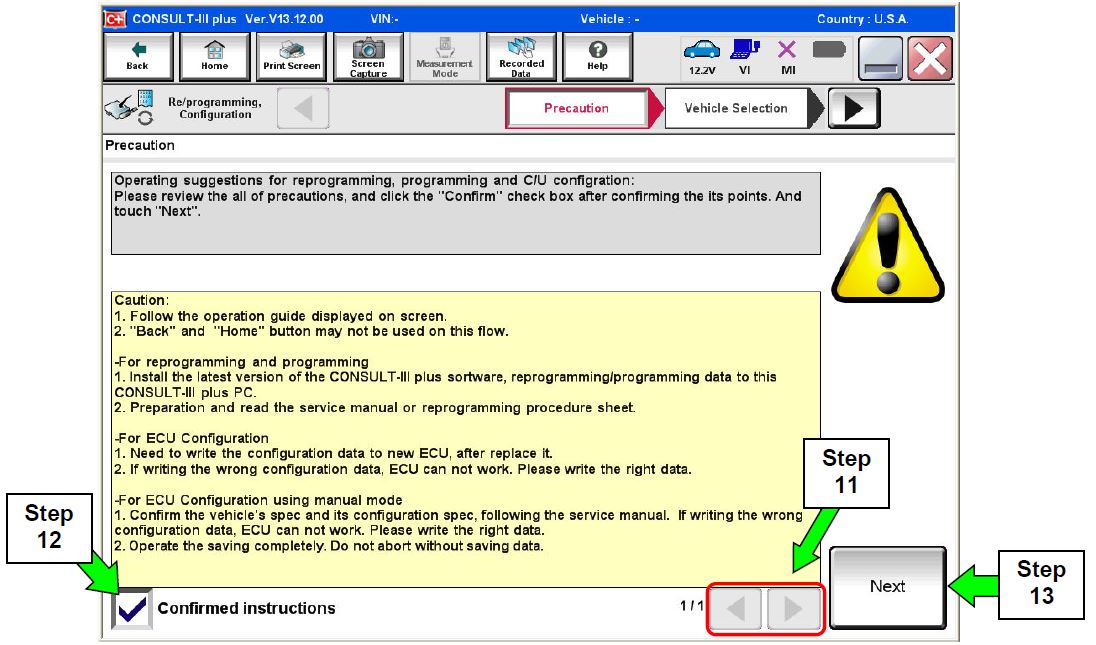
- Use arrows (if needed) to view and read all precautions.
- Check the box confirming the precautions have been read.
- Select Next.
Figure 3
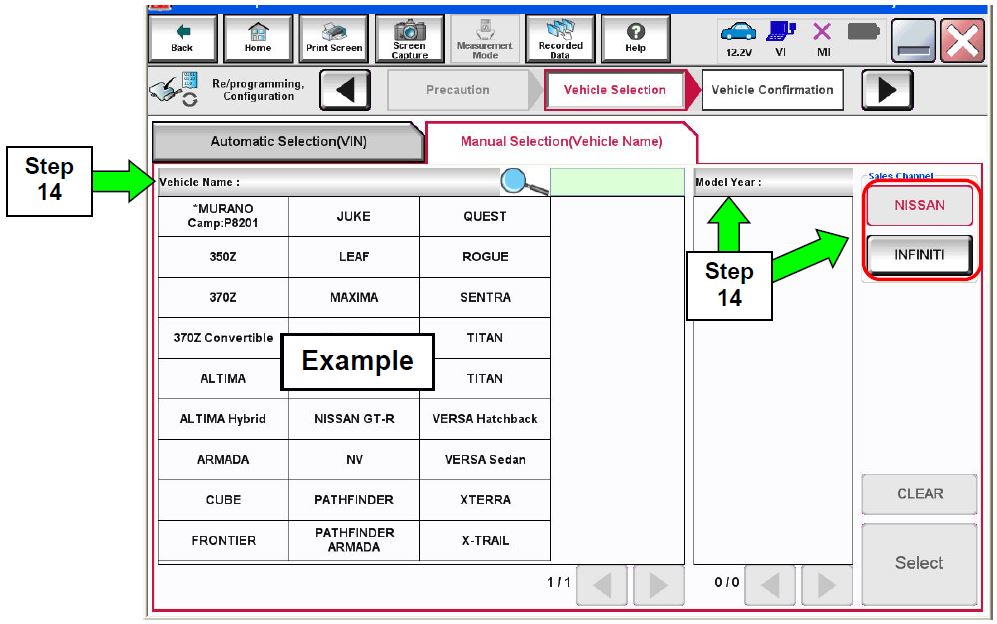
- Select Nissan
 , Vehicle Name, and then the correct Model Year.
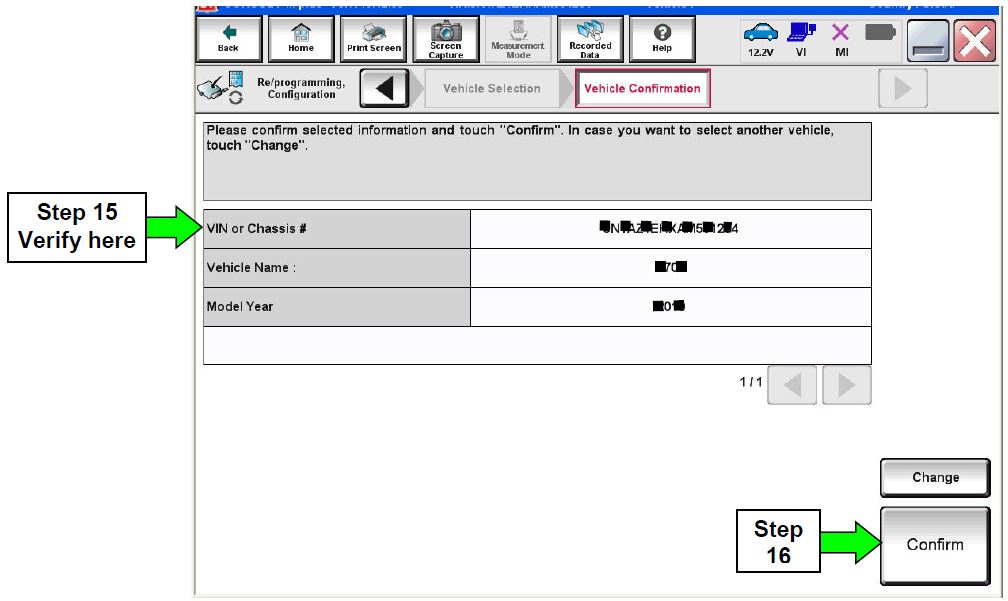
- If the screen in Figure 4 does not display, skip to step 15.
Figure 4
- Make sure VIN or Chassis # matches the vehicle’s VIN.
- If the correct VIN is displayed, select Confirm.
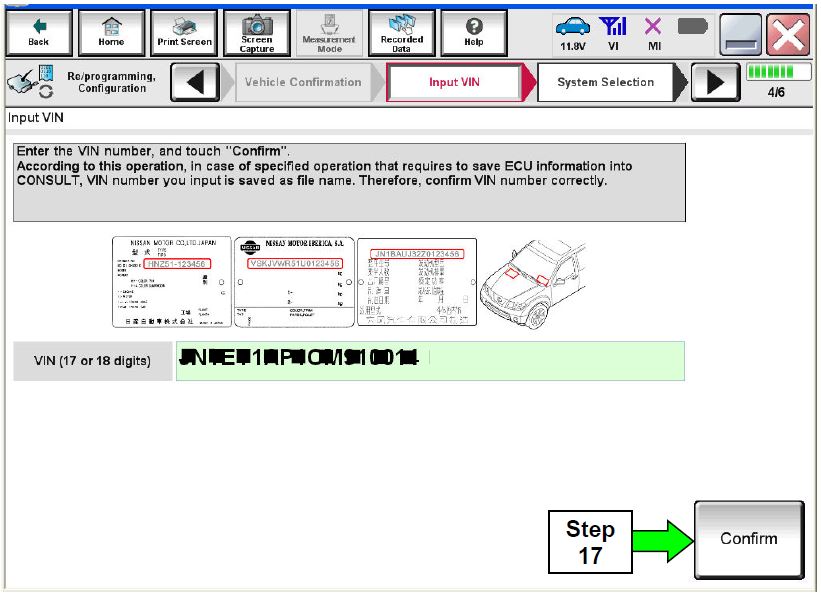
Figure 5
- Select Confirm.
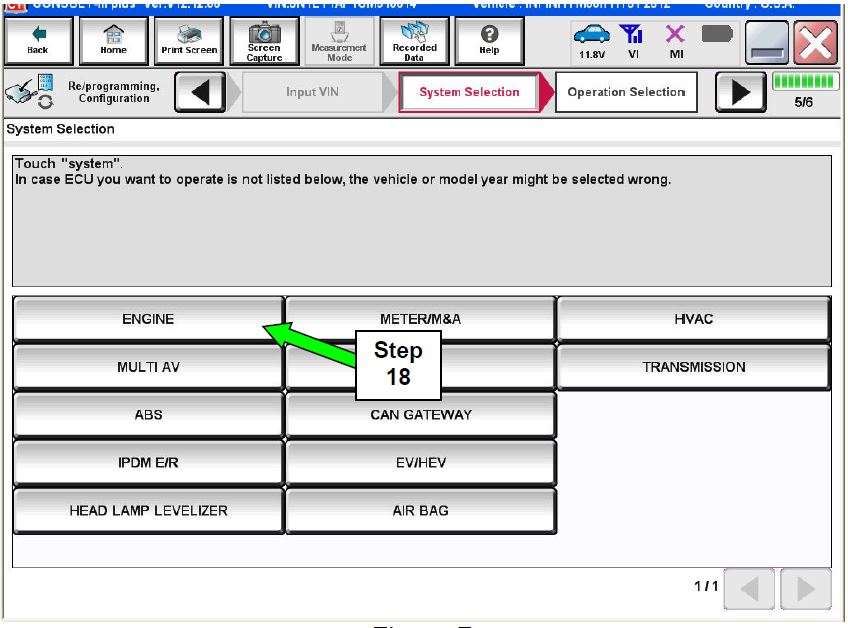
Figure 6
- Select ENGINE.
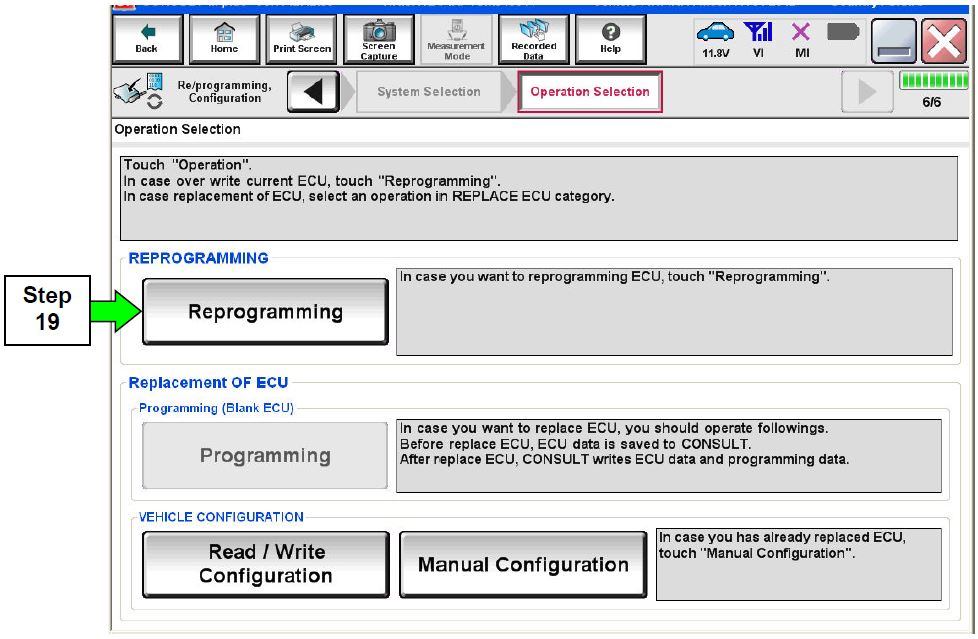
Figure 7
- Select Reprogramming.
Figure 8
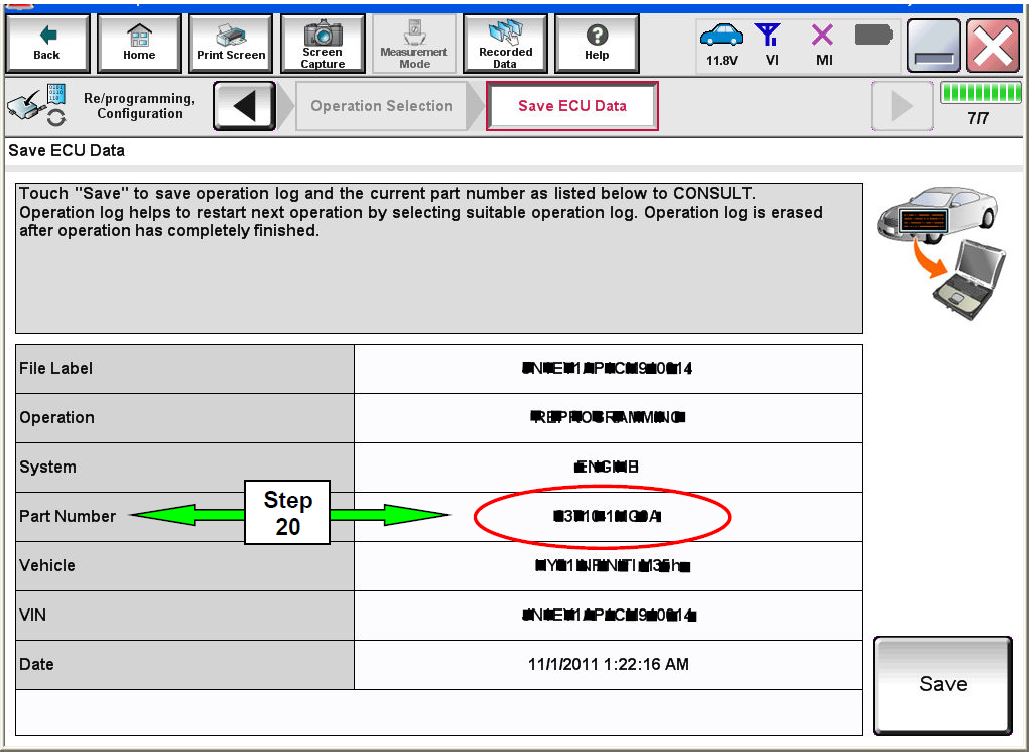
- Find the ECM Part Number (see Figure 9) and write it on the repair order.
NOTE: This is the current Part Number (P/N).
Figure 9
B. Compare the P/N you wrote down to the numbers in the Current ECM Part Number column in Table A below.
- If there is a match, this bulletin applies. Continue with the reprogramming procedure.
- If there is not a match, refer to the Claims Information and submit a claim using OP-CODE PC4791 (ECM Reprogram Not Needed).
Table A
| Model | Current ECM Part Number: 23710 – |
|---|---|
| 2016 Frontier | 9BN0A, 9BN2A, 9BN1A, 9BN3A, 9BN0B, 9BN2B, 9BN1B, 9BN3B, 9BN0C, 9BN2C, 9BN1C, 9BN3C |
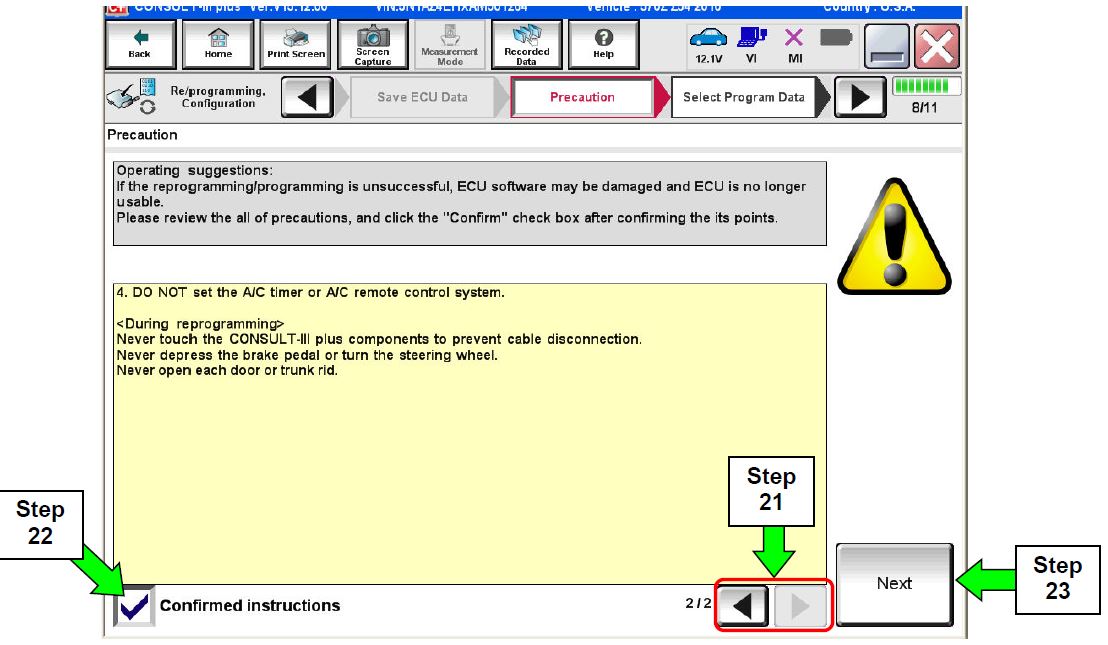
- Use arrows (if needed) to view and read all precautions.
- Check the box confirming the precautions have been read.
- Select Next.
Figure 10
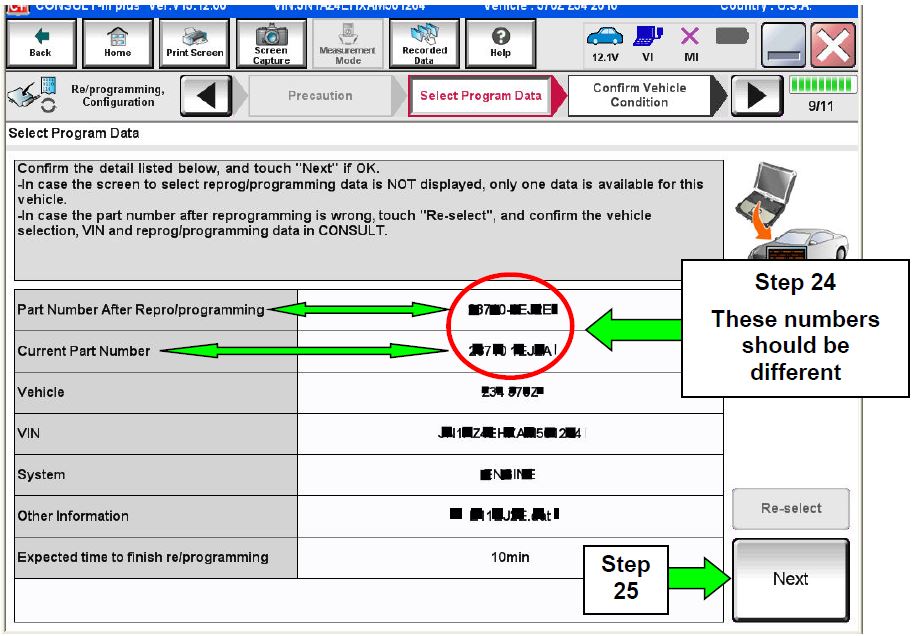
- Read the Current Part Number and Part Number After Reprogramming. They should be different.
- Select Next.
Figure 11
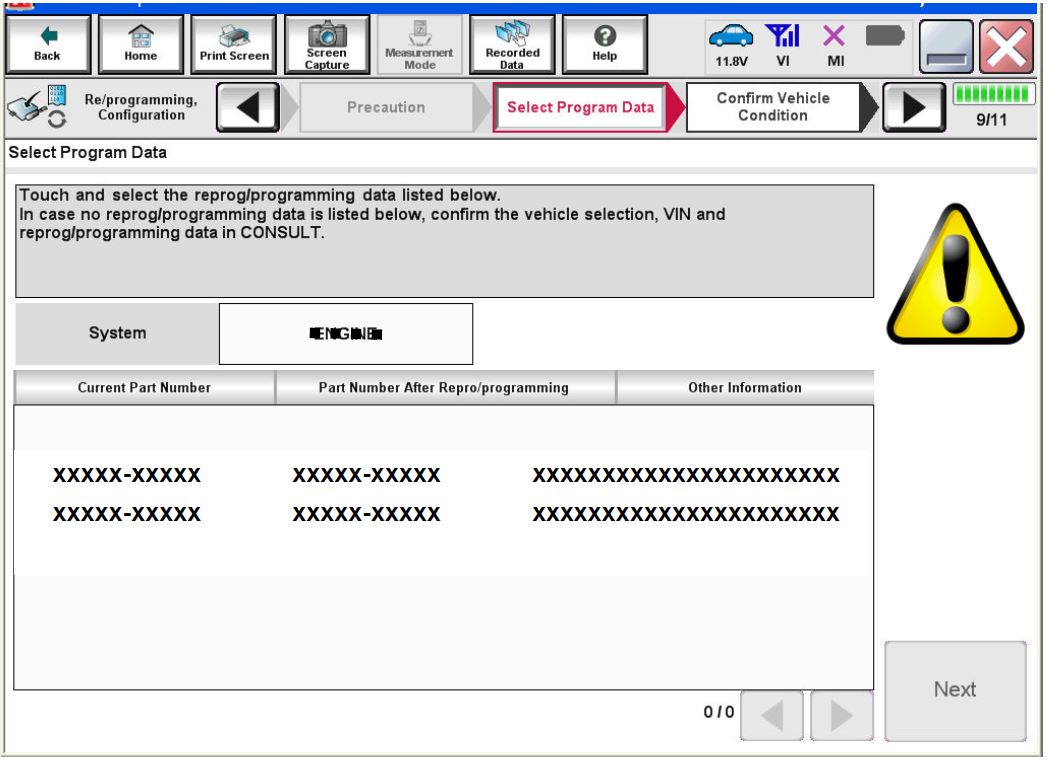
- If you get this screen and it is blank (no reprogramming listed), it means there is no matching ECM reprogramming available for this vehicle. If there is not a match, refer to the Claims Information and submit a claim using OP-CODE PC4791 (ECM Reprogram Not Needed).
Figure 12
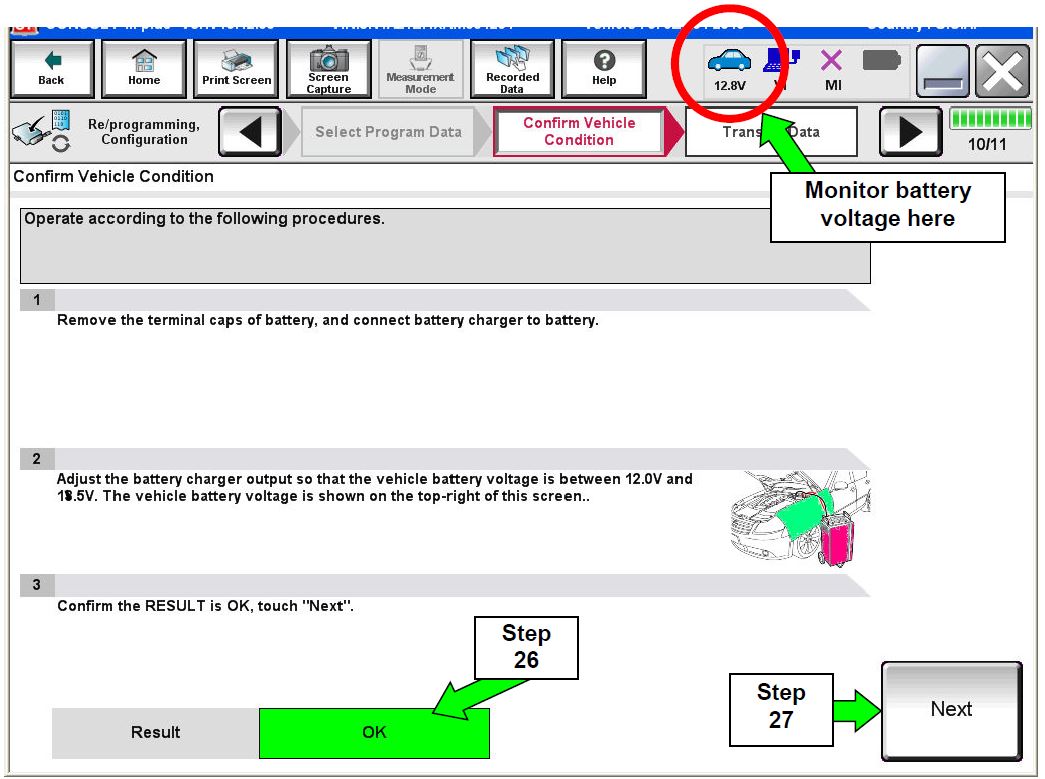
- Make sure OK is highlighted green (battery voltage must be between 0 and 15.5 Volts).
- Select Next.
IMPORTANT: Battery voltage must stay between 12.0 and 15.5 Volts during reprogramming or ECM reprogramming may be interrupted and ECM may be damaged.
Figure 13
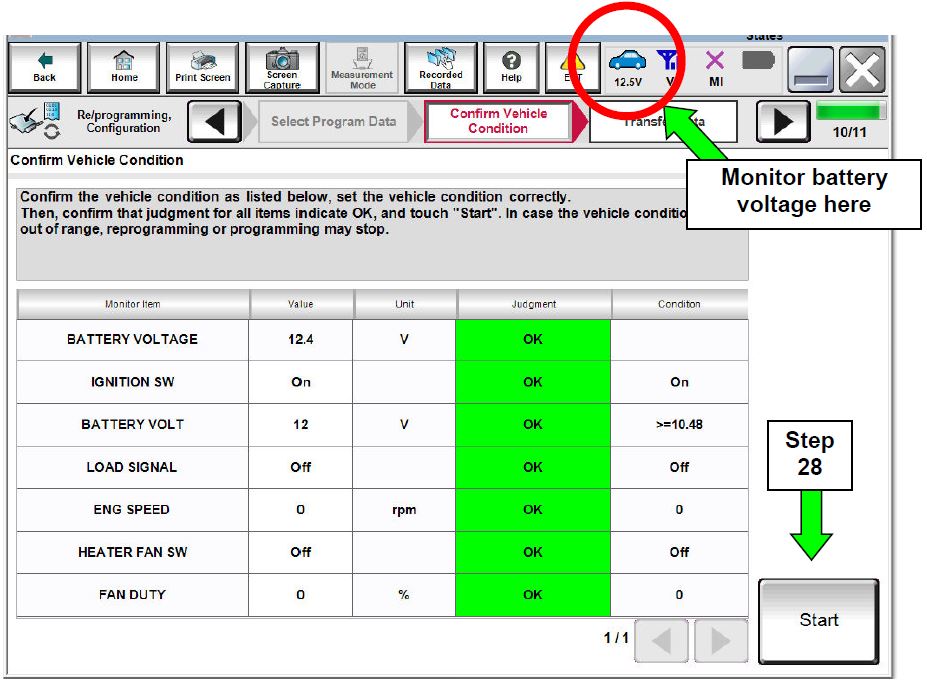
NOTE: In the next step, the reprogramming process will begin when Start is selected.
- Select Start.
Figure 14
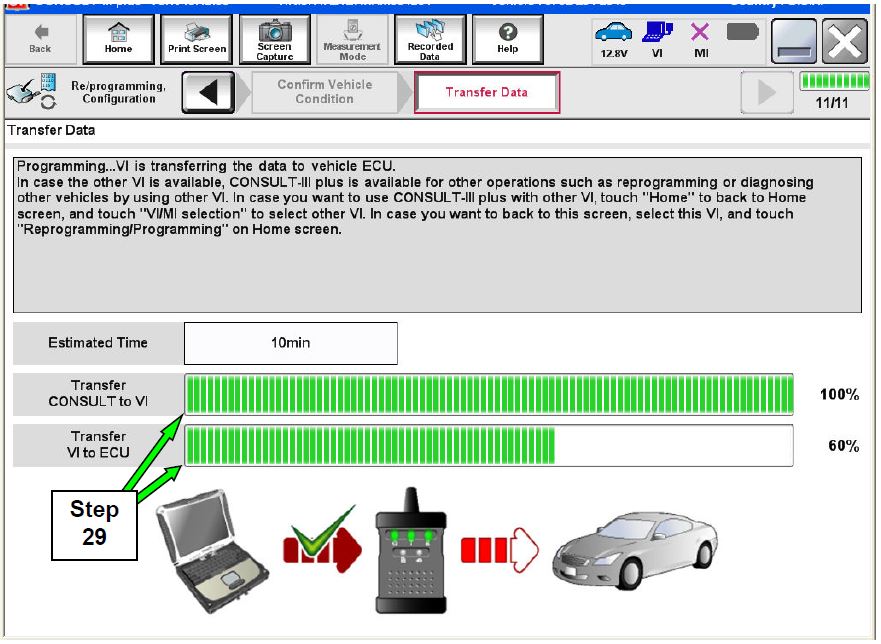
- Wait for both progress bars to complete.
Figure 15
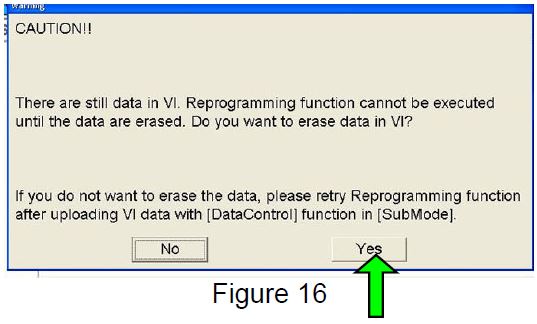
NOTE: If the message shown in Figure 16 appears, there is data stored in the plus VI. Select “Yes” to proceed with reprogramming.
Figure 16
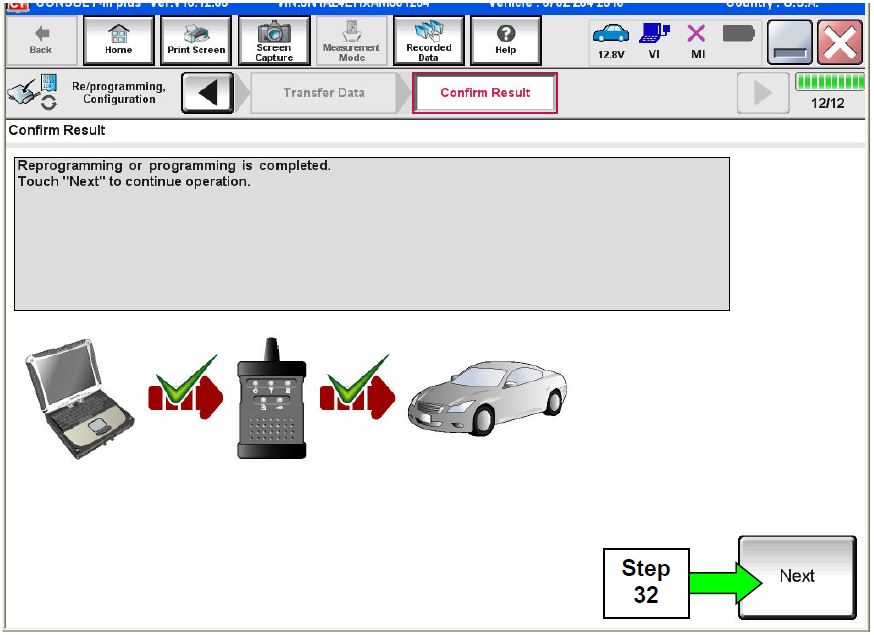
- When the screen in Figure 17 displays, the reprogramming is complete.
NOTE: If the screen in Figure 17 does not display (reprogramming does not complete), refer to the information on the next page.
- Disconnect the battery charger from the vehicle.
- Select Next.
Figure 17
NOTE: Additional steps/operations are required before C-III plus will provide the final reprogramming confirmation report.
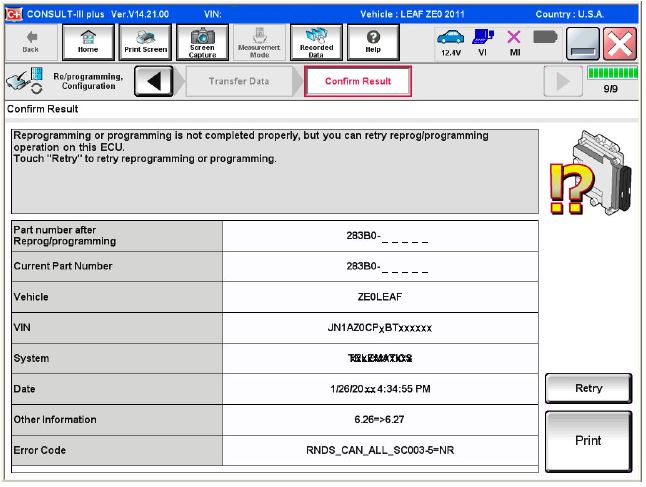
If reprogramming does not complete and the “!?” symbol displays as shown in Figure 18:
- Check battery voltage (12.0 – 15.5V).
- Ignition is ON, Ready Mode is OFF.
- External Bluetooth® devices are OFF.
- All electrical loads are OFF.
- Select Retry and follow the on screen instructions.
NOTE: Retry may not go through on first attempt and can be selected more than once.
Figure 18
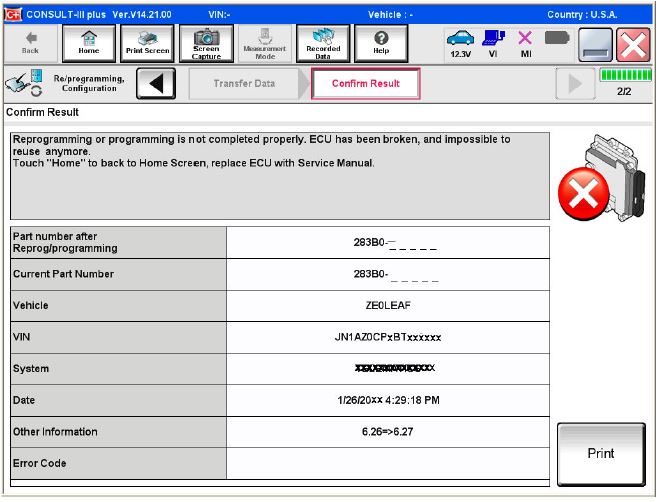
If reprogramming does not complete and the “X” symbol displays as shown in Figure 19:
- Do not disconnect the plus VI or shut down C-III plus if reprogramming does not complete.
- Check battery voltage (12.0 – 15.5V).
- CONSULT A/C adapter is plugged in.
- Ignition is ON, Ready Mode is OFF.
- Transmission in Park.
- All C-III plus / plus VI cables are securely connected.
- All C-III plus updates are installed.
- Select Home, and then restart the reprogram procedure from the beginning.
Figure 19
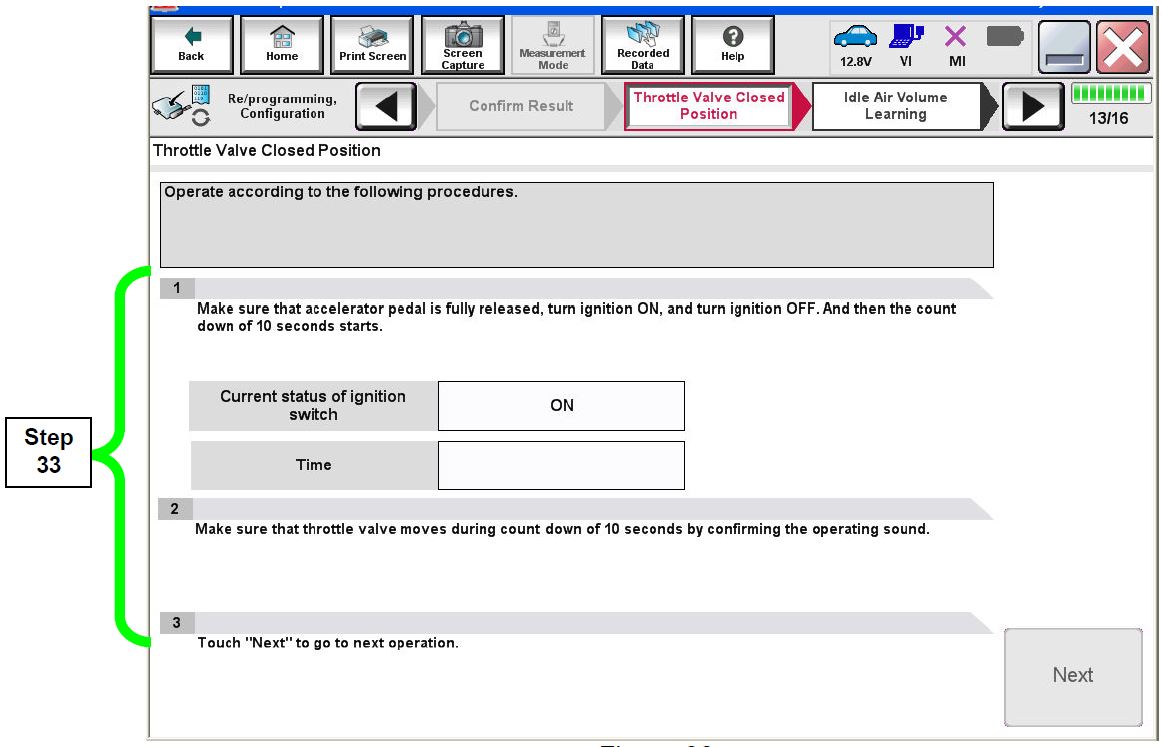
- Perform Throttle Valve Closed Position
- Follow the on-screen instructions (1, 2, and 3) to complete the procedure.
Figure 20
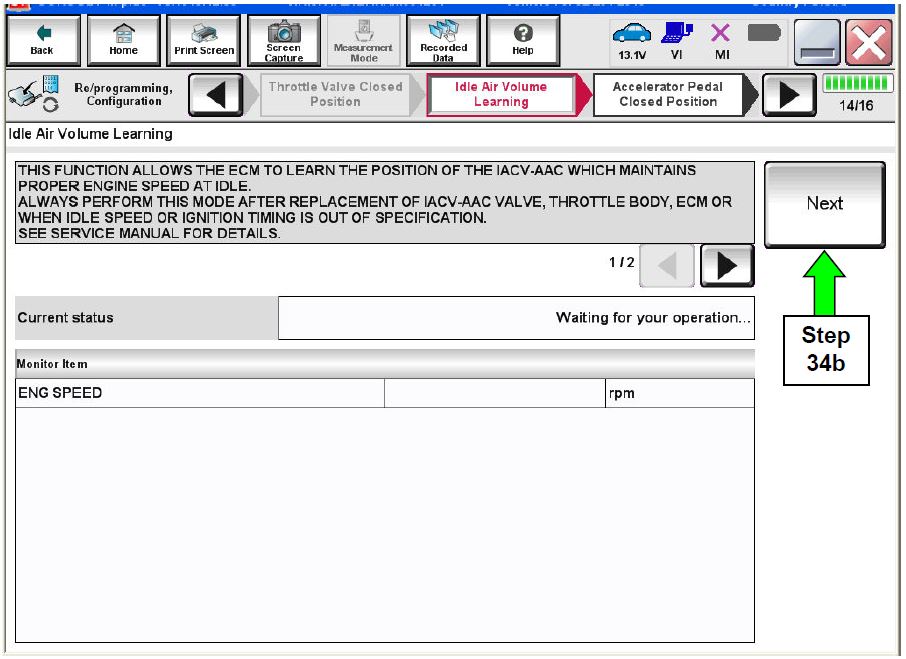
- For ECM reprogramming: Perform Idle Air Volume Learn (IAVL).
a. Start the engine and let it idle.
b. Select Next.
Figure 21
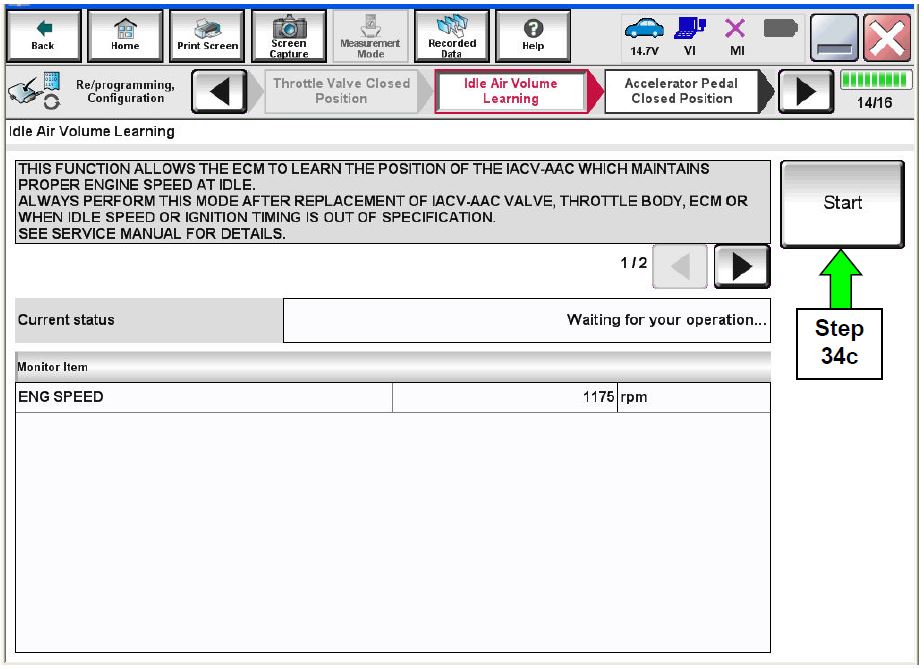
c. Select Start.
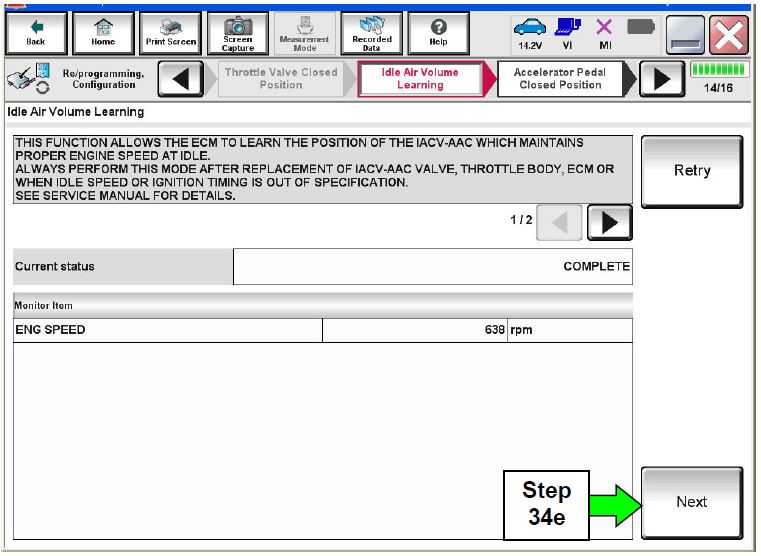
d. Wait for IAVL to complete.
Figure 22
NOTE:
- Listed below are common required conditions for IAVL to complete.
- If IAVL does not complete within a few minutes, a condition may be out of range.
- Refer to the appropriate Electronic Service Manual (ESM) for specific conditions required for the vehicle you are working on.
- Engine coolant temperature: 70 – 100° C (158 – 212°F)
- Battery voltage: More than 12.9V (At idle)
- Selector lever: P or N
- Electric load switch: OFF (Air conditioner, headlamp, rear window defogger)
- Steering wheel: Neutral (Straight-ahead position)
- Vehicle speed: Stopped
- Transmission: Warmed up
e. Select Next.
Figure 23
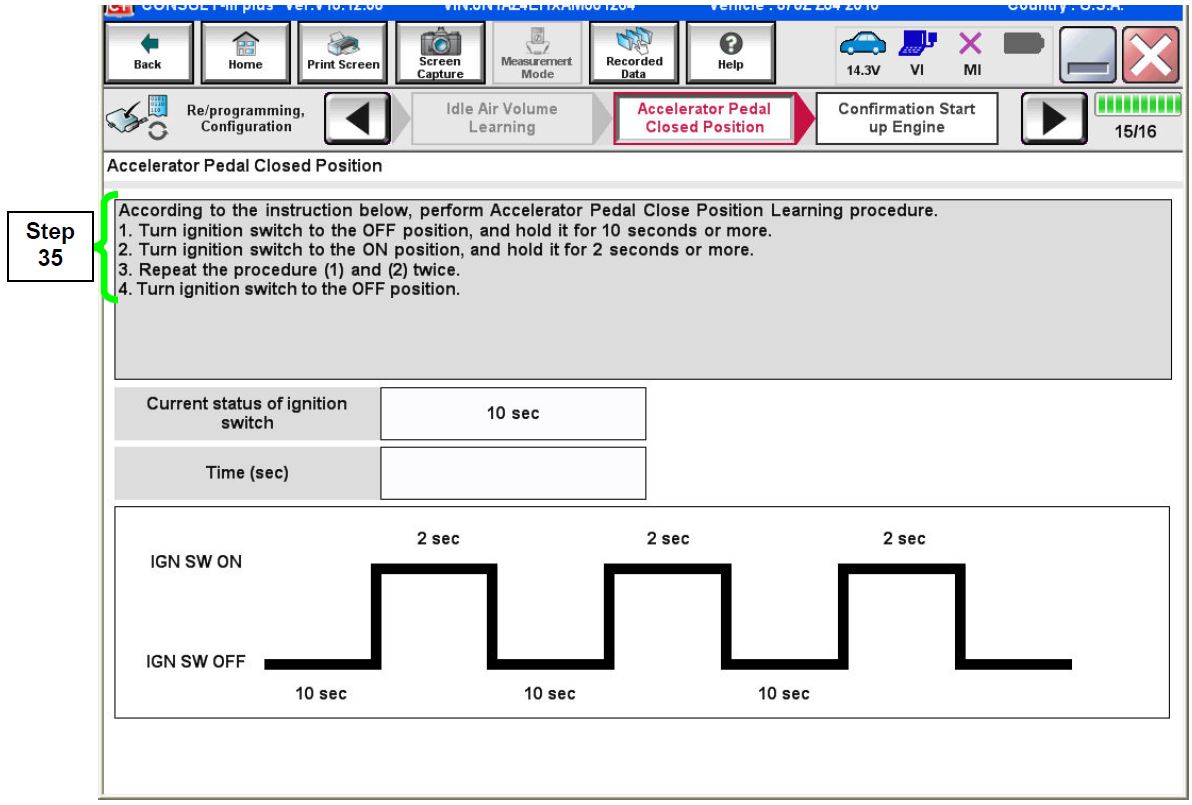
- For ECM reprogramming: Follow the on screen instructions to complete Accelerator Pedal Close Position Learning.
Figure 24
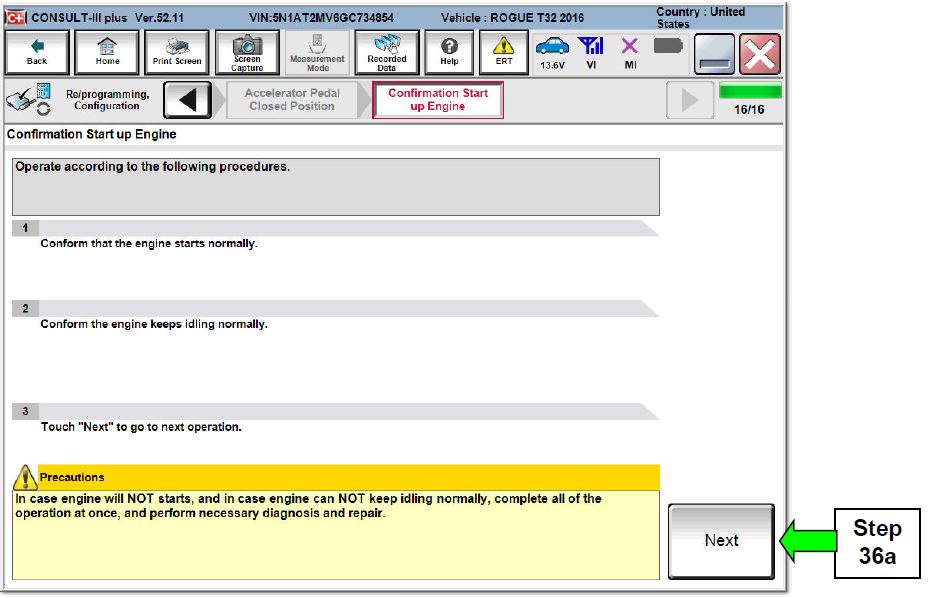
- Confirm engine start-up.
a. Select Next.
Figure 25
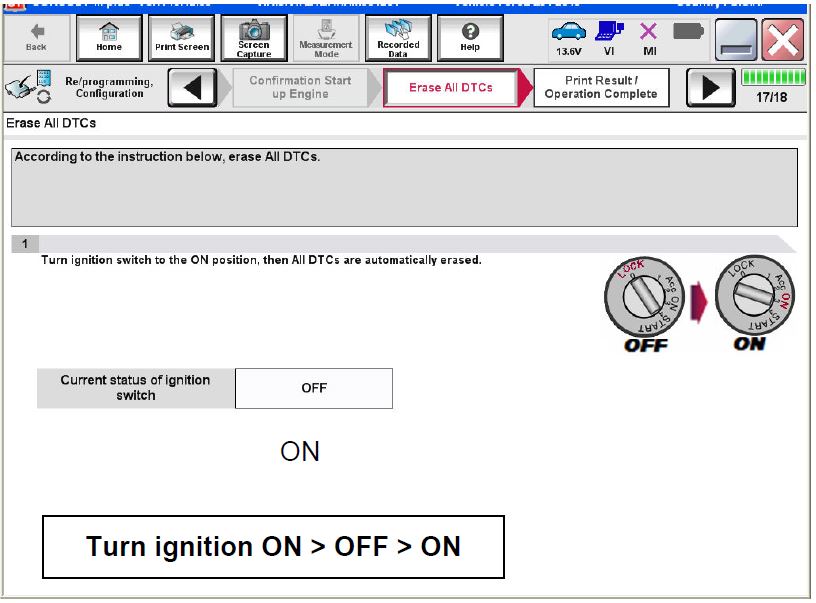
- Erase all DTCs as follows:
a. Turn the ignition OFF
b. Turn the Ignition ON.
c. Wait for DTC erase to complete.
Figure 26
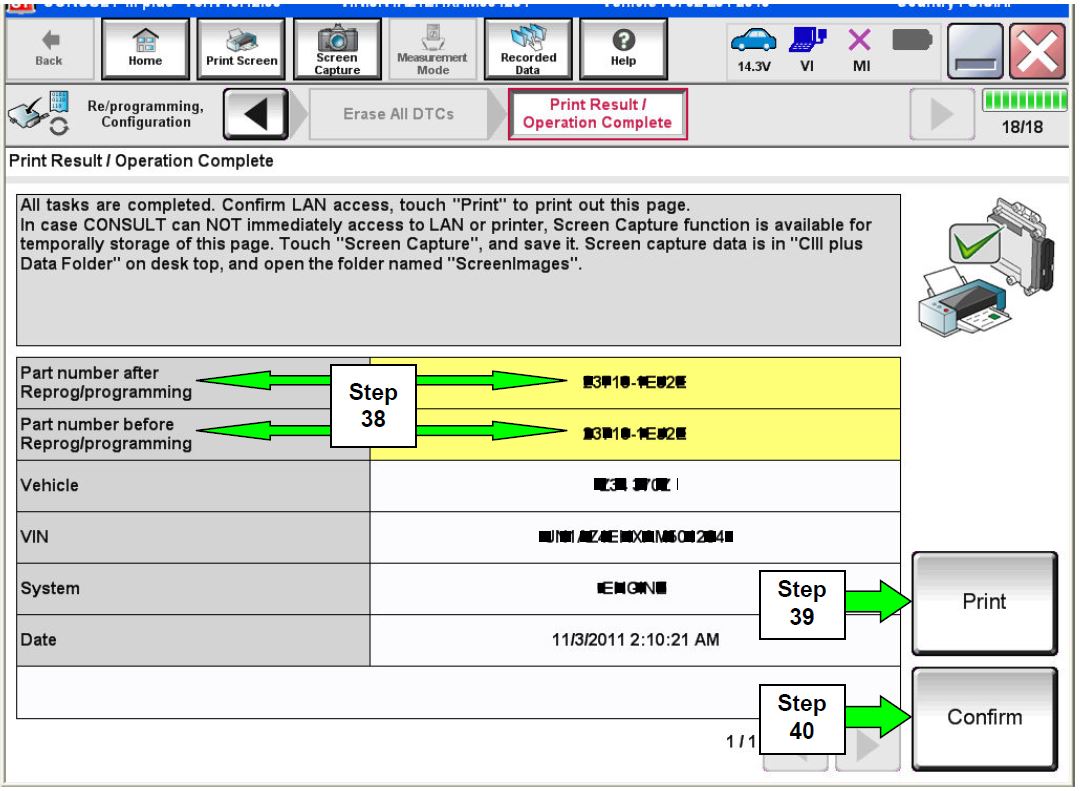
- Verify the before and after part numbers are different.
- Print a copy of this screen (Figure 27) and attach it to the repair order.
- Select Confirm.
Figure 27
NOTE: If you cannot print the above screen:
a. Select Screen Capture.
b. Name the file.
c. Save the file in My Documents.
- A copy of the screen is now saved in the CONSULT PC. It can be retrieved and printed at a later time.
- Close C-III plus.
- Turn the ignition OFF.
- Disconnect the plus VI from the vehicle.
CLAIMS INFORMATION
Submit a Campaign (CM) line claim using the following claims coding:
| CAMPAIGN (CM) I.D. # | DESCRIPTION | OP CODE | FRT |
|---|---|---|---|
| PC479 | ECM Reprogram | PC4790 | 0.5 hrs. |
OR
| CAMPAIGN (CM) I.D. # | DESCRIPTION | OP CODE | FRT |
|---|---|---|---|
| PC479 | ECM Reprogram Not Needed | PC4791 | 0.3 hrs. |
PC479
 Loading...
Reprogramming
J2534-1 Re/Programming
Tutorial for Purchasing NERS Software
Software updated April 26, 2019 to version # 04.03.00. It is recommended the latest version of NERS be installed before connecting to a vehicle.
This NERS software supports reprogrammable Engine and Transmission control units from 1999 to 2019 model year vehicles, and 2005 MY and later VIN writing into ECUs, when using a Nissan validated pass-through device. Click the Reprogramming Tab for additional information on reprogramming. This software only provides ECU reprogramming, blank programming and VIN writing capability. It does not provide diagnostic or key programming capability. For Engine and Transmission control unit reprogramming and VIN writing capability on 2020 MY & newer, please use CONSULT-III plus or CONSULT-III plus R2R software.
Vehicle reprogramming requires the use of the following:
- Nissan
 validated J2534-1 device
 - Nissan
 ECU Reprogramming Software (NERS)
 - Personal computer running Windows XP (SP2 or later) or Windows 7 or 10 64Bit
- Applicable reprogram file
Nissan tested and validated the below listed devices. Nissan
 does not recommend the use of any other J2534-1 device not listed here.
| Manufacturer | Models |
| Actia | PassThru +XS |
| Autel | MaxiFlash Elite (with firmware v3.01) |
| Bosch | Mastertech VCI (SFP v5.11.9) |
| Dearborn Group | VSI-2534 |
| Drew Technologies/OPUS IVS | CarDAQ Plus, CarDAQ M, Mongoose ISO/CAN |
| Hella Gutmann Solutions | Mega Macs 42 SE (DT VCI), Mega Macs 66 (DT66) |
| Texa | TEXA Navigator TXTs Series |
Click the below link to purchase NERS diagnostic software.
Download Purchased ECU Data File(s)
Once you have purchased ECU data file(s) and your order is completed, your ECU files can be downloaded. Please verify that you are logged in to your account before proceeding.
Purchase of ECU data enables file download access for a period of 24 hours, after which time the file will no longer appear in your list of purchased data files. Be sure to download all data files immediately following your purchase.
When you purchase a J-2534 reprogramming file, you will get a zip file containing a data file (.dat, .pdx, .xcal, .7z), a .csv or .xml file and a Reprog_readme.pdf. Please review the readme file for information on where to place the files in your PC.
Please Note that J2534-1 supports reprogramming on 1999 MY and later vehicles.
How to find the proper J-2534 Reprogramming ECU file:
In order for you to locate the proper ECU file, you will need to look up the applicable Technical Services Bulletin(TSB) for your vehicle. Instructions in the TSB will pinpoint and advise you of the ECU part # to enter below.
Download Purchased ECU Data File(s)
Once you have purchased ECU data file(s) and your order is completed, your ECU files can be downloaded. Please verify that you are logged in to your account before proceeding.
Purchase of ECU data enables file download access for a period of 24 hours, after which time the file will not longer appear in your list of purchased data files. Be sure to download all data files immediately following your purchase.
Special Note: Nissan and Infiniti
 vehicle uses a high level of security when Re/programming or Configuration is performed to the vehicle ECUs. With the release of NERS software version 04.00.01 or greater, technicians will be required to login with their Nissan
 or Infiniti
 Techinfo website user ID and password to perform Re/programming and Configuration in NERS.
Login Instruction Guide
September 2013, Nissan and Infiniti
 began the phase in of “Blank” Service Parts ECUs and TCMs. Depending upon the model and model year, replacement modules come WITHOUT software. When a replacement module is installed in an applicable vehicle for any reason, it will need to be programmed.
When you purchase a J-2534 Blank programming file, you will get a zip file containing a data file (.dat, .pdx, .xcal, .7z), a .csv or .xml file and a Reprog_readme.pdf. Please review the readme file for information on where to place the files in your PC.
How to find the proper J-2534 Blank Programming ECU file:
- Obtain the blank ECU part number when you purchase the replacement ECU. Nissan
 ’s and Infiniti
 ’s parts catalog provides both the blank ECU part number and the ROM-DATA ID part number (after programming part number) to be used. Enter this blank ECU part number in the field below.
or
- Using C-III plus software, retrieve the blank ECU part number from the new ECU. Enter this blank ECU part number in the field below.
Please note: Take care after making your selection that the listed vehicle information matches the vehicle you are programming.
- Special Note: NERS Version 03.08 or higher supports Blank RWD, 5 speed TCM programming.
Download Purchased ECU Data File(s)
Once you have purchased ECU data file(s) and your order is completed, your ECU files can be downloaded. Please verify that you are logged in to your account before proceeding.
Purchase of ECU data enables file download access for a period of 24 hours, after which time the file will not longer appear in your list of purchased data files. Be sure to download all data files immediately following your purchase.
Special Note: Nissan and Infiniti
 vehicle uses a high level of security when Re/programming or Configuration is performed to the vehicle ECUs. With the release of NERS software version 04.00.01 or greater, technicians will be required to login with their Nissan
 or Infiniti
 Techinfo website user ID and password to perform Re/programming and Configuration in NERS.
Login Instruction Guide
- J2534 Pass-Thru Programmer: TOPDON RLink J2534 is an advanced diagnostic and reprogramming tool that support all J2534 protocols, as well as D-PDU, CAN-FD and DoIP, ensuring compatibility with a wide range of modern vehicles. It offers extensive versatility with support for over 17 major automotive brands, including Chrysler, Ford, GM, Nissan
 , Toyota, Honda, Subaru, Land Rover/Jaguar, Volvo, Wuling, Volkswagen, Mercedes-Benz, and BMW, and so on, enjoy dealership-level functions at your fingertips
 - All-in-One OEM Diagnostics: This J2534 ECU programming tool elevates your automotive repair capabilities to new heights by delivering complete OEM diagnosis. Boasting comprehensive full-system diagnostics, intuitive repair guides, advanced ECU programming and coding, common reset services, a vast library of repair information and more, this all-in-one solution empowers technicians to effortlessly tackle complex vehicle issues with ease
- Proven Performance You Can Trust: Backed by over 10000 real vehicle tests and benefit from a wealth of practical experience, this OEM reprogramming tool guarantees stable and exceptional performance. Supported by TOPDON's dedicated technical experts with in-depth knowledge of both auto repair and J2534 Pass-Thru programming, the RLink J2534 provides prompt and professional assistance, ensuring a smooth setup and reliable compatibility
- Integrated Excellence, Always Up-to-Date: Featuring the exclusive RLink Platform to provide a streamlined experience with one-click driver installation and management, ensuring flawless integration with your OE software, maintaining the original performance quality. The built-in operation guide makes mastering OE software quick and easy, so you can get started right away. Plus, with lifetime free updates, your diagnostics will stay current with the latest drivers and innovations
- Efficiency Meets Versatility: Engineered to support three CAN channels simultaneously - CAN FD and CAN-CC included, giving you the edge in fast troubleshooting. To perfectly synchronized with the OE software, please diagnose with active subscriptions and make sure your computer system is running a compatible 64-bit Windows version (7, 8, 10 or later) to fully leverage the power of RLink J2534. *We don't provide extra OE software
- 【J2534 PROTOCOL WITH SMARTLINKC】 LAUNCH X431 PRO3S+ ELITE scan tool with newly upgraded smartlinkC V2.0. The SmartLinkC is a communication interface supporting J2534 specifications. Of course, it also can be used as a J2534 PassThru device, working together with the PC installed with the OEM diagnostic software to perform the J2534 protocol.J2534 protocol is the only solution for problems ranging from driveability and loss of power to poor fuel economy.
- 【INTELLIGENT TOPOLOGY MAP TO FASTER FULL SYSTEMS DIAGNOSIS】 X431 PRO3S+ELITE bidirectional scan tool with new-added intuitive topology mapping. Harnesses intuitive topology mapping for comprehensive visualization of the vehicle all system. It shows all available control units in different colors, the numbers of system, the scanned system, and the scan results, bringing maximum convenience & superfast speed for you to do swift diagnosis & high-level repairs.
- 【TOP HARDWARE CONFIGURATION, UPGRADED OF LAUNCH X431 PRO3S+】 LAUNCH X431 PRO3S+ELITE diagnostic scanner possess with Android 10.0 OS; CPU 4-Core Processor, 2.0 GHz. Greatly increased the speed of running multiple task. 2.4GHz/5GHz; 6300mAh/7.6V stronger battery capacity; 10.1 Inch Touchscreen with 8MP camera; AUTO VIN; 4GB+64GB storage memory; 20X faster transmission rate, save more vehicle documents and customer data; Supports 25+ Software Languages, such as EN, DE, FR, SP nd JP and so on.
- 【3000+ ACTIVE TEST/BI-DIRECTIONAL CONTROL LAUNCH SCANNER】 LAUNCH X431 PRO3S+ELITE HD automotive scanner is a cost-effective bidirectional scanner that deserves owned by every repairing DIYers and mechanics. You can easily send command signal at fingertips from the scanner to various module actuators to test component integrity and functionality in minutes or even seconds to tell if replacement or repair is needed.
- 【COMPLETE 60+ HOT RESETS, CALIBRATION, INITIALIZATION, RELEARN】 LAUNCH X431 PRO3S+ELITE SmartLinkC escaner automotriz professional enjoys 60+ special service, such as Oil Reset, ABS brake bleed, EPB, SAS, BMS, Suspension, Injector reset, Power Balance, Turbo Calibration, VGT, Transmission Adaption, Throttle Adaptation, matching and etc. rigorous on-site testing has been performed to ensure 100% availability.
- ALL OF THE J2534 PROTOCOLS - This single unit has all of the protocols you need for your OEM J2534 reprogramming and diagnostics including the latest in DoIP and CanFD
- J2534 TECHNICAL SUPPORT - FREE for the life of the tool. Staffed by technicians who understand vehicle repair and J2534 Pass‑thru
- TOOLBOX WITH OEM APPLICATION DESCRIPTIONS - educational video tutorials and real-time news – Giving you the confidence and up-to-date knowledge to get the job done
- J2534 v05.00 API - The newest version of J2534 to give you the latest in pass-thru technology
- FUTURE PROOF WITH 4 CAN CHANNELS - Going beyond the 3 required by select Chrysler/FCA models, CarDAQ-Plus 3 also provides a 4th to meet the needs of future OEM applications
- CUSTOM-DESIGNED FOR USE WITH FORSCAN: Works with all FORScan compatible vehicles and is recommended by the FORScan Team
- DEALERSHIP-LEVEL DIAGNOSTICS: OBDLink EX supports all Ford protocols, modules, and advanced features of FORScan
- ELECTRONIC SWITCH allows FORScan to access all CAN buses simultaneously and enables advanced functions not possible with “toggle switch” adapters
- MAXIMUM THROUGHPUT -- up to 20 times faster than “toggle switch” adapters
- ROCK-SOLID CONNECTION avoids data corruption and dropped packets
- 🌐【Works with Autel Elite II Elite MS908 MS908S Pro II MS908CV II MK908P MK908 Pro II】Autel J2534 work with these tools to program ECUs on specific BM.W/ BE.NZ for specific functions. ★★NOTE: J2534 CANNOT directly work with these single devices. After you received the J2534, you HAVE TO send us both the S/N(12 digits) of your scanner MS908S(etc.) and J2534. So, technically, Autel engineers can help you bind J2534 with your devices. If need any supports, contact us via: 🚘auteldirect @ outlook. com🚘.
- 🌐【SAE J2534-1 & J2534-2 Standards】Autel MaxiFlash Elite J2534 is a fully compliant SAE J2534-1 & SAE J2534-2 (March 2006) device, which performs standard PassThru J2534 functionality: Compatible with for Toyota Techstream, Volvo VIDA, Honda HDS, Jaguar-Land Rover IDS and BM.W 3G for OEM diagnostics. Autel MaxiFlash J2534 is also specially designed to provide users with P-C communication and ECU reprogramming capabilities on any modern vehicle diagnostic bus, reliability and flexibility.
- 🌐【High-speed Transmission Speed】Autel MaxiFlash Elite Reprogramming Device J2534 supports simultaneous communication definition in J2534-1, running 3 protocols at the same time, which greatly improves reprogramming and diagnostic speed. Embedded with the ARM9 Dual-core processor (clocked up to 500MHz), which further boosts the communicating speed to save more times and win more business.
- 🌐【Multiple Devices Connected with P-C】Autel MaxiFlash Elite J2534 also supports multiple device connections to the P-C, which can operate diagnostic and reprogramming functions on more than one vehicle at the same time. Autel MaxiFlash Elite J2534 built-in wireless and data storage, which can update via Internet. It also ensures quickly reprogramming even the newest controllers.
- 🌐【Extensive Compatibility】Autel MaxiFlash J2534 is compatible with Toyota Techstream, Volvo VIDA, Honda HDS, Jaguar-Land Rover IDS and BM.W 3G for OEM diagnostics. To check compatibility, please contact 🚘auteldirect @ outlook . com🚘 directly for satisfaction-guaranteed support!
- [J2534 COMPLIANT] - The Mastertech II is a J2534-1 and J2534-2 compliant VCI for OEM reprogramming and diagnostic applications
- [FULLY VALIDATED BY TOP 6 OEMS] - Mastertech II has been fully validated to operate with the top 6 OEM reprogramming applications: GM, Ford, FCA, Nissan/Infinity, Honda/Acura, and Toyota/Lexus
- [PRE-CONFIGURED] - The pre-configured wireless and wired connections make it quick and easy to connect to a vehicle from your PC (requires PC compliant with OE specifications and software)
- [RIGHT TO REPAIR] - Supports 'Right to Repair' (R2R) initiatives
- [COMPREHENSIVE KIT] - Kit includes: VCI, WiFi adapters (wireless PC to VCI), J1962 Cable (connect to vehicle), USB cable (connect to PC for firmware updates and setup), and Quick Start Guide
Last update on 2025-05-08 / Affiliate links / Images from Amazon Product Advertising API
This product presentation was made with AAWP plugin.

