
| Classification: | Reference: | Date: |
| EL22-016A | NTB23-007A | January 20, 2023 |
VOLUNTARY SAFETY RECALL CAMPAIGN
2017 ROGUE; WIRE HARNESS CONNECTOR CORROSION
| CAMPAIGN ID #: | PC934 |
| APPLIED VEHICLES: | 2017 Rogue (T32) |
INTRODUCTION
Nissan is conducting this voluntary safety recall campaign, on certain specific model year 2017 Rogue vehicles, to inspect and, if necessary, replace the Main Wire Harness M74 to Body Wire Harness B42 connector. This service will be performed at no charge to the customer for parts or labor.
IDENTIFICATION NUMBER
Nissan has assigned identification number PC934 to this campaign. This number must appear on all communication and documentation of any nature dealing with this campaign.
PC934 Corroded Harness Connector May Start Fire – 2017 Nissan Rogue
Voluntary Safety Recall Campaign 2017 Nissan Rogue; Wire Harness Connector Corrosion
Remedy Instructions and TSB
RCRIT-22V875-7473.pdf 613.902KB
Remedy Instructions and TSB
RCRIT-22V875-5004.pdf 3627.18KB
Latest Recalls Documents

- Protects Electrical Connections And Wiring From Salt, Dirt And Corrosion
- Prevents Voltage Leaks Around Any Electrical Connection
- Extends The Life Of Bulb Sockets
- Required For Modern High Energy Ignition Systems


- Secure Electrical Connections: Seal, lubricate and insulate to prevent various leaks or damage around any electrical connectors ensuring top performance and vehicle quality(Dieletric Breakdown 10KVA)
- Anti Corrosion: Designed with outstanding oxidation and corrosion resistance to keep all electrical components insulated over long periods of time. This grease is multi-surface friendly and safe to use on rubber, plastic, and ceramic surfaces
- Required For High Energy Ignition: BTAS die electric silicone grease ensures automotive performance, extended lifetime and corrosion preventer with in electrical systems
- Superior Temperature Performance: Ultra high and low temperature environments are no match for BTAS dialectic contact grease. This high-performance dialectric silicone grease is designed to handle operating temperatures of -40° to +428°F
- Suggested Applications: BTAS di electrical grease is appropriate for automotive electrical connectors,battery terminals, spark plug boots, and all other electrical connectors

- TRUSTED AMERICAN QUALITY SINCE 1931 – MORE GREASE FOR LESS: AGS has been manufacturing professional-grade automotive chemicals right here in the USA for over 90 years. At 4oz per can, you get 2–4x more dielectric grease than competing products at the same price — premium protection that doesn't cut corners.
- PROFESSIONAL-GRADE DIELECTRIC GREASE FOR ALL ELECTRICAL CONNECTORS: This silicone-based dielectric grease seals out moisture, prevents corrosion, and stops voltage leakage on spark plug boots, battery terminals, wiring harnesses, ignition coils, fuse boxes, and all automotive electrical connectors — keeping every connection performing like new.
- PRECISE, MESS-FREE BRUSH-TOP APPLICATOR: Unlike squeeze tubes that waste product and create a mess, the AGS brush-top can delivers controlled, targeted application exactly where you need it. Perfect for DIYers and professional mechanics who value clean, efficient workmanship.
- EXTREME TEMPERATURE PERFORMANCE & LONG-LASTING PROTECTION: Formulated to perform from -40°F to +400°F, this dielectric silicone compound maintains its protective seal in the harshest automotive environments. It resists washout from rain and road splash while extending the life of spark plugs, connectors, and rubber boots.
- SAFE FOR ALL ELECTRICAL COMPONENTS & WIDELY COMPATIBLE: Non-conductive and non-reactive — safe to use on rubber, plastic, and metal components without causing corrosion or degradation. Ideal for battery terminal grease, trailer connectors, marine applications, outdoor lighting, and any electrical connection requiring a reliable moisture barrier.

- Protects electrical connections and wiring from salt, dirt and corrosion
- Prevents voltage leaks around any electrical connection
- Extends the life of bulb sockets
- Required for modern high energy ignition systems
- Suggested Applications: Marine and automotive electrical connections, spark plug boots, trailer hitches, battery terminals
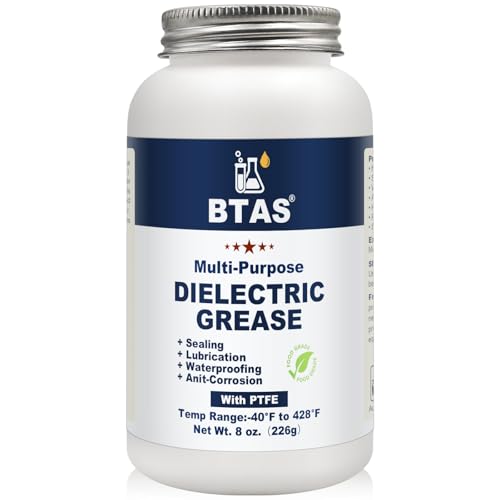
- Better Electrical Contact:This di electrical grease can be used for automotive electrical connectors, marine electronics battery terminals, pool gasket o-rings, ignition coils, spark plugs, brake caliper pins, filters, pipework, battery connectors and more
- Rust & Corrosion Preventer: High quality rust and corrosion inhibitors are added to protect metal parts from noise, rust, corrosion, wear and seizing in wet environments, ensuring easy dismantling and maintenance at a later stage
- High-Temperature Anti Corrosion: Ultra high and low temperature environments are no match for BTAS dialectric grease,preventing corrosion and bonding on metal contact surfaces caused by high temperatures or prolonged operation
- Food Grade Die Electric Silicone Grease:Odourless and colourless, no chemical contamination of drinking water, cleanable for use
- Dielectric Silicone Grease:This type of die electric grease is commonly used in electrical connectors to protect parts from dust, moisture and corrosion.Not only does it provide dielectric properties, it also lubricates, reduces friction and wear between mechanical parts, and provides protection and sealing
SEOCONTENT-START
Classification: Reference: Date: EL22-016A NTB23-007A January 20, 2023 Nissan Bulletins are intended for use by qualified technicians, not ‘do-it-yourselfers’. Qualified technicians are properly trained individuals who have the equipment, tools, safety instruction, and know-how to do a job properly and safely. NOTE: If you believe that a described condition may apply to a particular vehicle, DO NOT assume that it does. See your Nissan dealer to determine if this applies to your vehicle. 1/16 VOLUNTARY SAFETY RECALL CAMPAIGN 2017 ROGUE; WIRE HARNESS CONNECTOR CORROSION CAMPAIGN ID #: PC934 APPLIED VEHICLES: 2017 Rogue (T32) Check Service COMM or Dealer Business Systems (DBS) National Service History to confirm campaign eligibility. INTRODUCTION Nissan is conducting this voluntary safety recall campaign, on certain specific model year 2017 Rogue vehicles, to inspect and, if necessary, replace the Main Wire Harness M74 to Body Wire Harness B42 connector. This service will be performed at no charge to the customer for parts or labor. IDENTIFICATION NUMBER Nissan has assigned identification number PC934 to this campaign. This number must appear on all communication and documentation of any nature dealing with this campaign. DEALER RESPONSIBILITY It is the dealer’s responsibility to check Service COMM or Dealer Business Systems (DBS) National Service History for the campaign status on each vehicle falling within the range of this voluntary safety recall which for any reason enters the service department. This includes vehicles purchased from private parties or presented by transient (tourist) owners and vehicles in a dealer’s inventory. Federal law requires that new vehicles in dealer inventory which are the subject of a safety recall must be corrected prior to sale. Failure to do so can result in civil penalties by the National Highway Traffic Safety Administration. While federal law applies only to new vehicles, Nissan strongly encourages dealers to correct any used vehicles in their inventory before they are retailed. This bulletin has been amended. See AMENDMENT HISTORY on the last page. Please discard previous versions of this bulletin. 2/16 NTB23-007A REPAIR OVERVIEW IMPORTANT: The purpose of REPAIR OVERVIEW (above) is to give you a quick idea of the work you will be performing. You MUST closely follow the entire SERVICE PROCEDURE as it contains information that is essential to successfully completing this repair. No evidence of corrosion present. There is evidence of corrosion present. Use Service Comm (Campaign ID # PC934) to confirm the vehicle you are working on is affected by this campaign Replace both wire harness connectors (M74 and B42). Step 10 on page 7 Apply white lithium grease to M74 and B42 wire harness connectors Step 20 on page 11 END Inspect the Main Harness M74 and Body Harness B42 wire harness connectors for evidence of corrosion. Step 9 on page 6 3/16 NTB23-007A REQUIRED SPECIAL TOOLS Flameless Heat Gun, special tool J-46538. o The flameless heat gun is no longer available from Tech•Mate, an equivalent tool may be used. Figure 1 Aluminum Crimping Pliers, special tool J-48817-8 (provided in Aluminum Wire Repair Kit J-48817-AL-KIT). o New part number for Aluminum Crimping Pliers NI-48817-8 (new part number for Aluminum Wire Repair Kit NI-48817-AL-KIT). Figure 2 Terminal Release Tool, special tool J-48817-1. o New part number NI-48817-1. Figure 3 Additional tools may be purchased from Tech•Mate online: techmatetools.com, or by phone: 1-833-397-3493. 4/16 NTB23-007A SERVICE PROCEDURE Inspection 1. Write down the radio settings. Presets 1 2 3 4 5 6 AM FM 1 FM 2 XM 1 XM 2 XM 3 Bass Treble Balance Fade Speed Sen. Vol. 2. If equipped, write down the customer settings for the ATC (Automatic Temperature Control) system. 3. Turn the ignition OFF. 4. Disconnect the negative battery cable. 5. Remove the driver (LH) side inner front kicking plate. Refer to the ESM: BODY INTERIOR > INTERIOR > REMOVAL AND INSTALLATION > BODY SIDE TRIM > KICKING PLATE 6. Remove the driver (LH) side dash side finisher. Refer to the ESM: BODY INTERIOR > INTERIOR > REMOVAL AND INSTALLATION > BODY SIDE TRIM > DASH SIDE FINISHER 5/16 NTB23-007A 7. Disconnect the M74 wire harness connector from the B42 wire harness connector. Figure 4 8. Pull the B42 wire harness connector toward the rear of the vehicle to disengage the connector from the connector bracket. Figure 5 B42 wire harness connector M74 wire harness connector B42 wire harness connector Connector bracket 6/16 NTB23-007A 9. Inspect the M74 and B42 wire harness connectors for any signs of corrosion (Figure 6 – Figure 10). If signs of corrosion are found, proceed to step 10 on page 7 to replace both M74 and B42 wire harness connectors. If there are no signs of corrosion, skip to step 20 on page 11 to apply white lithium grease to both wire harness connectors. Examples of Corrosion Figure 6 Figure 7 Figure 8 Figure 9 Figure 10 Corrosion Corrosion Corrosion Corrosion Corrosion 7/16 NTB23-007A Wire Harness Connector Replacement 10. Remove and discard the foam tape from the B42 wire harness connector to assist with identifying connector pin locations in the original connector. 11. Replace the M74 and B42 wire harness connectors as follows: a. Starting with the M74 wire harness connector, cut and splice in the new wire harness connector, one wire at a time. See PARTS INFORMATION on the last page. IMPORTANT: Some vehicles may not utilize all circuits in the replacement connectors. The length of the unused wires should be trimmed to an appropriate length and secured to the wire harness branch with electrical tape. Be sure to stagger, or offset, each cut wire so that the wire repair terminal crimps are not all in the same area. Some of the wire colors on the replacement connector may not match the vehicle’s connectors. Be sure to verify the terminal positions are the same between both connectors when splicing in the new wire harness connector. b. Use the wire repair terminal crimps and heat shrink provided in the wire harness repair kit to attach all wires. IMPORTANT: Do not use solder sleeves for this repair. The parts provided in the wire harness repair kit must be used. Each wire harness repair kit includes two (2) different sized wire repair terminal crimps and two (2) different sizes of heat shrink. Be sure the correct size wire repair terminal crimp and heat shrink is used with the correct sized wire. If needed, refer to Quick Reference for Performing Wire Repairs on Aluminum Wiring on page 8. c. Wrap the wire and heat shrink with electrical tape to prevent water from entering. IMPORTANT: Do not wrap the electrical tape up the wire harness branch, only apply electrical tape over the wire repair terminal crimp. d. Repeat a, b, and c above for all the wires in the M74 and B42 wire harness connectors, and then skip to step 19 on page 10. 8/16 NTB23-007A Quick Reference for Performing Wire Repairs on Aluminum Wiring Figure 11 Figure 12 Figure 13 12. Insert the heat shrink (2) over the aluminum wires (1) that will be repaired. Strip off 10 mm of the wire insulation and then install the appropriate size wire repair terminal crimp (3). 13. Insert the wire repair terminal crimp into the appropriate crimp size of the Aluminum Crimping Pliers, special tool NI-48817-8. 14. Press the handles of the Aluminum Crimping Pliers, special tool NI-48817-8, until the handles are released automatically. HINT: If the crimping tool handles do not release automatically, the wire repair terminal crimp has not been crimped properly. 9/16 NTB23-007A Figure 14 Figure 15 Figure 16 15. After crimping the aluminum wires in the wire repair terminal crimp, make sure that the wires do not come out of the wire repair terminal crimp when pulling on the wires from both sides. 16. Slide the heat shrink over the aluminum crimp and heat the heat shrink using the Flameless Heat Gun, special tool J-46538, or equivalent. 17. After heating the heat shrink, make sure that there are signs of sealant (A) around each edge of the heat shrink. 10/16 NTB23-007A Figure 17 Figure 18 18. Wrap the wire and heat shrink with electrical tape (A) to prevent water from entering. IMPORTANT: Only apply the electrical tape over the wire repair terminal crimp. 19. Once all of the wires have been connected, secure the wire harness together with electrical tape. The length of the unused wires should be trimmed to an appropriate length and secured to the wire harness branch with electrical tape. IMPORTANT: Do not wrap the electrical tape up the wire harness branch, only apply the electrical tape over the wire repair terminal crimp. 11/16 NTB23-007A Apply White Lithium Grease to the M74 and B42 Wire Harness Connectors To avoid damage to the vehicle’s interior, be careful not to get grease on any interior components. 20. Using the 04A tool of the Terminal Release Tool, special tool NI-48817-1 (Figure 19), remove the Terminal Position Assurance (TPA) from the B42 wire harness connector. The TPA release is located on the wire harness side of the B42 wire harness connector (Figure 20). 21. Insert the 04A tool into the TPA release, and then push the TPA toward the terminal side of the wire harness connector, as shown in Figure 21. IMPORTANT: Be careful not to break or damage the TPA, they are not available as an individual part. HINT: There are two (2) separate retainers that secure the TPA. The first retainer will release, and then the TPA will move forward slightly and stop. o Continue to push the TPA toward the terminal side of the connector to disengage the second retainer. o Once both TPA retainers have been released, the TPA can be removed. Figure 21 Figure 19 Figure 20 04A tool Terminal Release Tool TPA release Terminal Release Tool TPA release TPA B42 wire harness connector 12/16 NTB23-007A Figure 22 Figure 23 22. Apply white lithium grease to the B42 wire harness connector. Apply grease around all sides of all terminals in the connector, making sure the level of the grease comes up to the top of the terminals, as shown in Figure 22. 23. Reinstall the TPA into the B42 wire harness connector. a. Wrap a shop towel or cloth around the wire harness connector. b. Using a small flat-blade screw driver, carefully push the TPA down until it is fully seated. c. Wipe off the excess grease from the sides of the wire harness connector. TPA White lithium grease B42 wire harness connector B42 wire harness connector 13/16 NTB23-007A 24. Using the 04A tool of the Terminal Release Tool, special tool NI-48817-1, disengage the TPA from the M74 wire harness connector, as shown in Figure 24. a. Carefully pry upward on one of the corners of the TPA to release the first retainer. b. Repeat for the opposite corner. c. Using your hand, carefully pull the TPA straight outward to release the secondary retainer, and then remove the TPA. Figure 26 Figure 24 Figure 25 25. Apply white lithium grease to the M74 wire harness connector. Only add enough grease to coat the terminals, as shown in Figure 26. 04A tool TPA TPA White lithium grease M74 wire harness connector M74 wire harness connector M74 wire harness connector 14/16 NTB23-007A Figure 27 27. Re-connect the M74 wire harness connector to the B42 wire harness connector. Wipe off the excess grease from the sides of the M74/B42 wire harness connectors. 28. Reattach the B42 wire harness connector to the wire harness connector holding bracket. Vehicle Reassembly 29. Reinstall the dash side finisher. Refer to the ESM: BODY INTERIOR > INTERIOR > REMOVAL AND INSTALLATION > BODY SIDE TRIM > DASH SIDE FINISHER 30. Reinstall the inner kicking plate. Refer to the ESM: BODY INTERIOR > INTERIOR > REMOVAL AND INSTALLATION > BODY SIDE TRIM > KICKING PLATE 31. Re-connect the negative battery cable. 32. Reset the clock, radio settings, and if equipped, the ATC settings. 26. Reinstall the TPA into the M74 wire harness connector. a. Wrap a shop towel or cloth around the wire harness connector. b. Position the TPA over the wire harness connector and carefully push it into place. c. Wipe off the excess grease from the sides of the wire harness connector. TPA M74 wire harness connector 15/16 NTB23-007A 33. Initialize the driver’s power window as follows: a. Turn the ignition ON (keep the transmission in Park and the parking brake applied). b. Close the door. c. Hold DOWN the power window switch to fully open the window. d. Hold UP the power window switch to fully close the window. e. Continue holding the power window switch UP for 3 seconds after the glass stops at fully closed position. f. Check that auto-up function operates normally. 16/16 NTB23-007A PARTS INFORMATION DESCRIPTION PART NUMBER QUANTITY KIT – ENGINE ROOM HARNESS 240R2-6RR1A 1 GREASE TUBE 60918-6RR0A (1) As Needed (2) (1) Order this item through the Nissan Maintenance Advantage program: Phone 877-NISNMA1 (877-647-6621). Website order via link on the dealer portal; www.NNAnet.com and click on the “Maintenance Advantage-Tire/Battery/Chemical” link. (2) One tube of grease will repair up to 10 vehicles. CLAIMS INFORMATION Submit a “CM” line claim using the following claims coding: CAMPAIGN (“CM”) ID DESCRIPTION OP CODE FRT PC934 Inspect Wire Harness Connectors (OK Condition) and Apply White Lithium Grease PC9340 0.3 Inspect and Replace Wire Harness Connectors and Apply White Lithium Grease PC9341 2.6 EXPENSE CODE EXPENSE CODE DESCRIPTION MAX AMOUNT 015 Grease $0.72 AMENDMENT HISTORY PUBLISHED DATE REFERENCE DESCRIPTION January 19, 2023 NTB23-007 Original bulletin published January 20, 2023 NTB23-007A Updated CLAIMS INFORMATION
**************************************************************************************************************
**************************************************************************************************************
SEOCONTENT-END
This product presentation was made with AAWP plugin.